How to Add a Video Conferencing Activity to Moodle with Plug-N-Meet
Welcome to the definitive guide for integrating plugNmeet, a powerful, open-source Moodle video conferencing platform, into your Moodle courses. This document provides a comprehensive walkthrough, from initial setup to leveraging advanced features, ensuring you can build a seamless and engaging virtual classroom experience. With this free video conference software, you can host live online classes, webinars, and meetings without ever leaving your Moodle site.
1. Introduction: Why plugNmeet is the Best Choice for Moodle
plugNmeet is not just another video meeting tool; it's a complete virtual classroom solution built for deep integration with Moodle.
- Seamless Native Experience: The classroom loads directly within your Moodle layout. To your students and teachers, it feels like a natural part of your site, not a third-party tool. This boosts user adoption and reduces confusion.
- Open Source and Free: As a leading open source video conferencing solution, plugNmeet gives you complete ownership. You control your data, your infrastructure, and your costs.
- Deep Moodle Integration: plugNmeet hooks directly into Moodle's core systems, including the calendar, activity completion, grading, and user permissions, for a truly integrated experience.
- Rich Feature Set: It's packed with tools designed for education, including an interactive whiteboard, breakout rooms, live polling, and advanced analytics.
- Unmatched Customization: Brand the entire virtual classroom—from logos and colors to the layout itself—to perfectly match your institution's identity.
2. Installation and Configuration
To get started with plugNmeet, your Moodle administrator must install the plugin and connect it to a plugNmeet server. This section covers the installation and configuration of the Moodle plugin itself.
Step 2.1: Install the plugNmeet Moodle Plugin
- Download the latest version of the plugin from the Moodle Plugin Directory or the official GitHub repository.
- Log in to your Moodle site as an administrator.
- Navigate to
Site administration > Plugins > Install plugins. - Upload the plugin's ZIP file and click "Install plugin from the ZIP file".
- Moodle will check the plugin and prompt you to "Upgrade Moodle database now". Proceed with the upgrade.
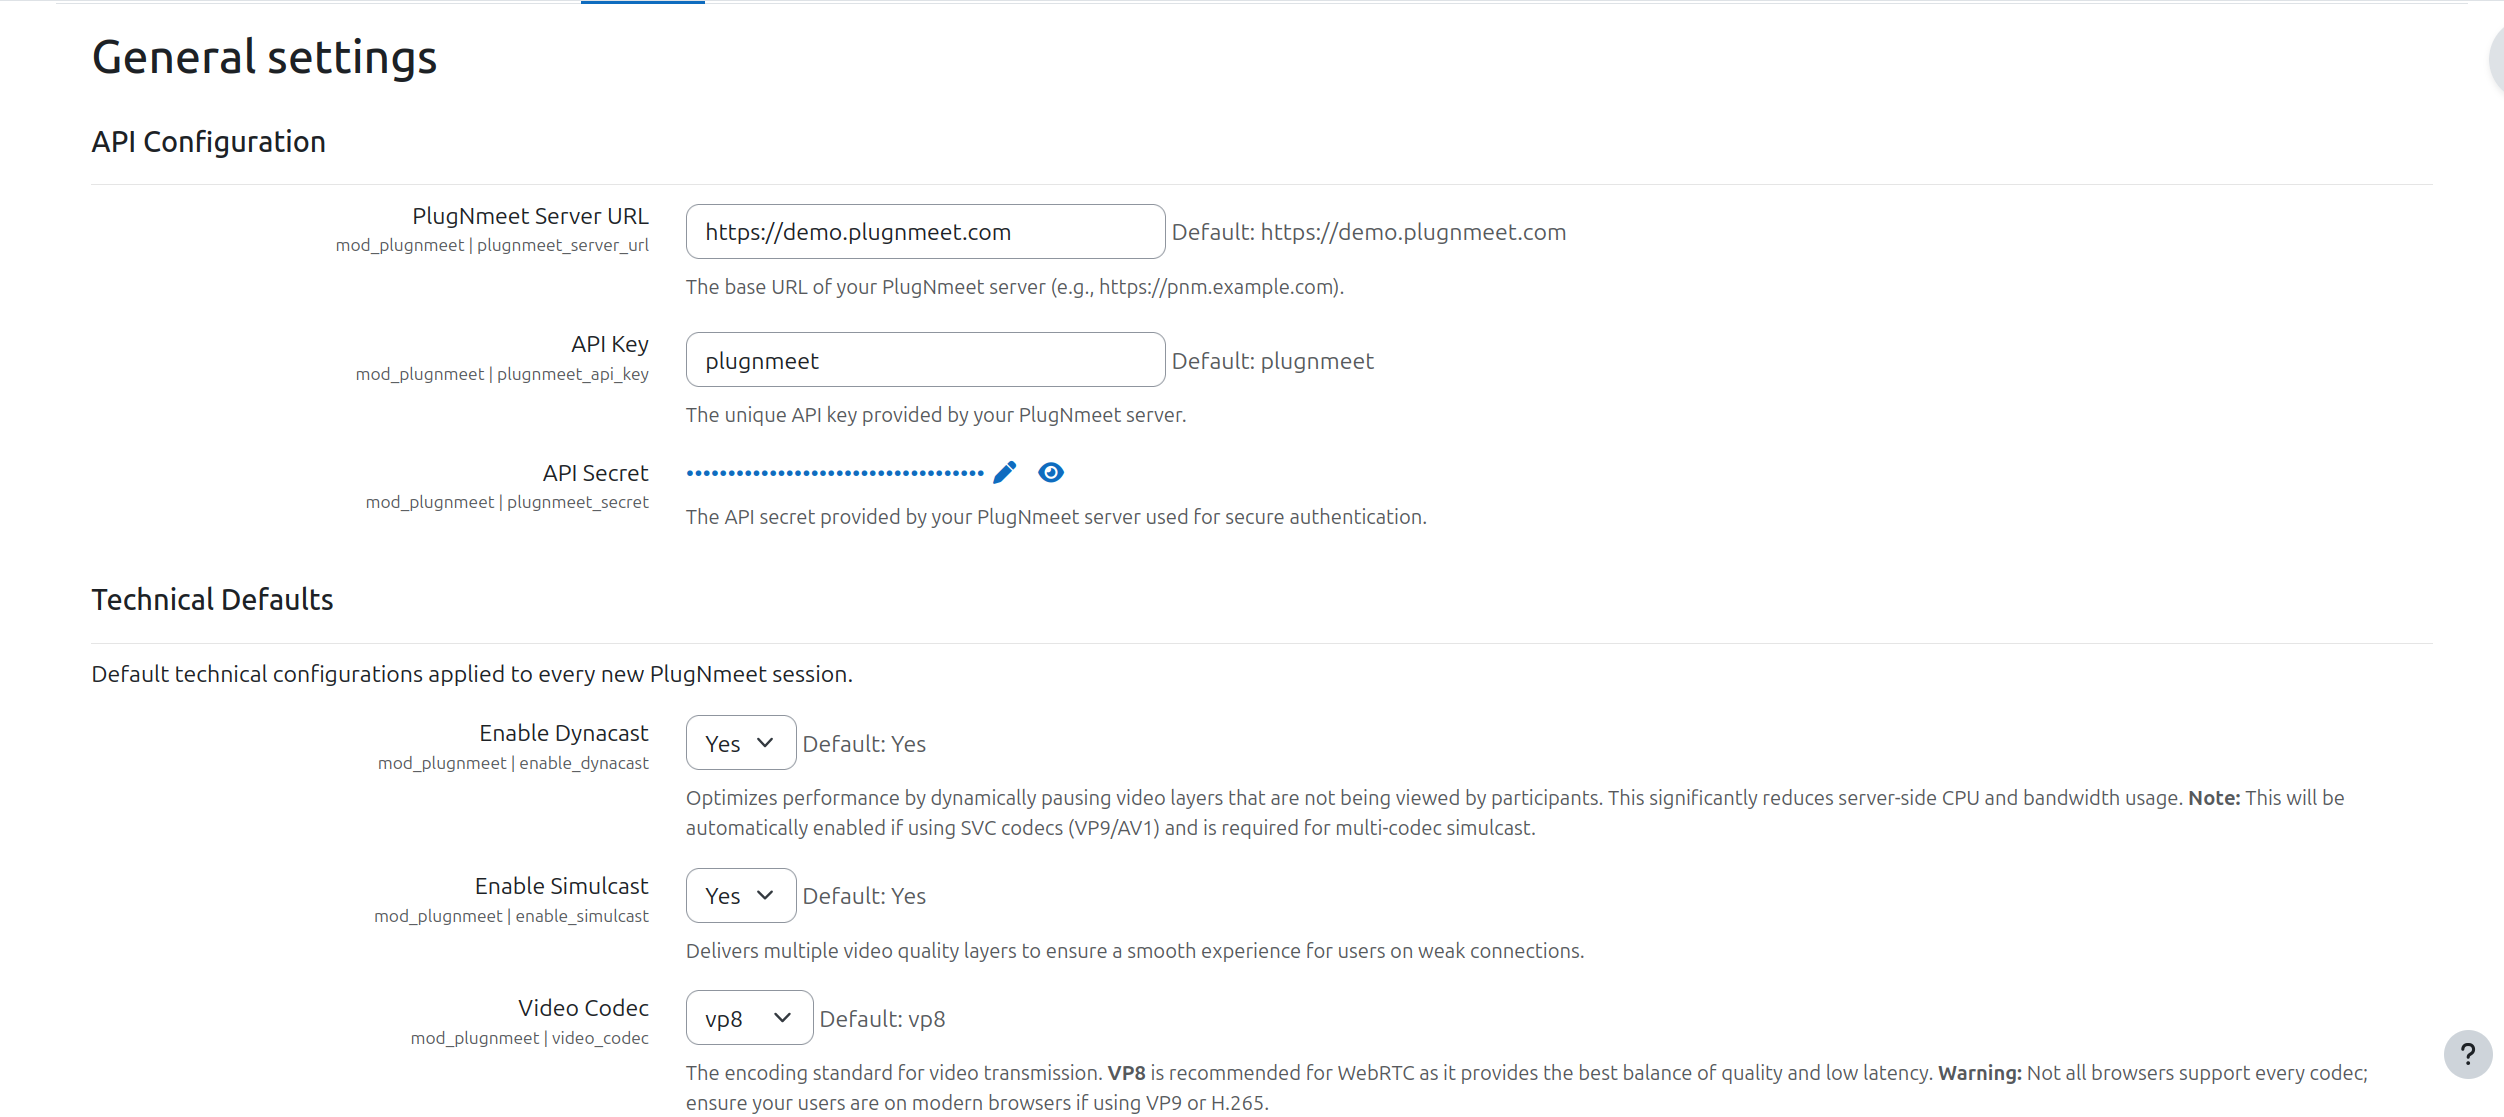
Step 2.2: Configure the Plugin Connection
This is the most critical step. You need to tell Moodle how to connect to your plugNmeet server. Your server administrator will provide you with the necessary credentials.
- After installation, you will be taken to the settings page. You can also find it later at
Site administration > Plugins > plugNmeet. - API Configuration:
- Server URL: Enter the full URL of your plugNmeet server (e.g.,
https://pnm.yourdomain.com). - API Key: Enter the
PLUGNMEET_API_KEYprovided by your server administrator. - API Secret: Enter the
PLUGNMEET_SECRETprovided by your server administrator.
- Server URL: Enter the full URL of your plugNmeet server (e.g.,
- Client Loading Method:
- Choose Remote (Embedded). This is the recommended setting for a seamless, white-label experience where the classroom loads inside your Moodle page.
Redirectis a fallback that sends users to the plugNmeet server's default interface, which is not ideal for branding.
- Save changes. The plugin will attempt to connect to the server. If successful, you're ready to go! If not, double-check your credentials and server URL.
3. Creating and Managing a Live Session
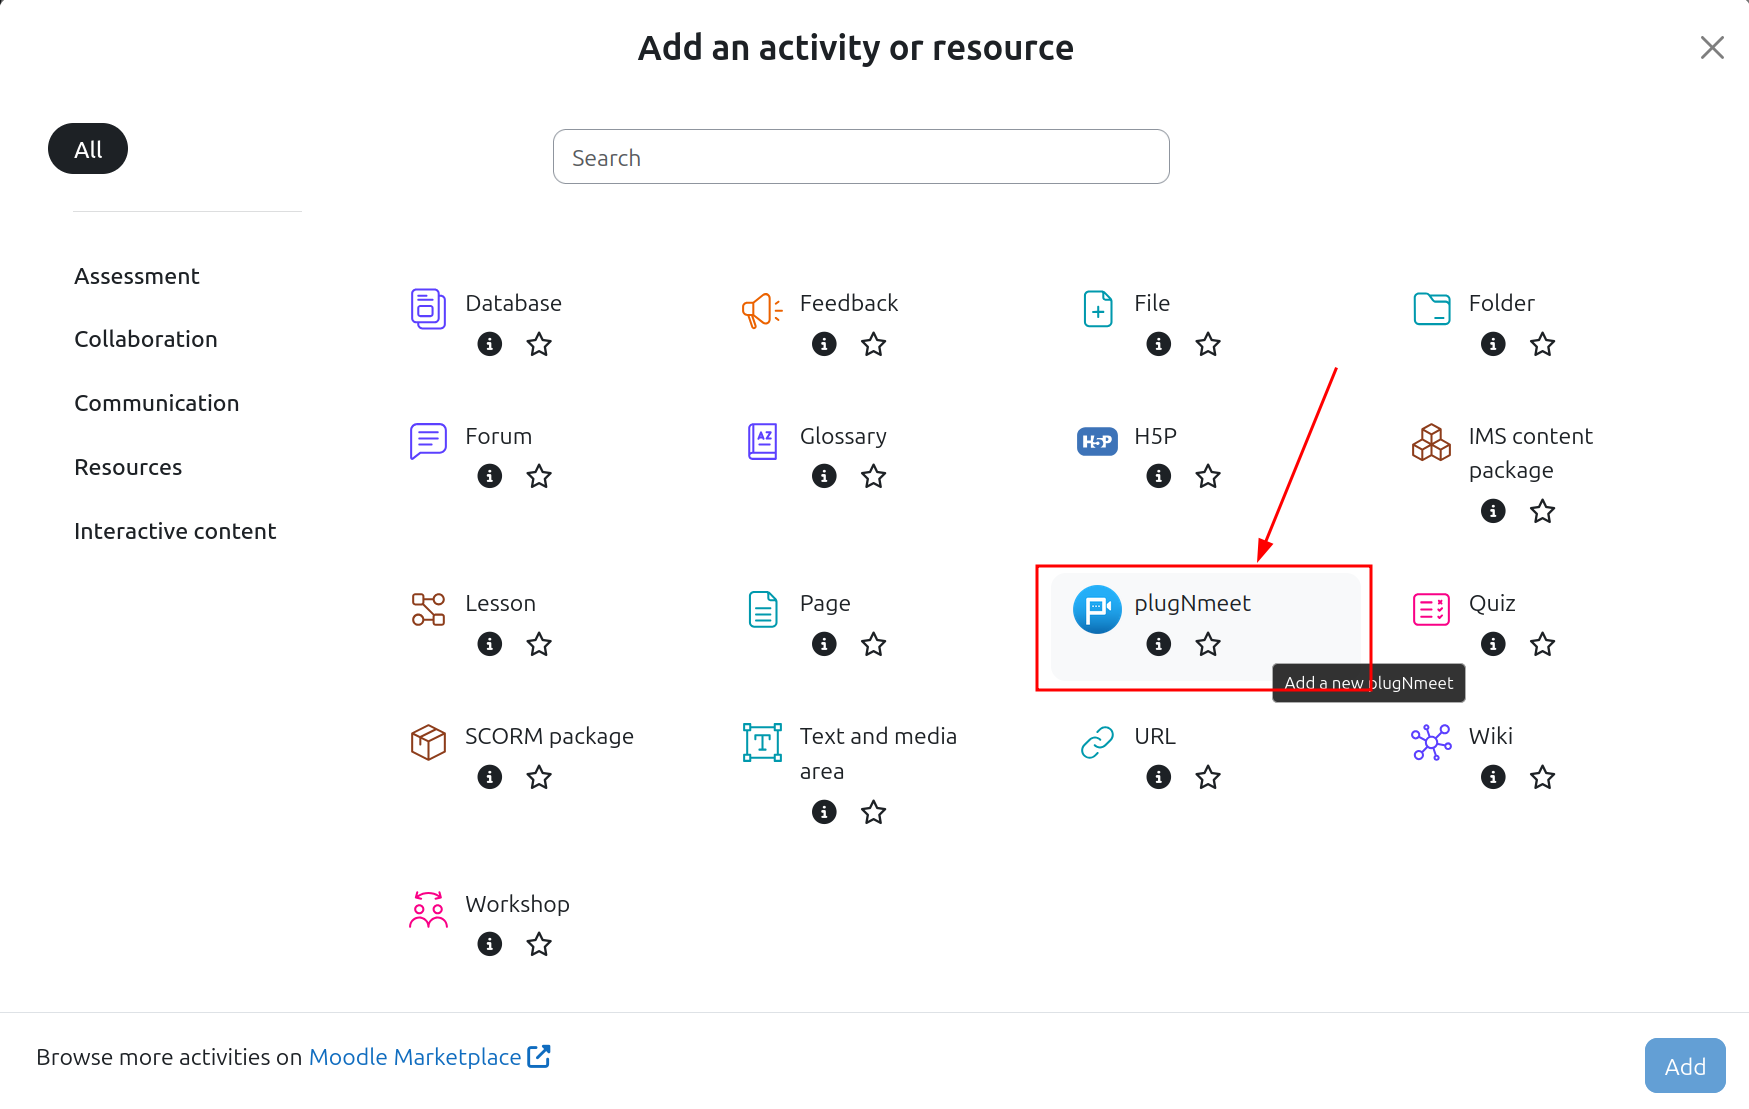
Adding a video conference to a course is simple.
- Navigate to the Moodle course where you want to add the session.
- Turn Edit mode on.
- In the desired section, click Add an activity or resource.
- Select plugNmeet from the activity chooser. You will be taken to the activity settings page.
Detailed Configuration Options
This form gives you granular control over every aspect of the session.
-
General Settings:
- Room Title: The name of your session (e.g., "Weekly Biology Seminar"). This is what students will see.
- Welcome Message: A custom message that appears in the chat when users join. Great for posting an agenda or instructions.
- Max Participants: Limit the number of users who can join the session.
-
Room Features (Collapsible Section):
- Moderator must join first: Prevents students from starting the session without a teacher present.
- Mute on start: A great classroom management tool to ensure a quiet start to the session.
- Allow Screen Share / Webcams: Enable or disable these core features. You can even set it to "Admin only webcams" for a presentation-style webinar.
-
Recording Features:
- Allow Recording: Master switch to enable/disable all recording types.
- Allow Cloud Recording: Enables recording directly to the server. This is the most common and useful option.
- Enable Auto Start Cloud Recording: The session will automatically start recording as soon as the first person joins.
-
Default Lock Settings:
- These settings establish the initial state of the room locks for participants (not moderators).
- For a secure-by-default classroom, you can Lock Screen Sharing, Lock Whiteboard, and Lock Shared Notepad. Participants will have to ask for permission (raise their hand) to use these tools.
-
Availability:
- Available from: Sets the start time for the session. This automatically creates an event in the Moodle Calendar, making it a crucial tool for scheduling your Moodle webinar or class.
- Deadline: Sets the end time. After this time, the "Join" button will disappear.
4. In-Room Features for Engaging Online Classes
plugNmeet is packed with tools to foster interaction and collaboration.
- Interactive Whiteboard: A powerful tool for real-time collaboration. You can draw, write text, upload and annotate PDFs/presentations, and work together with students.
- Screen Sharing: Share your entire screen, a single application window, or a browser tab with high-quality resolution.
- Breakout Rooms: Split your main session into smaller, private groups for focused discussions or project work. Moderators can move between rooms and broadcast messages to all.
- Polls: Create polls on the fly to engage students, check for understanding, or vote on topics. Results can be published live.
- Shared Notepad: A simple, real-time collaborative text editor for taking shared notes.
- AI-Powered Features: If enabled on the server, you can access:
- Live Transcription & Translation: Get a real-time transcript of the conversation, which can be translated by users into their preferred language.
- AI Meeting Summarization: Automatically generate and download a summary of the meeting's key points.
5. Advanced Analytics, Attendance, and Completion Tracking
plugNmeet's integration with Moodle provides unparalleled insights into student engagement.
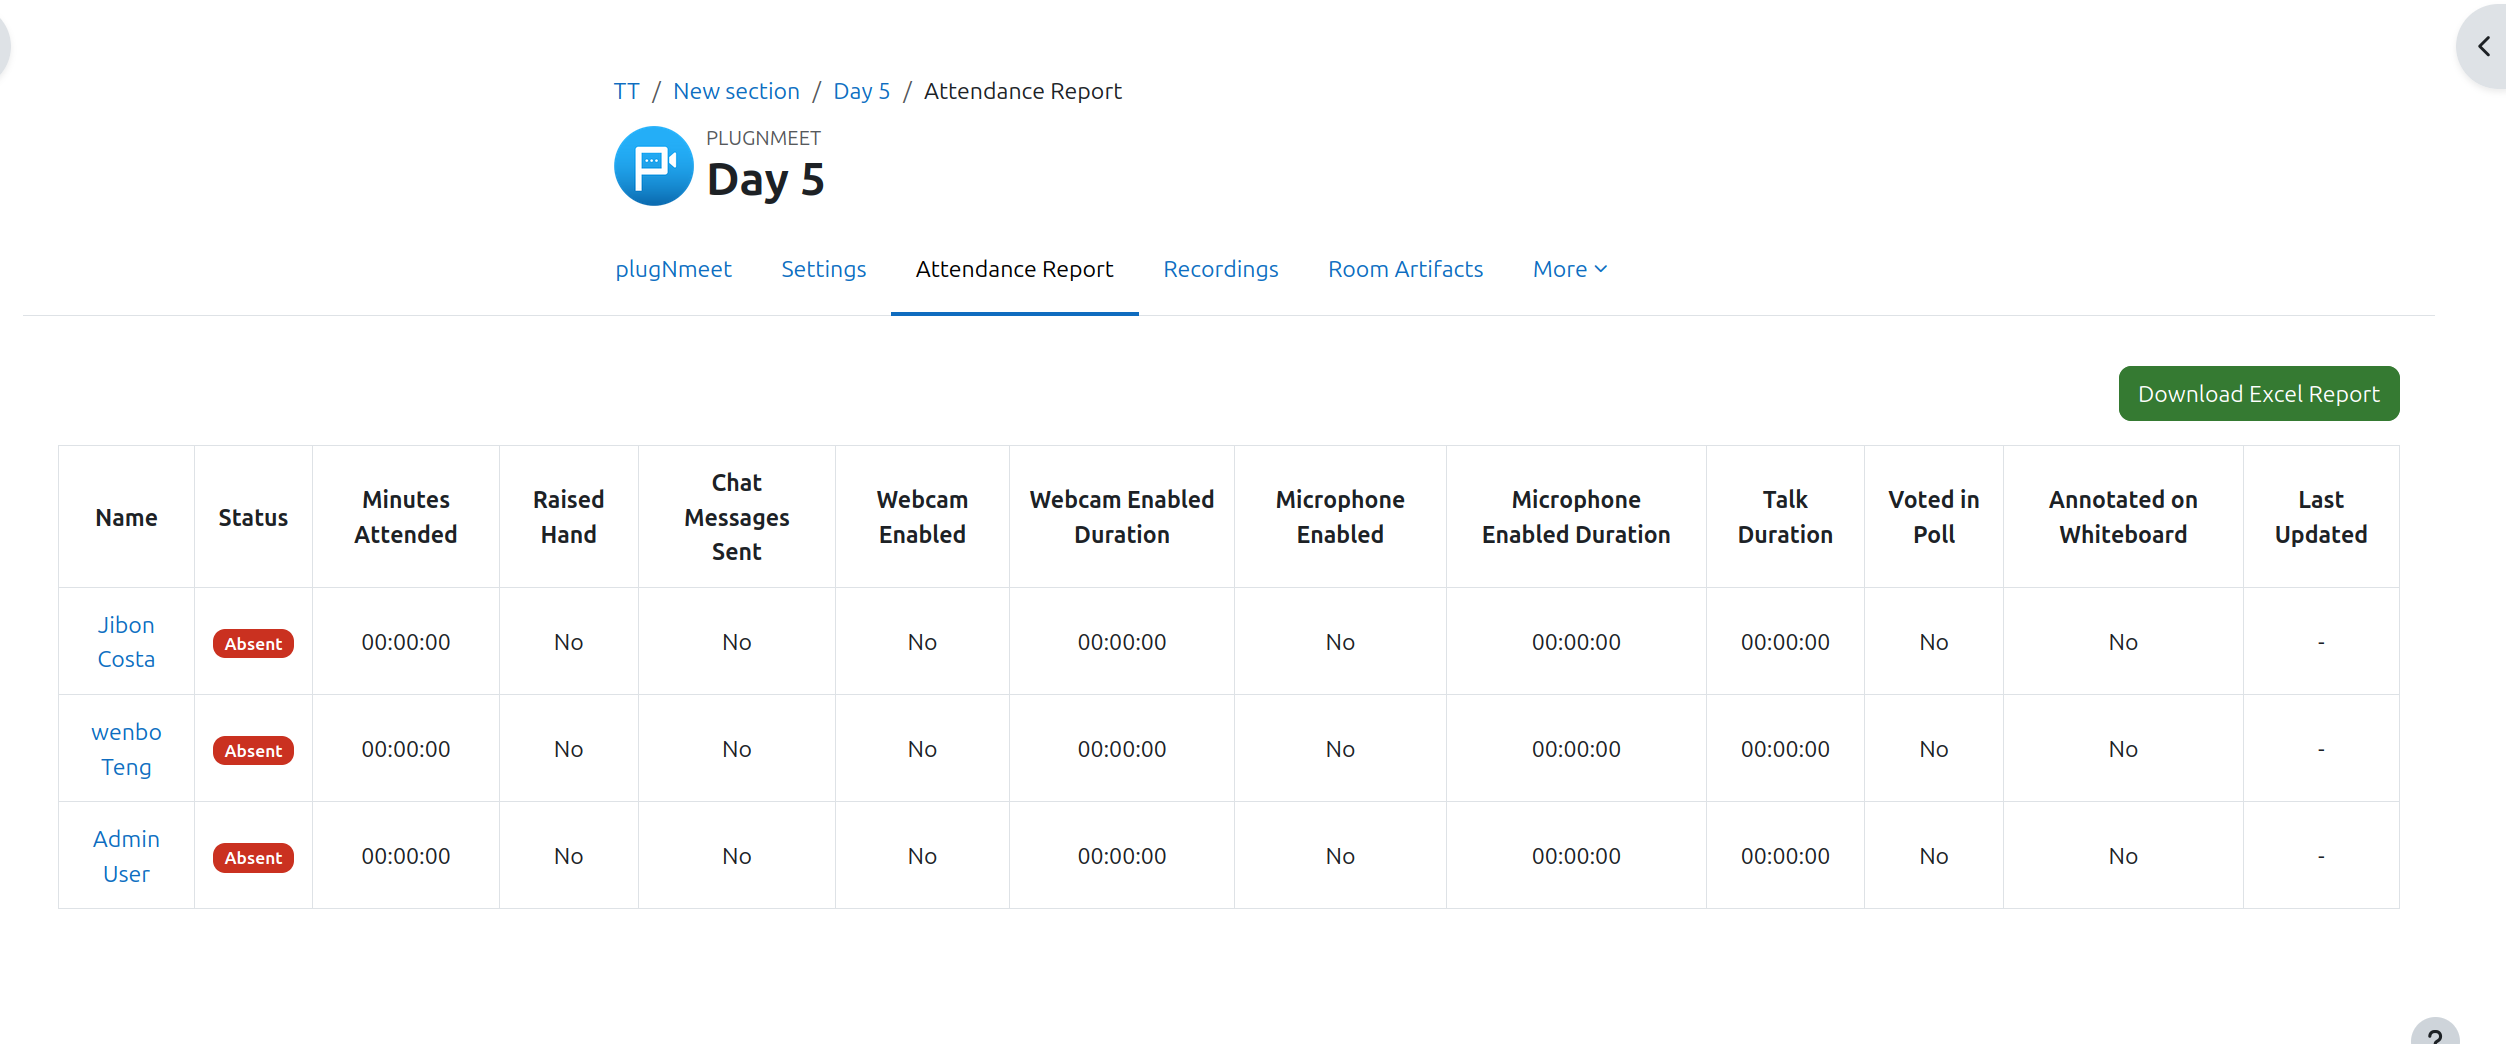
Cumulative Attendance Reporting
Unlike tools that only report on a single session, plugNmeet aggregates data across all sessions within a single Moodle activity.
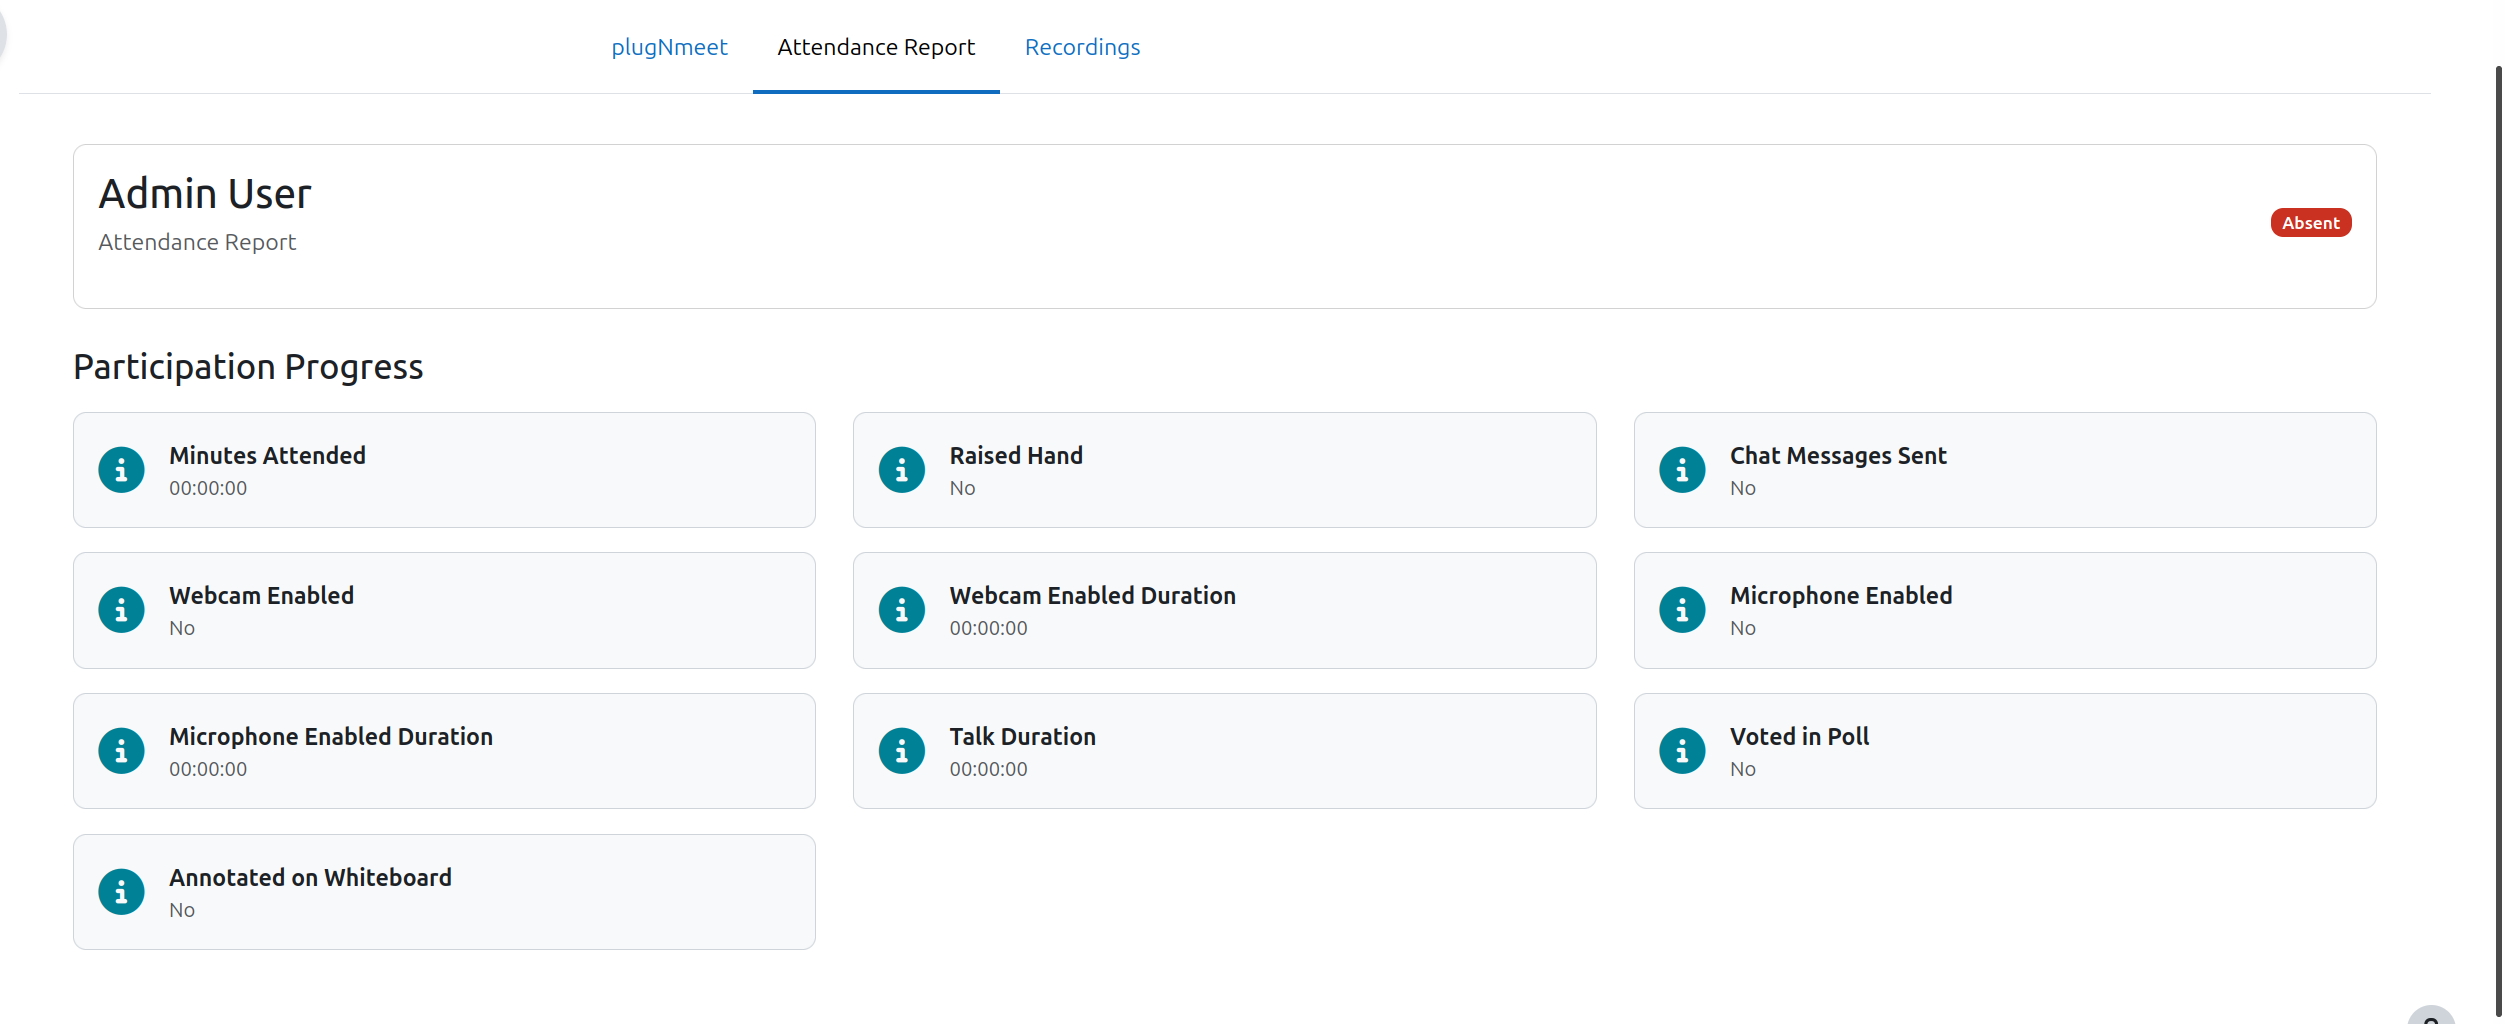
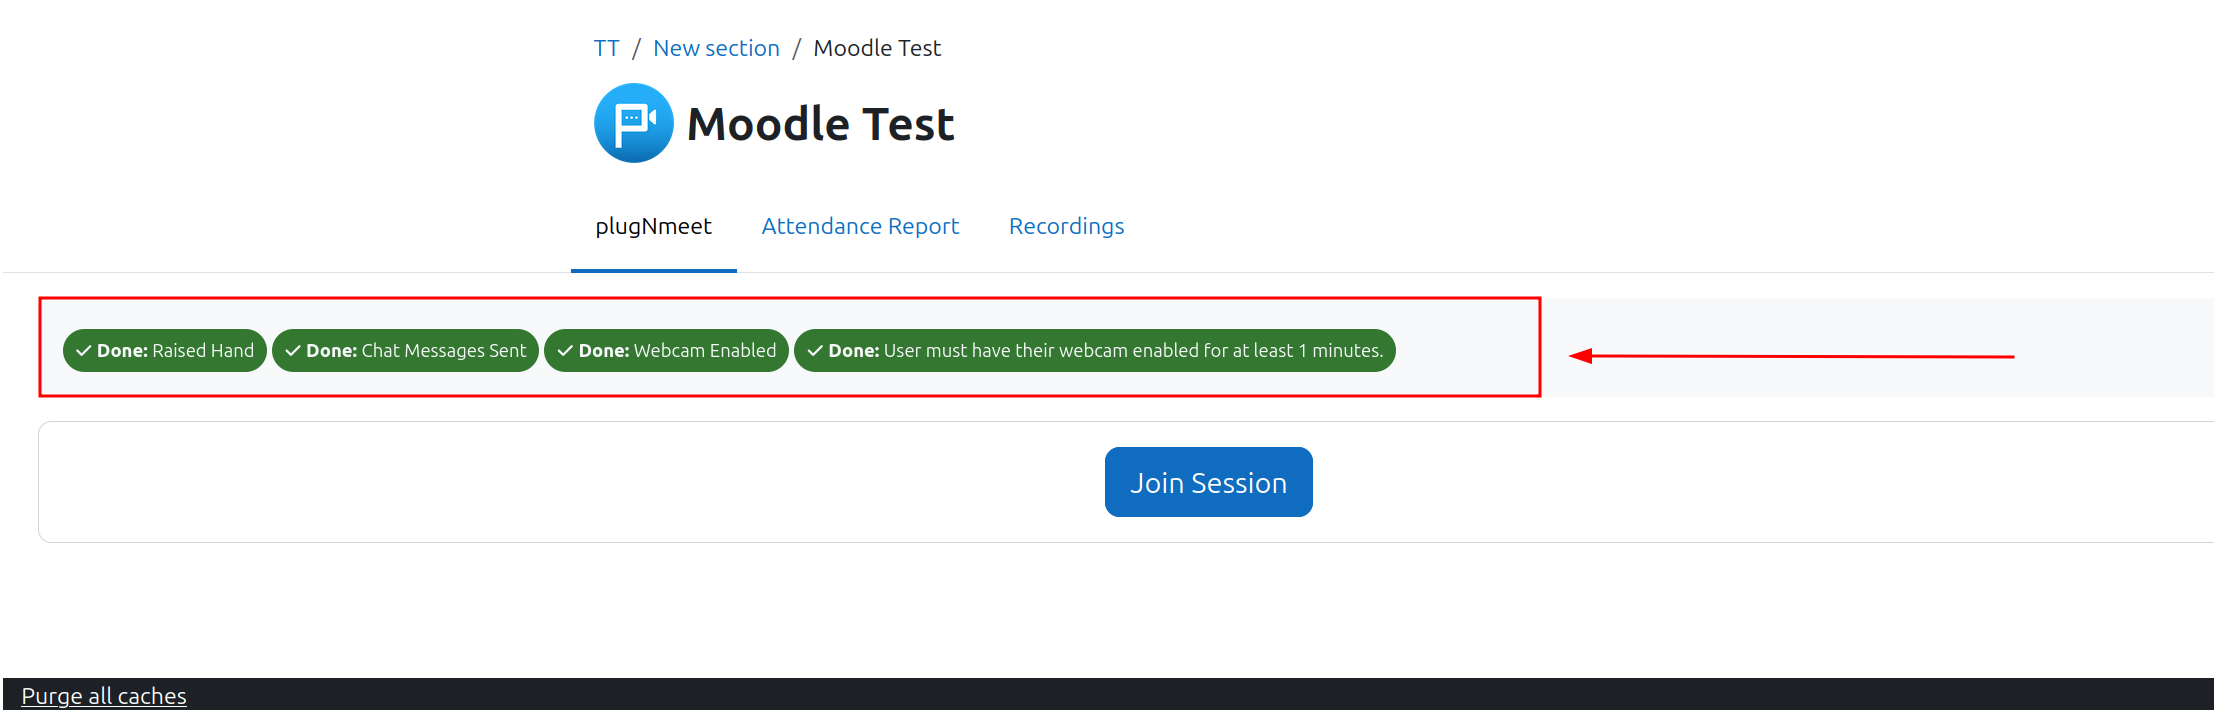
- For Teachers: Access the Attendance report from the activity page to see a summary of each student's total participation. This includes total time attended, whether they raised their hand, sent chat messages, etc.
- For Students: Students have their own self-service dashboard where they can see their attendance status and track their own engagement against the activity's requirements.
Advanced Activity Completion
This is one of the most powerful features for Moodle virtual classrooms. You can set highly specific, automated completion rules based on active participation.
- In the activity settings, go to the Activity completion section.
- Set Completion tracking to "Show activity as complete when conditions are met".
- Check the boxes for the criteria you want to enforce. Examples:
- Require students to attend for a cumulative total of 45 minutes.
- Require students to send at least one chat message.
- Require students to enable their webcam at least once.
This system moves beyond passive viewing and encourages active, measurable engagement.
6. Real-Time Session Monitoring and Interaction
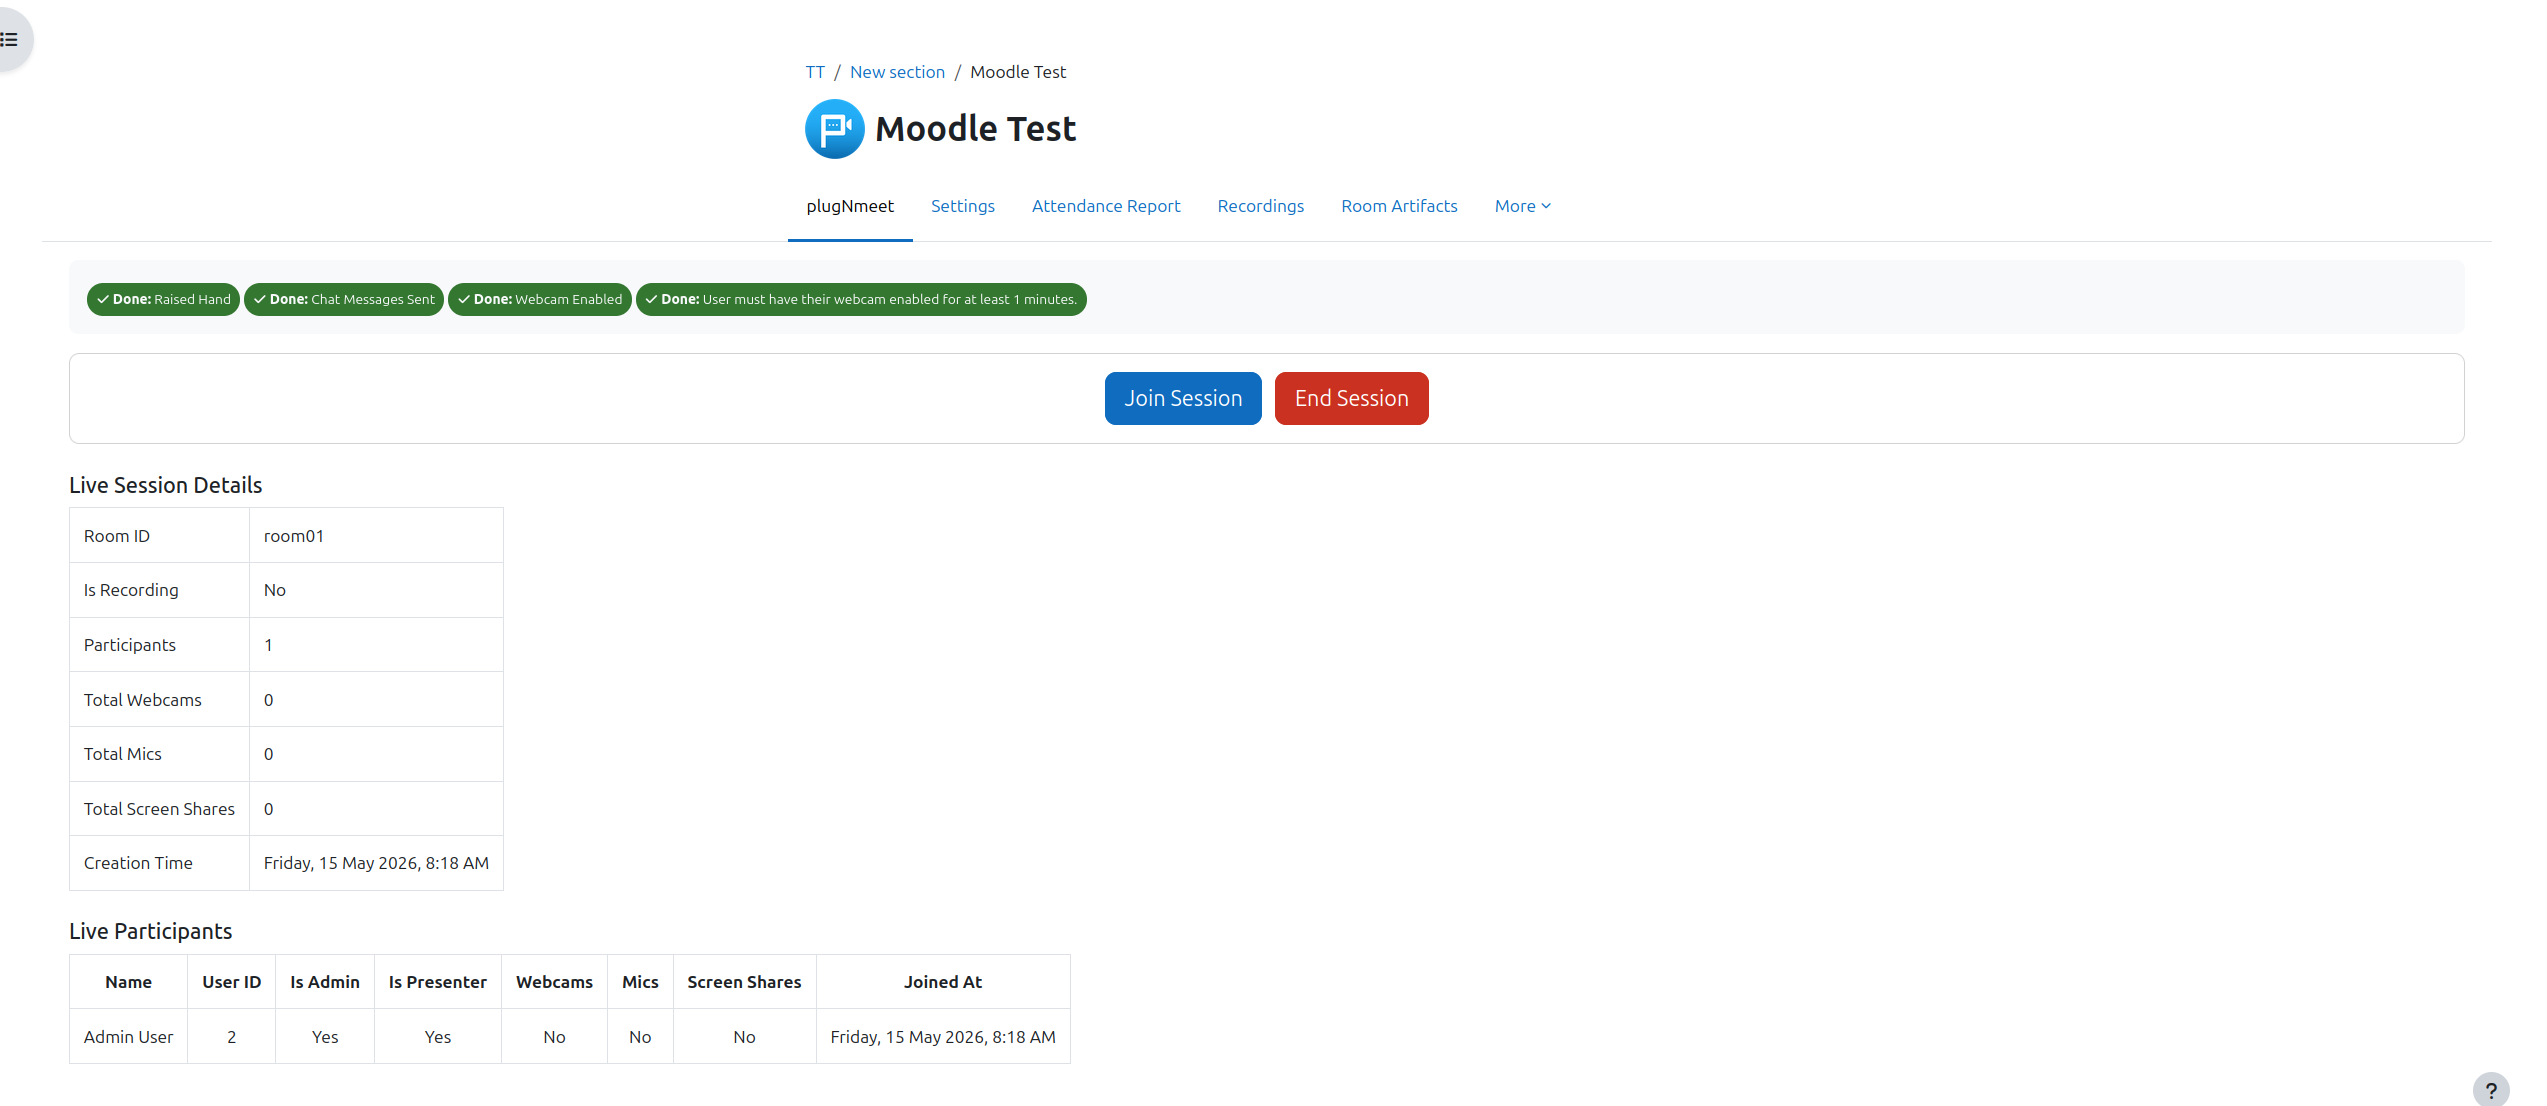
In-Activity Live Dashboard
Once a session is live, teachers and moderators gain access to a real-time dashboard directly on the Moodle activity page. This powerful tool provides an at-a-glance overview of the session's status and allows for direct interaction. You can instantly see:
- Live Participant List: A list of all users currently in the session.
- Activity Status: See who has their webcam or microphone active.
- Session Summary: A summary of key metrics, including participant count, recording status, and active media.
This live data allows moderators to manage the classroom effectively without having to constantly switch between windows.
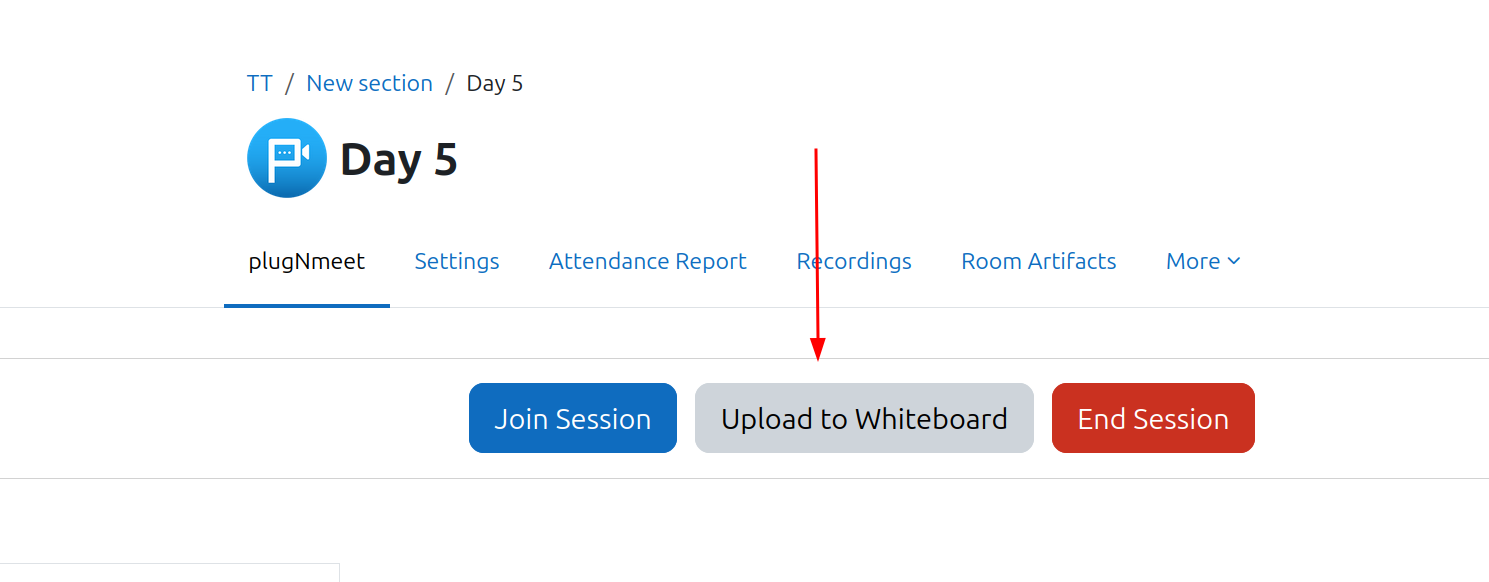
Upload to Whiteboard from Moodle
While a session is running, administrators and teachers can upload files directly to the whiteboard from Moodle's file repository. This feature streamlines the process of sharing course materials without leaving the virtual classroom.
- From the live dashboard on the Moodle activity page, click the new "Upload to Whiteboard" button.
- This will open the familiar Moodle file picker.
- You can select an existing file from your course files.
- Once selected, the file is automatically added to the whiteboard's file list inside the live session, ready for you to present to the class.
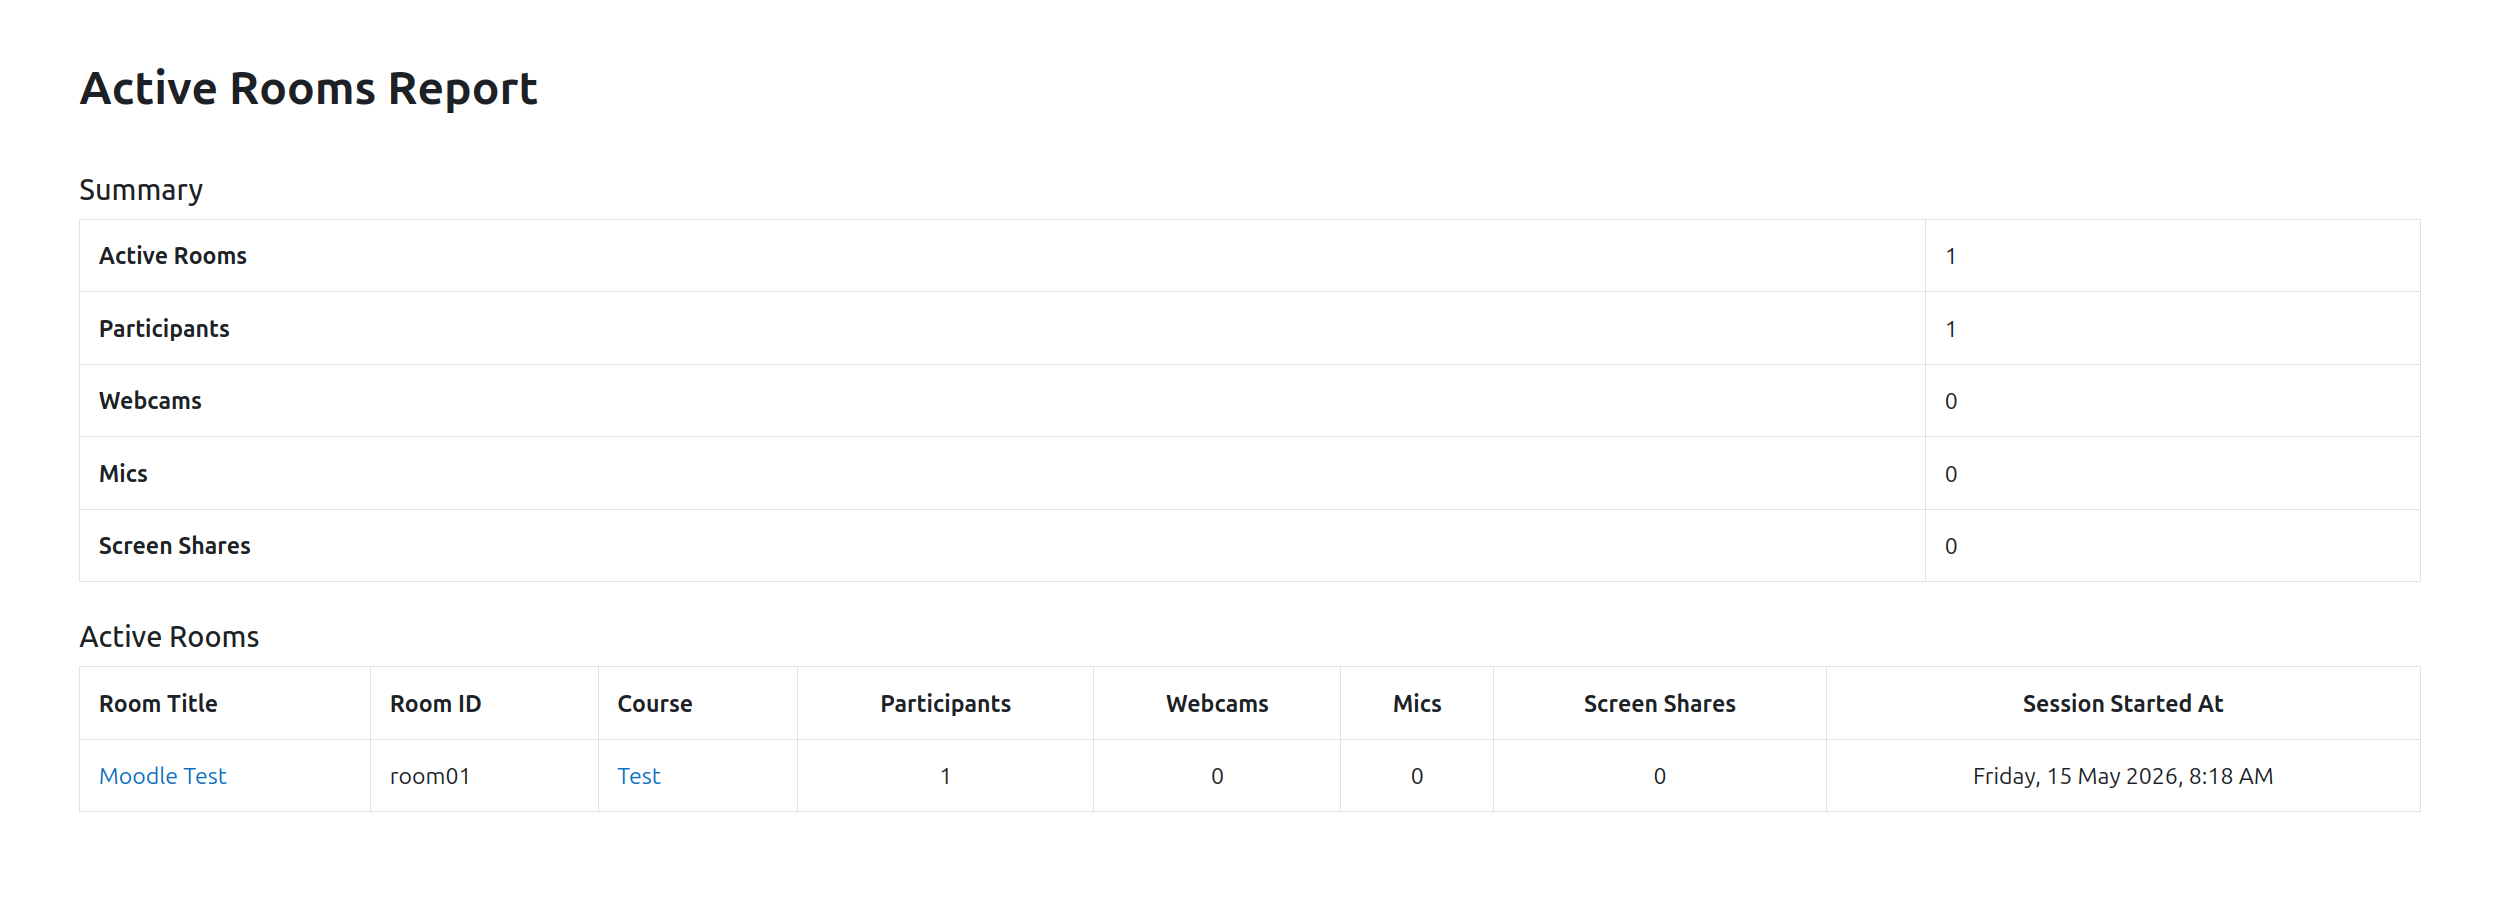
Site-Wide Active Session Report (Admin Data Pull)
For administrators, plugNmeet offers a real-time "live data pull" of all active sessions across the entire Moodle site. This is an essential tool for monitoring site-wide activity.
- How to Access: An administrator can add a custom link to their admin dashboard or simply navigate to
https://youmoodlesite.com/mod/plugnmeet/index.php. - What it Shows: The report displays a list of all currently running rooms, showing the room title, course, number of participants, and session duration. This allows admins to see at a glance how the Moodle video conferencing system is being used.
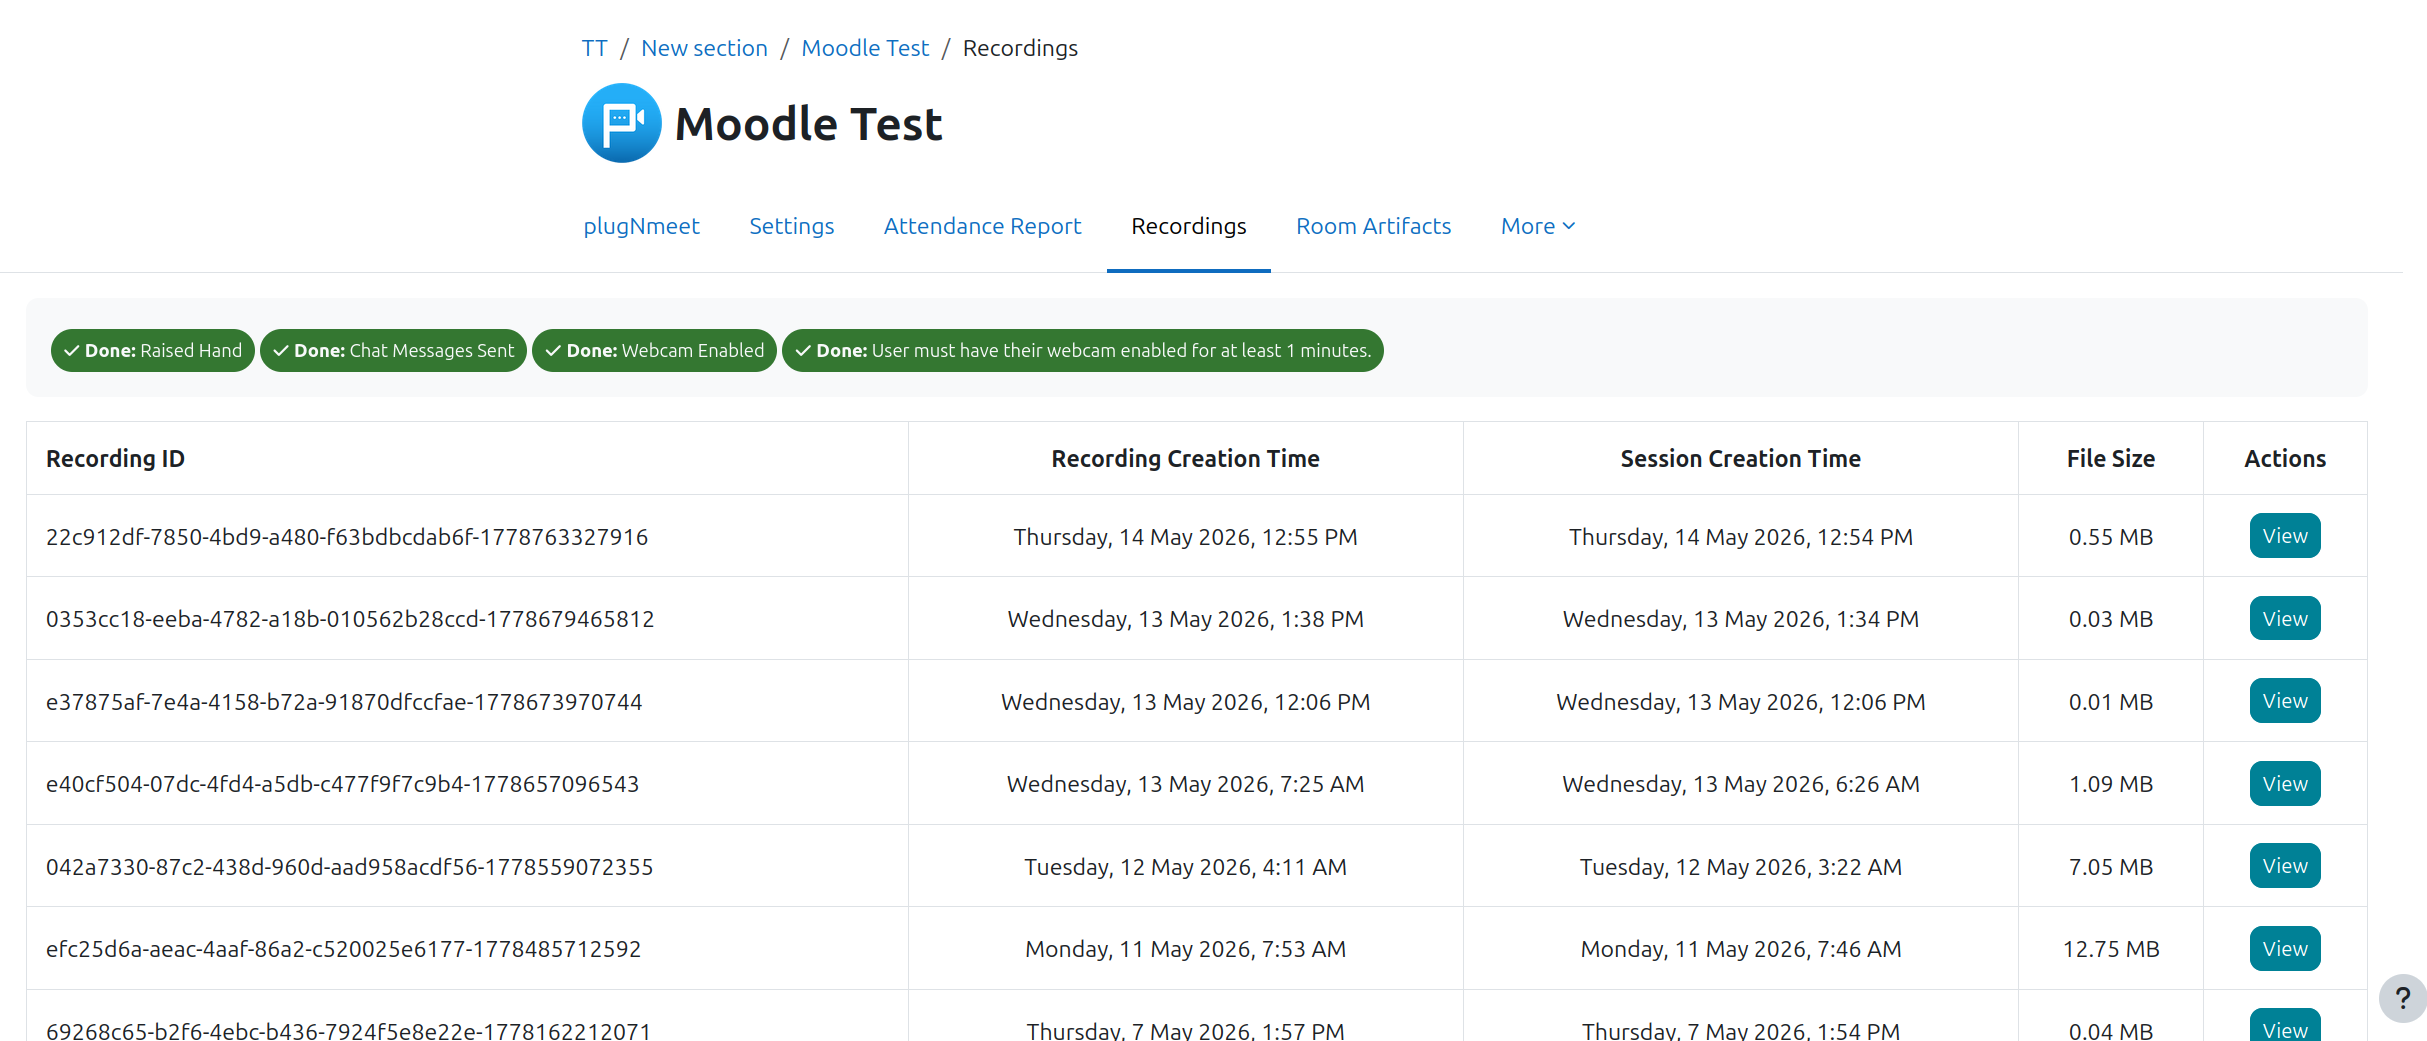
7. Managing Post-Session Recordings and Artifacts
All files generated during your sessions are neatly organized and accessible directly from the Moodle activity page.
Recordings Tab
Here you can find all cloud recordings. Teachers can:
- Play the recording.
- Control visibility (show/hide from students).
- Download the recording file.
- Delete the recording.
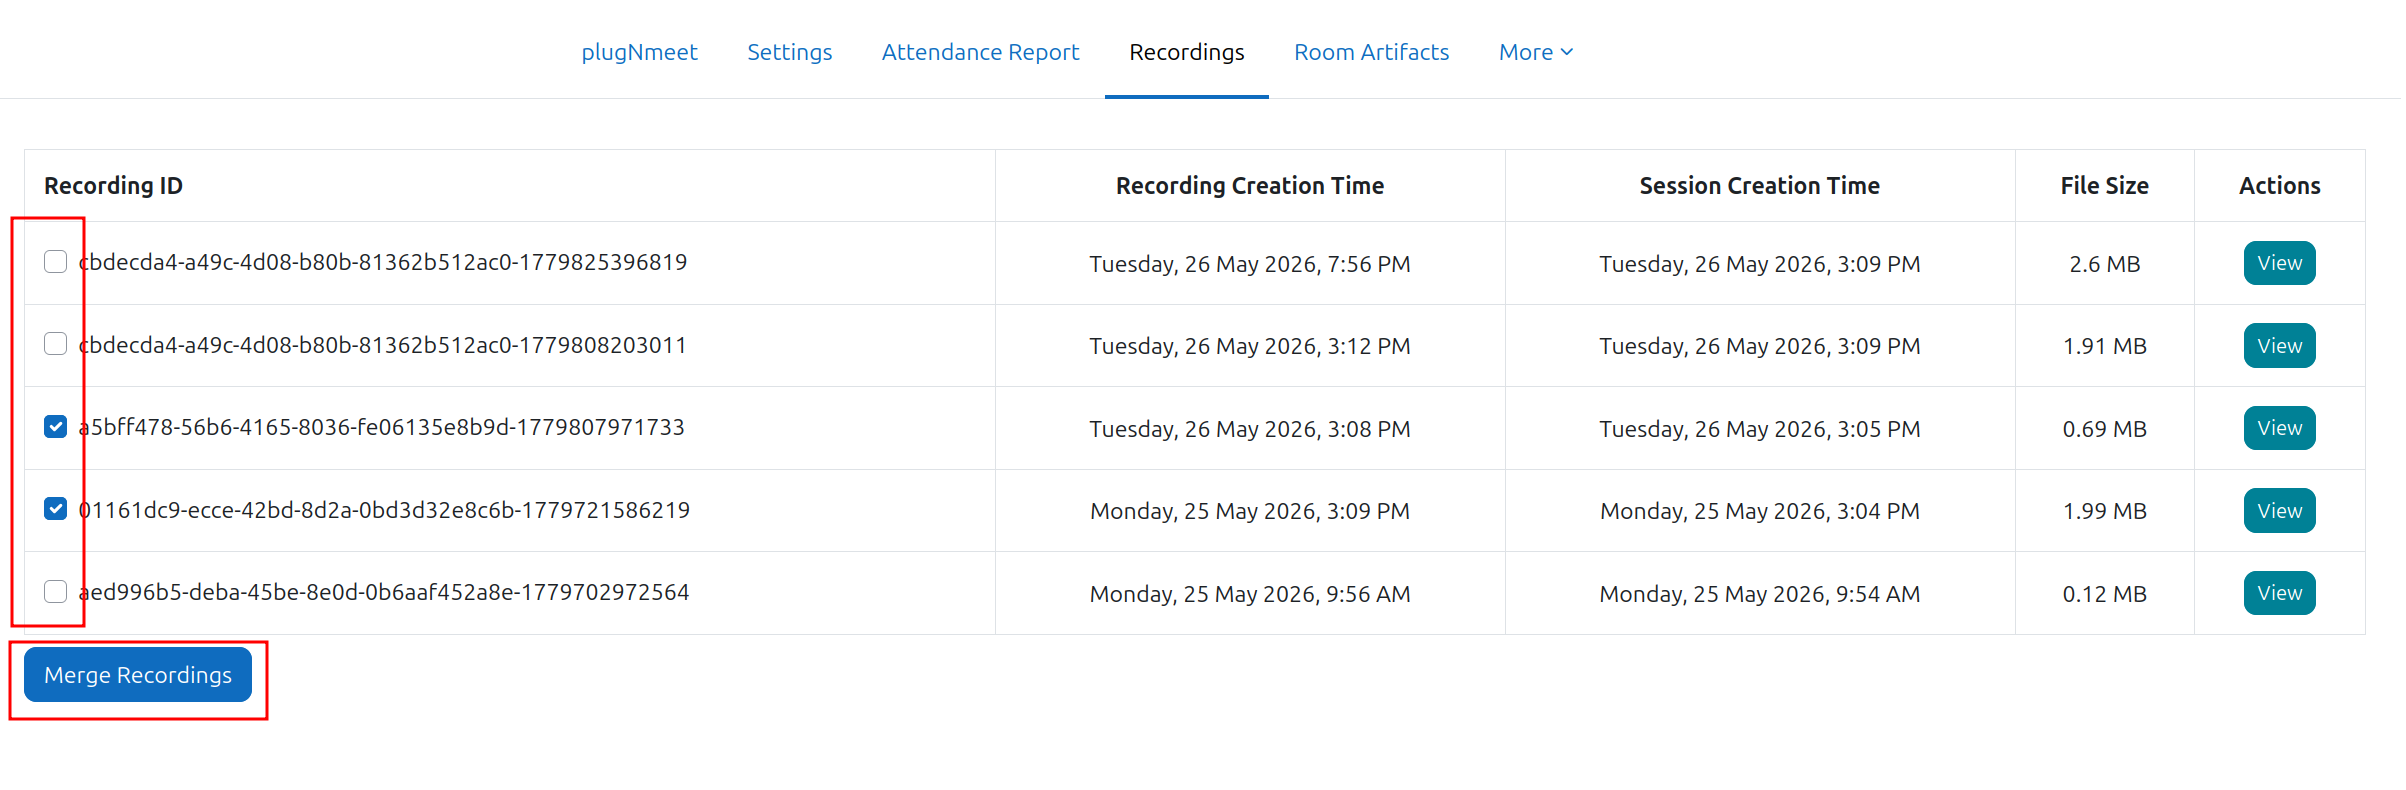
Merge Multiple Recordings
If a session was recorded in multiple segments, you can now easily merge them into a single, continuous video directly from the Moodle interface.
- Navigate to the Recordings tab for the plugNmeet activity.
- You will see checkboxes next to each recording. Select the recordings in the specific order you want them to appear in the final video.
- Click the "Merge Recordings" button that appears at the bottom of the list.
- A confirmation pop-up will show the list of recording IDs you are about to merge, verifying the sequence of your selection.
- Confirm the action to start the merge process. The new, merged recording will appear in the list once it's ready.
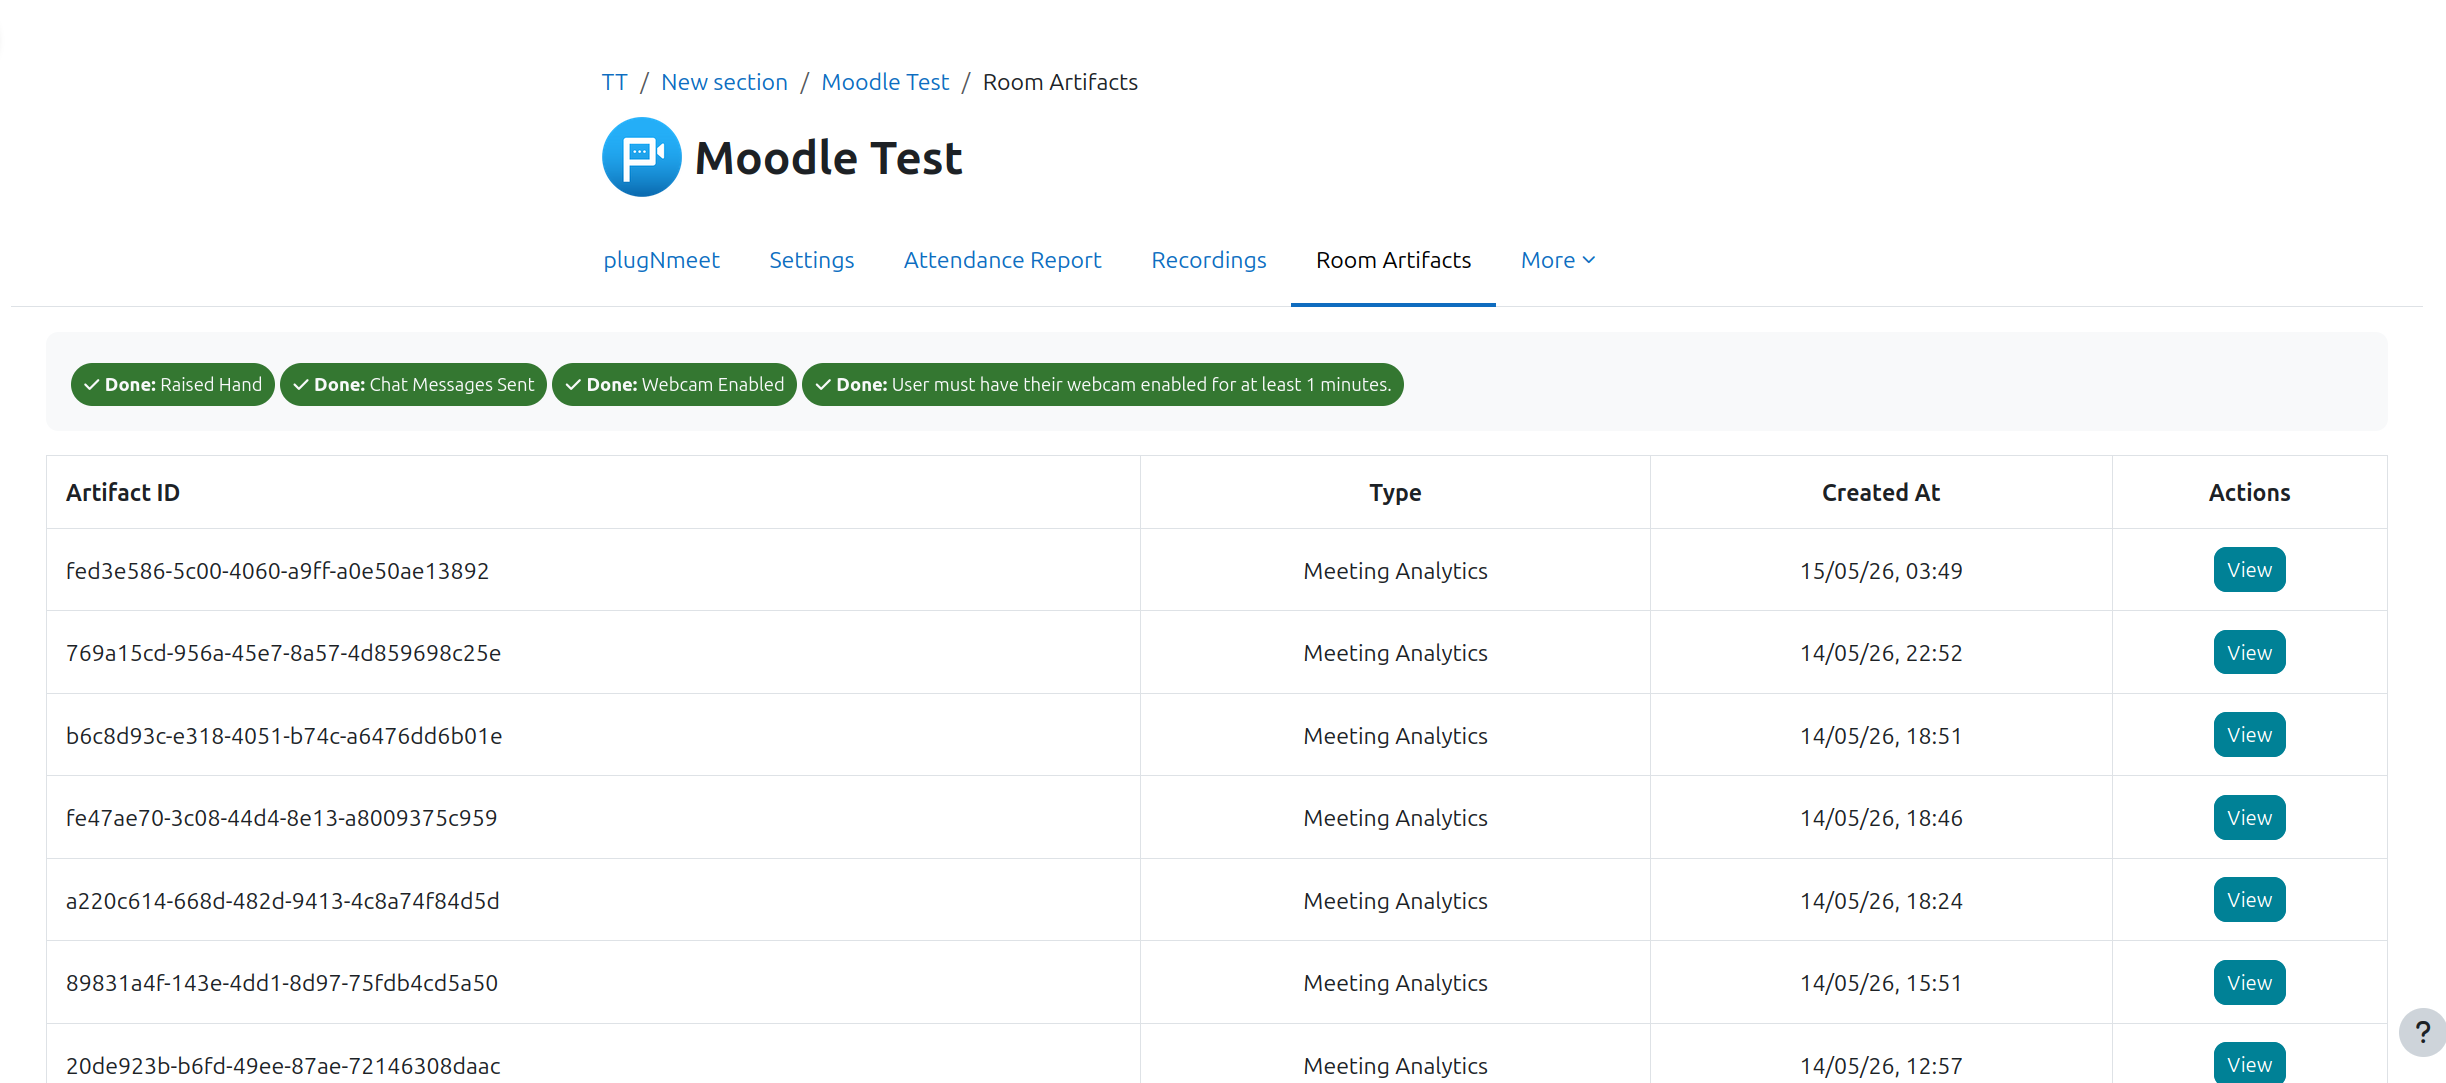
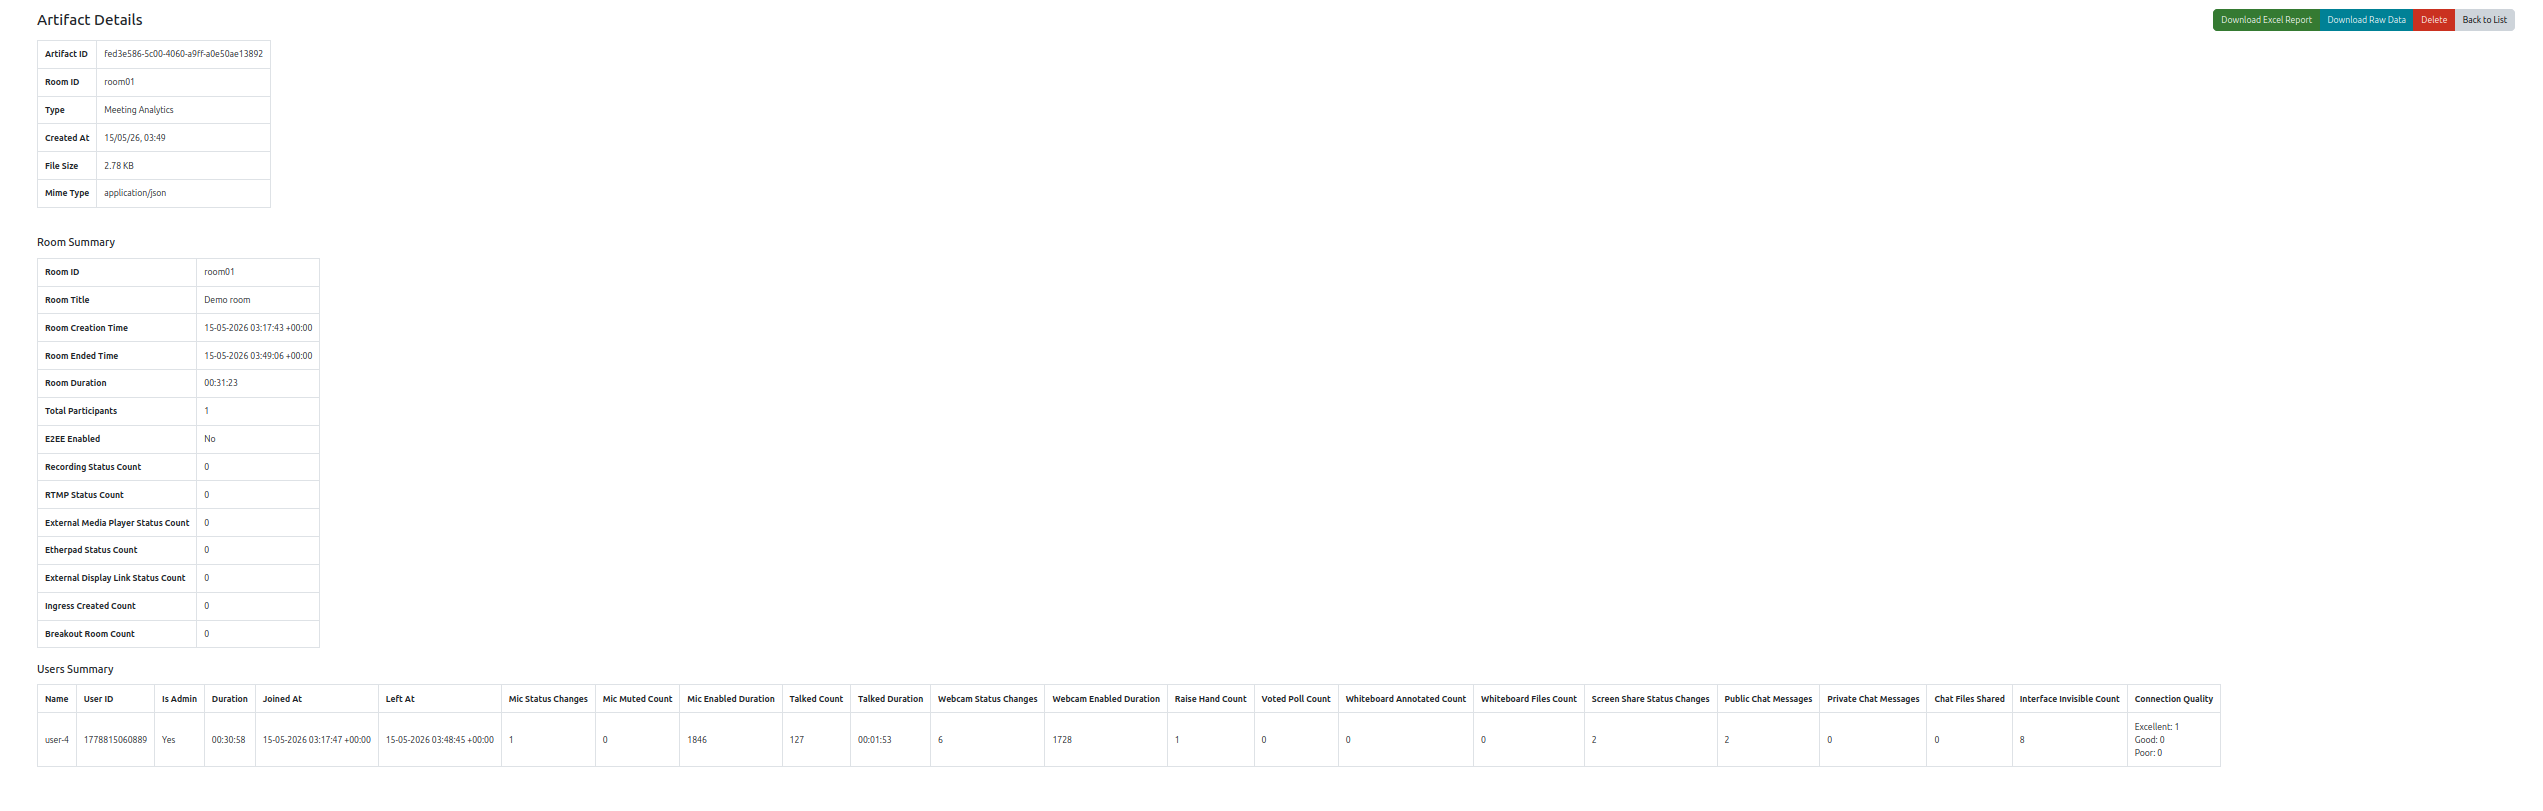
Artifacts Tab
This tab contains all other session-generated files, governed by Moodle permissions. This includes:
- AI-generated meeting summaries.
- Transcription files (e.g., VTT, SRT).
- Detailed per-session analytics reports in JSON format.
8. Security and Privacy
plugNmeet is designed with security in mind for educational institutions.
- Role-Based Permissions: The plugin respects Moodle's roles. For example, only users with the
mod/plugnmeet:viewrecordingscapability can see the recordings tab. The Active Rooms Report is also protected by a specific capability (mod/plugnmeet:viewactiveroomsreport). - Secure by Default: Use the Default Lock Settings in your activity to create a controlled environment where students must request permission to share their screen or whiteboard.
- End-to-End Encryption (E2EE): For maximum security, you can enable E2EE for your sessions.
- Guest Access Control: Guest access can be disabled globally from the admin settings, and each session's guest link has a configurable expiration time.
This concludes the detailed guide to the plugNmeet Moodle plugin. You are now ready to build a secure, engaging, and fully-branded Moodle video conferencing experience for your users.