Moderator Guide: How to Host and Manage a Meeting
Welcome to the Moderator Guide. This document provides a complete overview of all the features and controls available to you as a meeting host or moderator.
The moderator has full control over the meeting, including managing participants, using presentation tools, and configuring room settings. This guide is structured to help you quickly find the feature you need.
First Steps: Entering the Room & Choosing Your Audio
When you first enter a PlugNmeet room, you will be prompted to choose how you want to join the audio session. This is your most important first step.
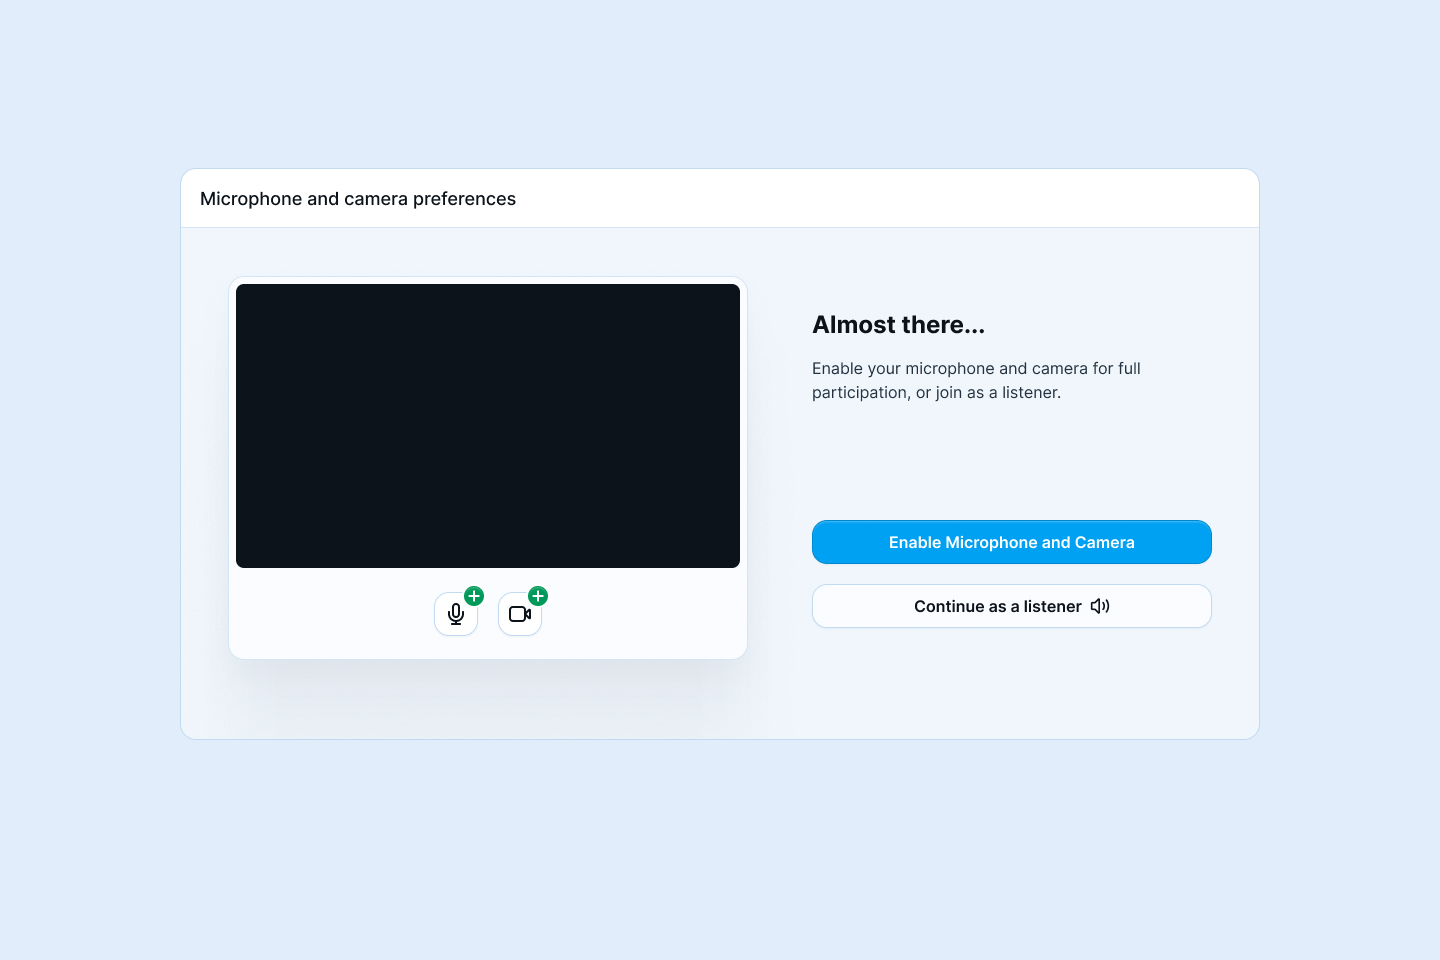
- Enable Microphone and Camera: Choose this option to speak and share your video in the meeting. Your browser will ask for permission to access your microphone and camera.
- Continue as a listener: Choose this option to join without a microphone or camera. You will be able to hear everything but will not be able to speak or share video.
Important: This choice is not permanent. If you decide to Continue as a listener, you can easily activate your microphone and camera later from the main control bar.
Section 1: Core Media Controls and recording
These are the basic controls for your audio and video, located in the bottom-left of the control bar.
Managing Your Microphone & Audio
- Mute/Unmute: If you joined with microphone and camera access, click the Microphone icon in the bottom-left of the footer to mute or unmute yourself.
- Activate Microphone: If you joined in "Continue as a listener" mode, the icon will show a headset. Click it to leave the listen-only session and activate your microphone.
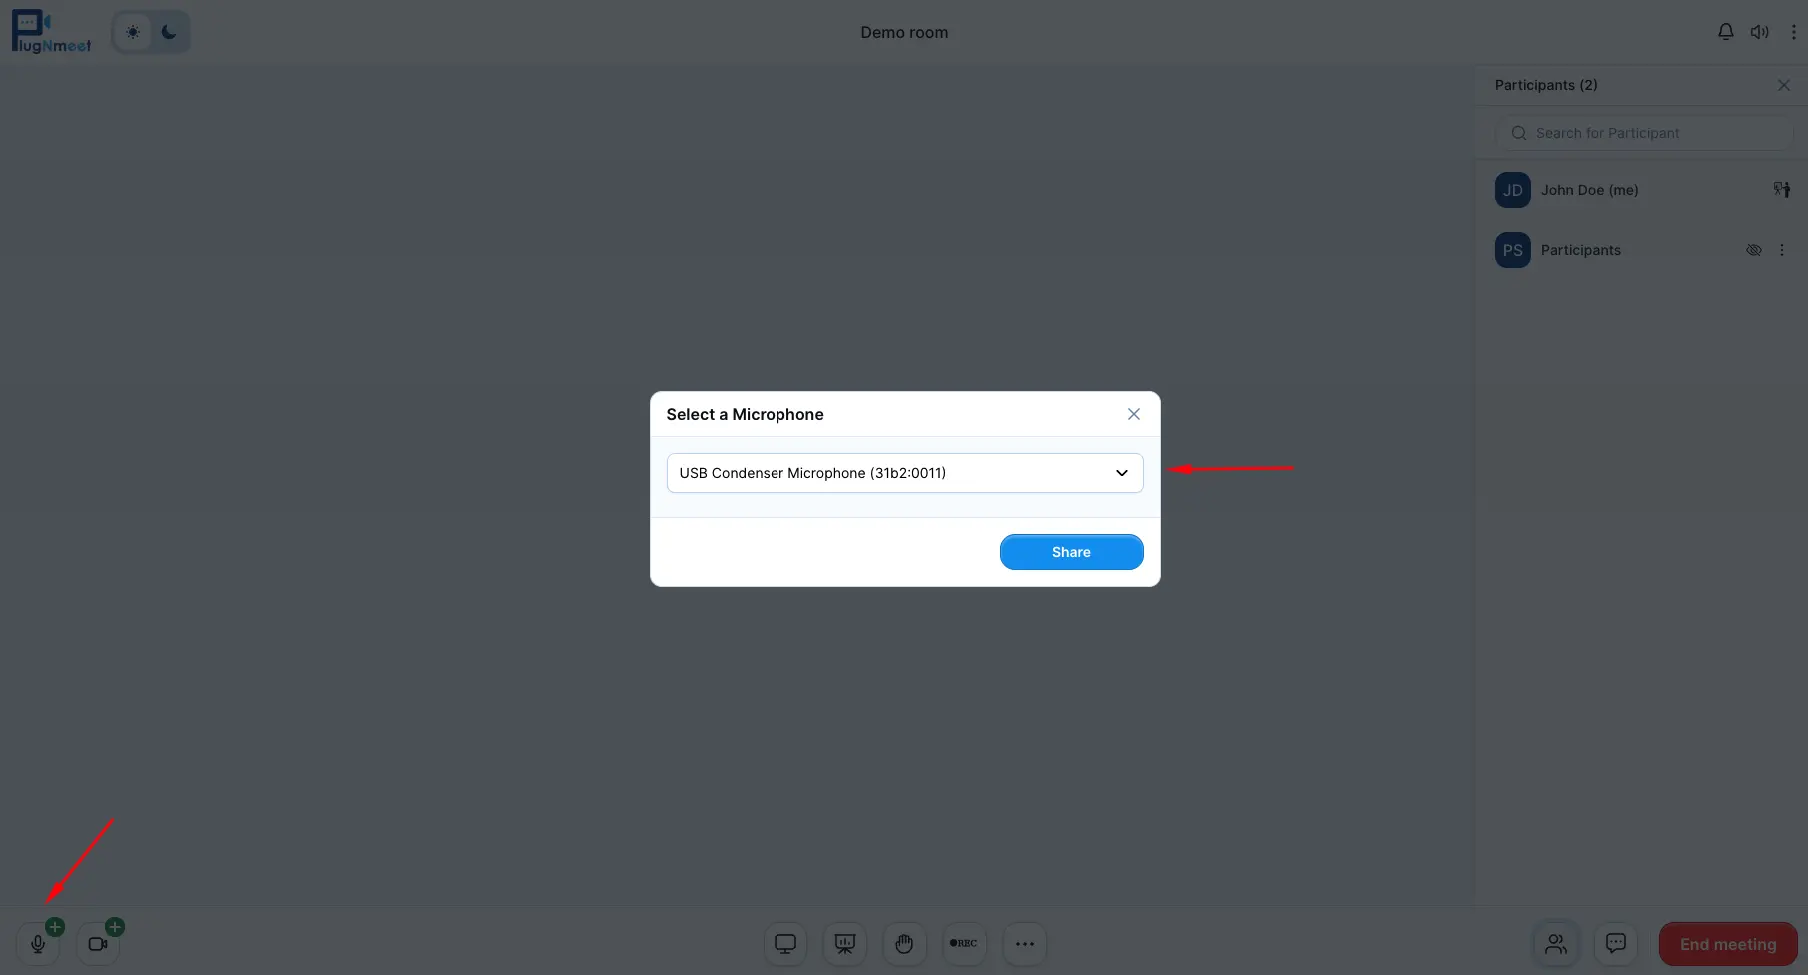
- Change Audio Source: Click the small arrow next to the microphone icon to switch between different microphones.
Managing Your Webcam & Virtual Backgrounds
- Start/Stop Webcam: Click the Webcam icon in the bottom-left of the footer to start or stop sharing your video. You can also toggle the visibility of your video in the meeting.
- Virtual Backgrounds: When starting your webcam, a preview window will appear. Here you can select a virtual background (blur or an image) or upload your own image (using the plus icon) before clicking Share.

Recording the Meeting
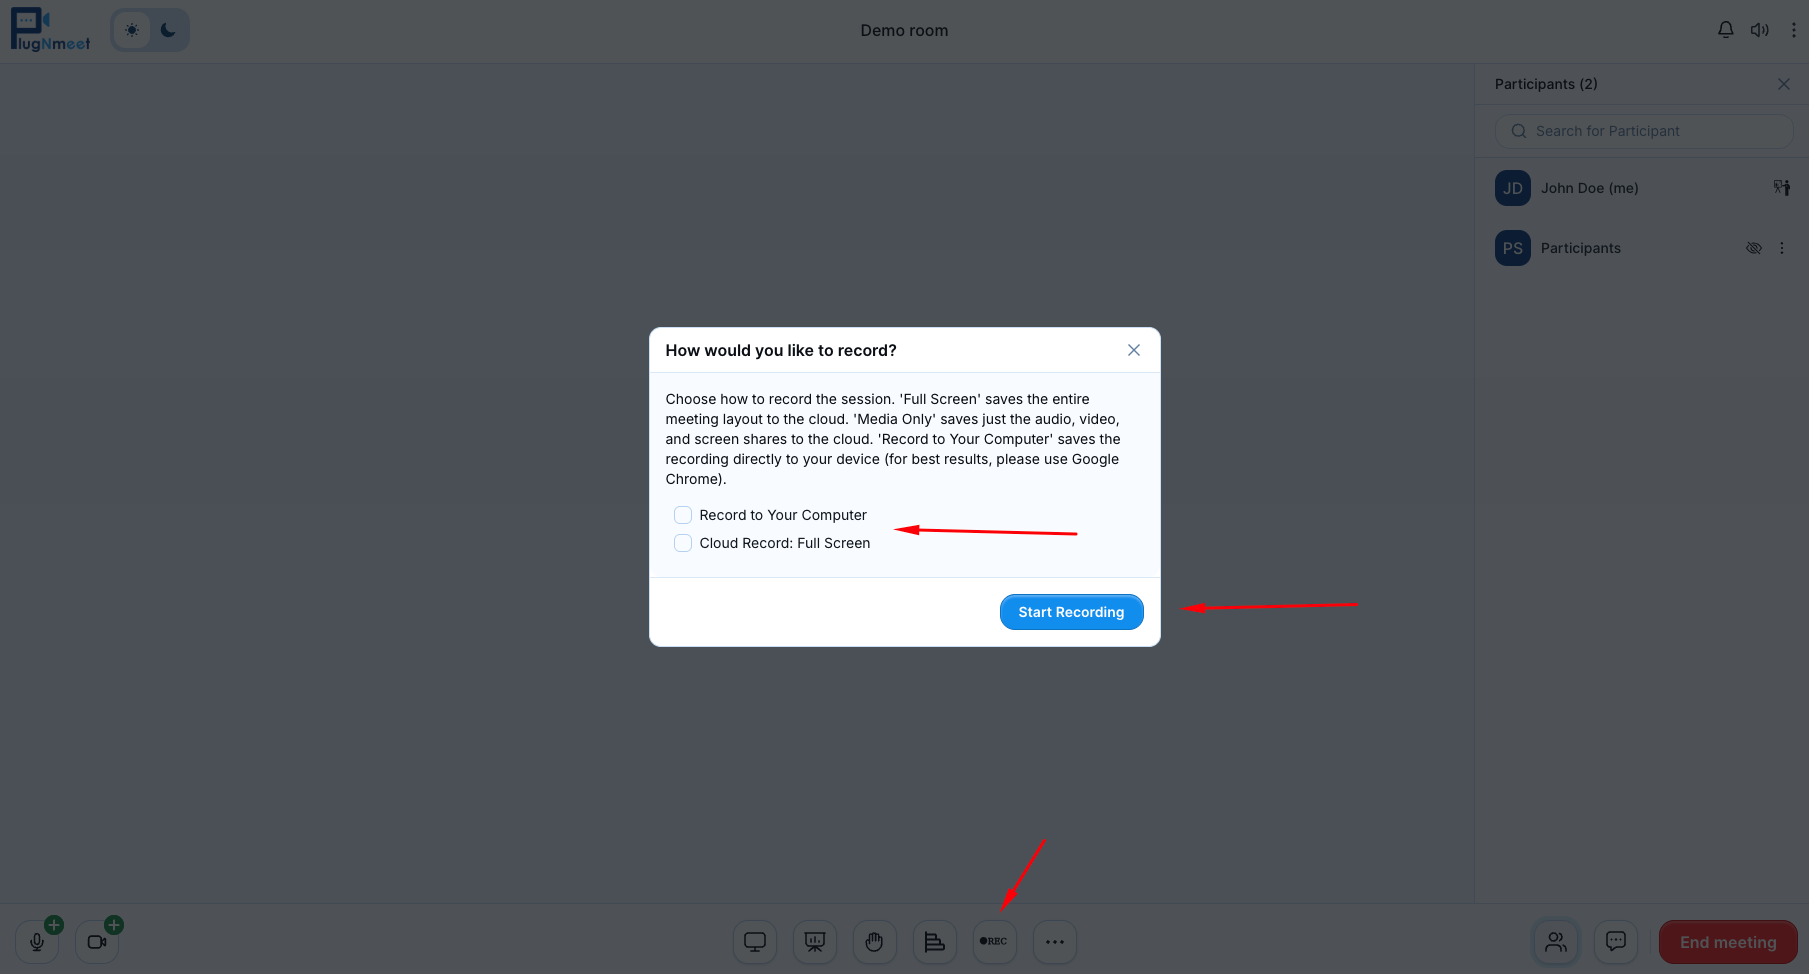
Plug-N-Meet offers two distinct methods for recording your session: Cloud Recording (server-side) and Local Recording (browser-based). To start either, click the REC icon in the main control bar and choose your preferred option.
Cloud Recording (Recommended)
This is the most reliable method. The recording is processed on your server, capturing the entire session without depending on your local computer's performance.
-
Requirement: To use Cloud Recording, the free and open-source
plugNmeet-recordercomponent must have been installed on your server. This is an option during the main installation process. -
Troubleshooting: If you see a "No recorder available" message, it means this component is not running on your server.
-
How it works: Simply select "Cloud Recording" to start. The REC icon will pulse to indicate that the server is recording. Click it again to stop.
New Recording Options: When initiating a cloud recording, you now have additional options to optimize the recorded layout:
- Enable auto-close chat panel: If enabled, the public chat panel will automatically hide after a period of inactivity. This provides more screen space for webcams, screen shares, or presentations in the final recording.
- Duration after last message (in minutes): Specify the duration of inactivity (in minutes) after which the chat panel will automatically close.
These options ensure that your recordings are clean and focused on the primary content, especially useful for RTMP broadcasting where screen real estate is crucial. Our recording philosophy ensures that what you see is what gets recorded, so controlling the chat panel visibility directly impacts the final video.
Local Recording (Browser-Based)
This method uses your web browser's capabilities to capture and save the meeting directly to your computer. It has very specific requirements and is only supported in Google Chrome.
Important: Local Recording is an advanced feature. For the best results, please read the following instructions carefully.
To capture all audio within the session (not just your own microphone), the recording must be performed by a "virtual" second user.
Step-by-Step Instructions:
- Open a new Chrome window (not just a new tab).
- Using the new window, log in to the same meeting with a different user account that has moderator privileges. You will now have two instances of yourself in the meeting.
- In this second window, click the REC icon and choose Local Recording.
- A Chrome prompt will appear asking you to share a tab. Select the tab of your original meeting session.
- Crucial Step: At the bottom of the Chrome prompt, you must check the box that says "Share tab audio". If you do not enable this, only the video will be recorded, with no sound.
Alternative Method (for capturing your microphone only):
If you only need to record what your microphone picks up along with the main video, you can start local recording without a second user. However, you must share your microphone first, and then start the local recording. If you start recording before sharing your mic, your own audio will be excluded.
Section 2: Presentation & Collaboration Tools
These tools allow you to present content and collaborate with your attendees.
Sharing Your Screen
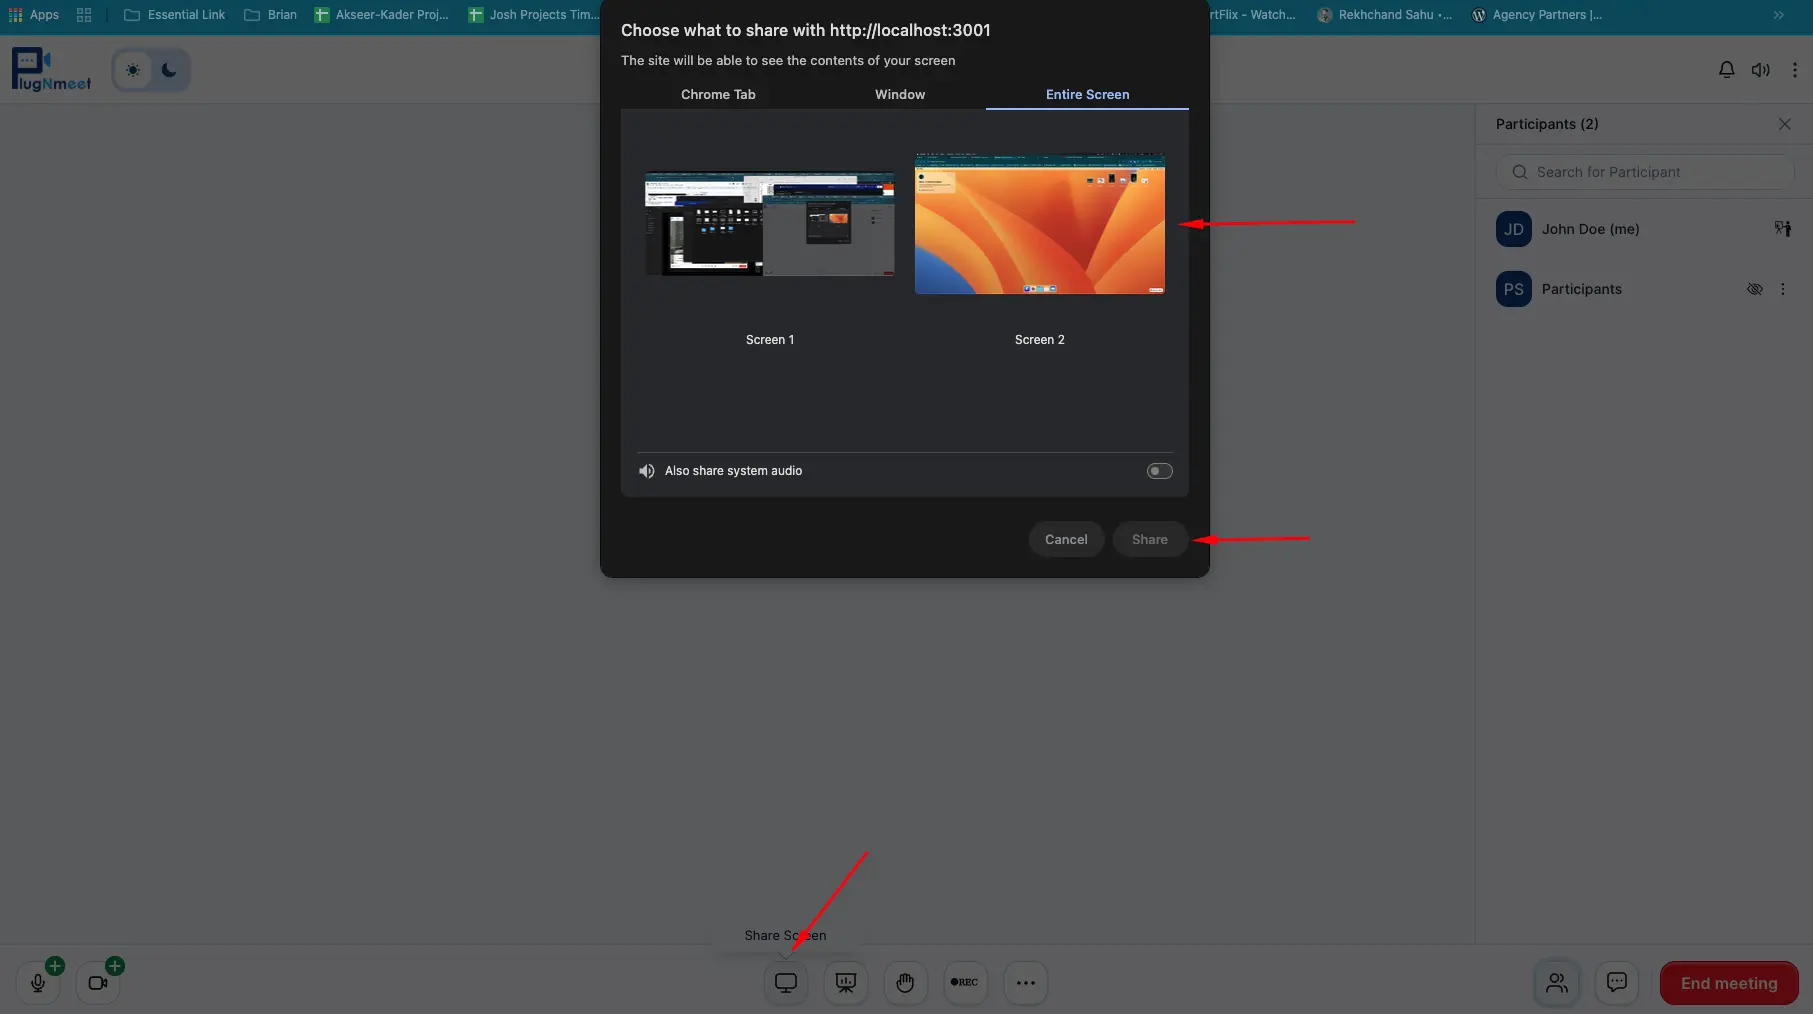
- Click the Share Screen icon in the main footer control bar.
- Your browser will prompt you to choose whether to share your entire screen, a specific application window, or a browser tab.
- To stop sharing, click the Share Screen icon again.
Using the Interactive Whiteboard
The whiteboard is a powerful tool for real-time collaboration, powered by Excalidraw. To open it, click the Whiteboard icon in the main footer control bar.
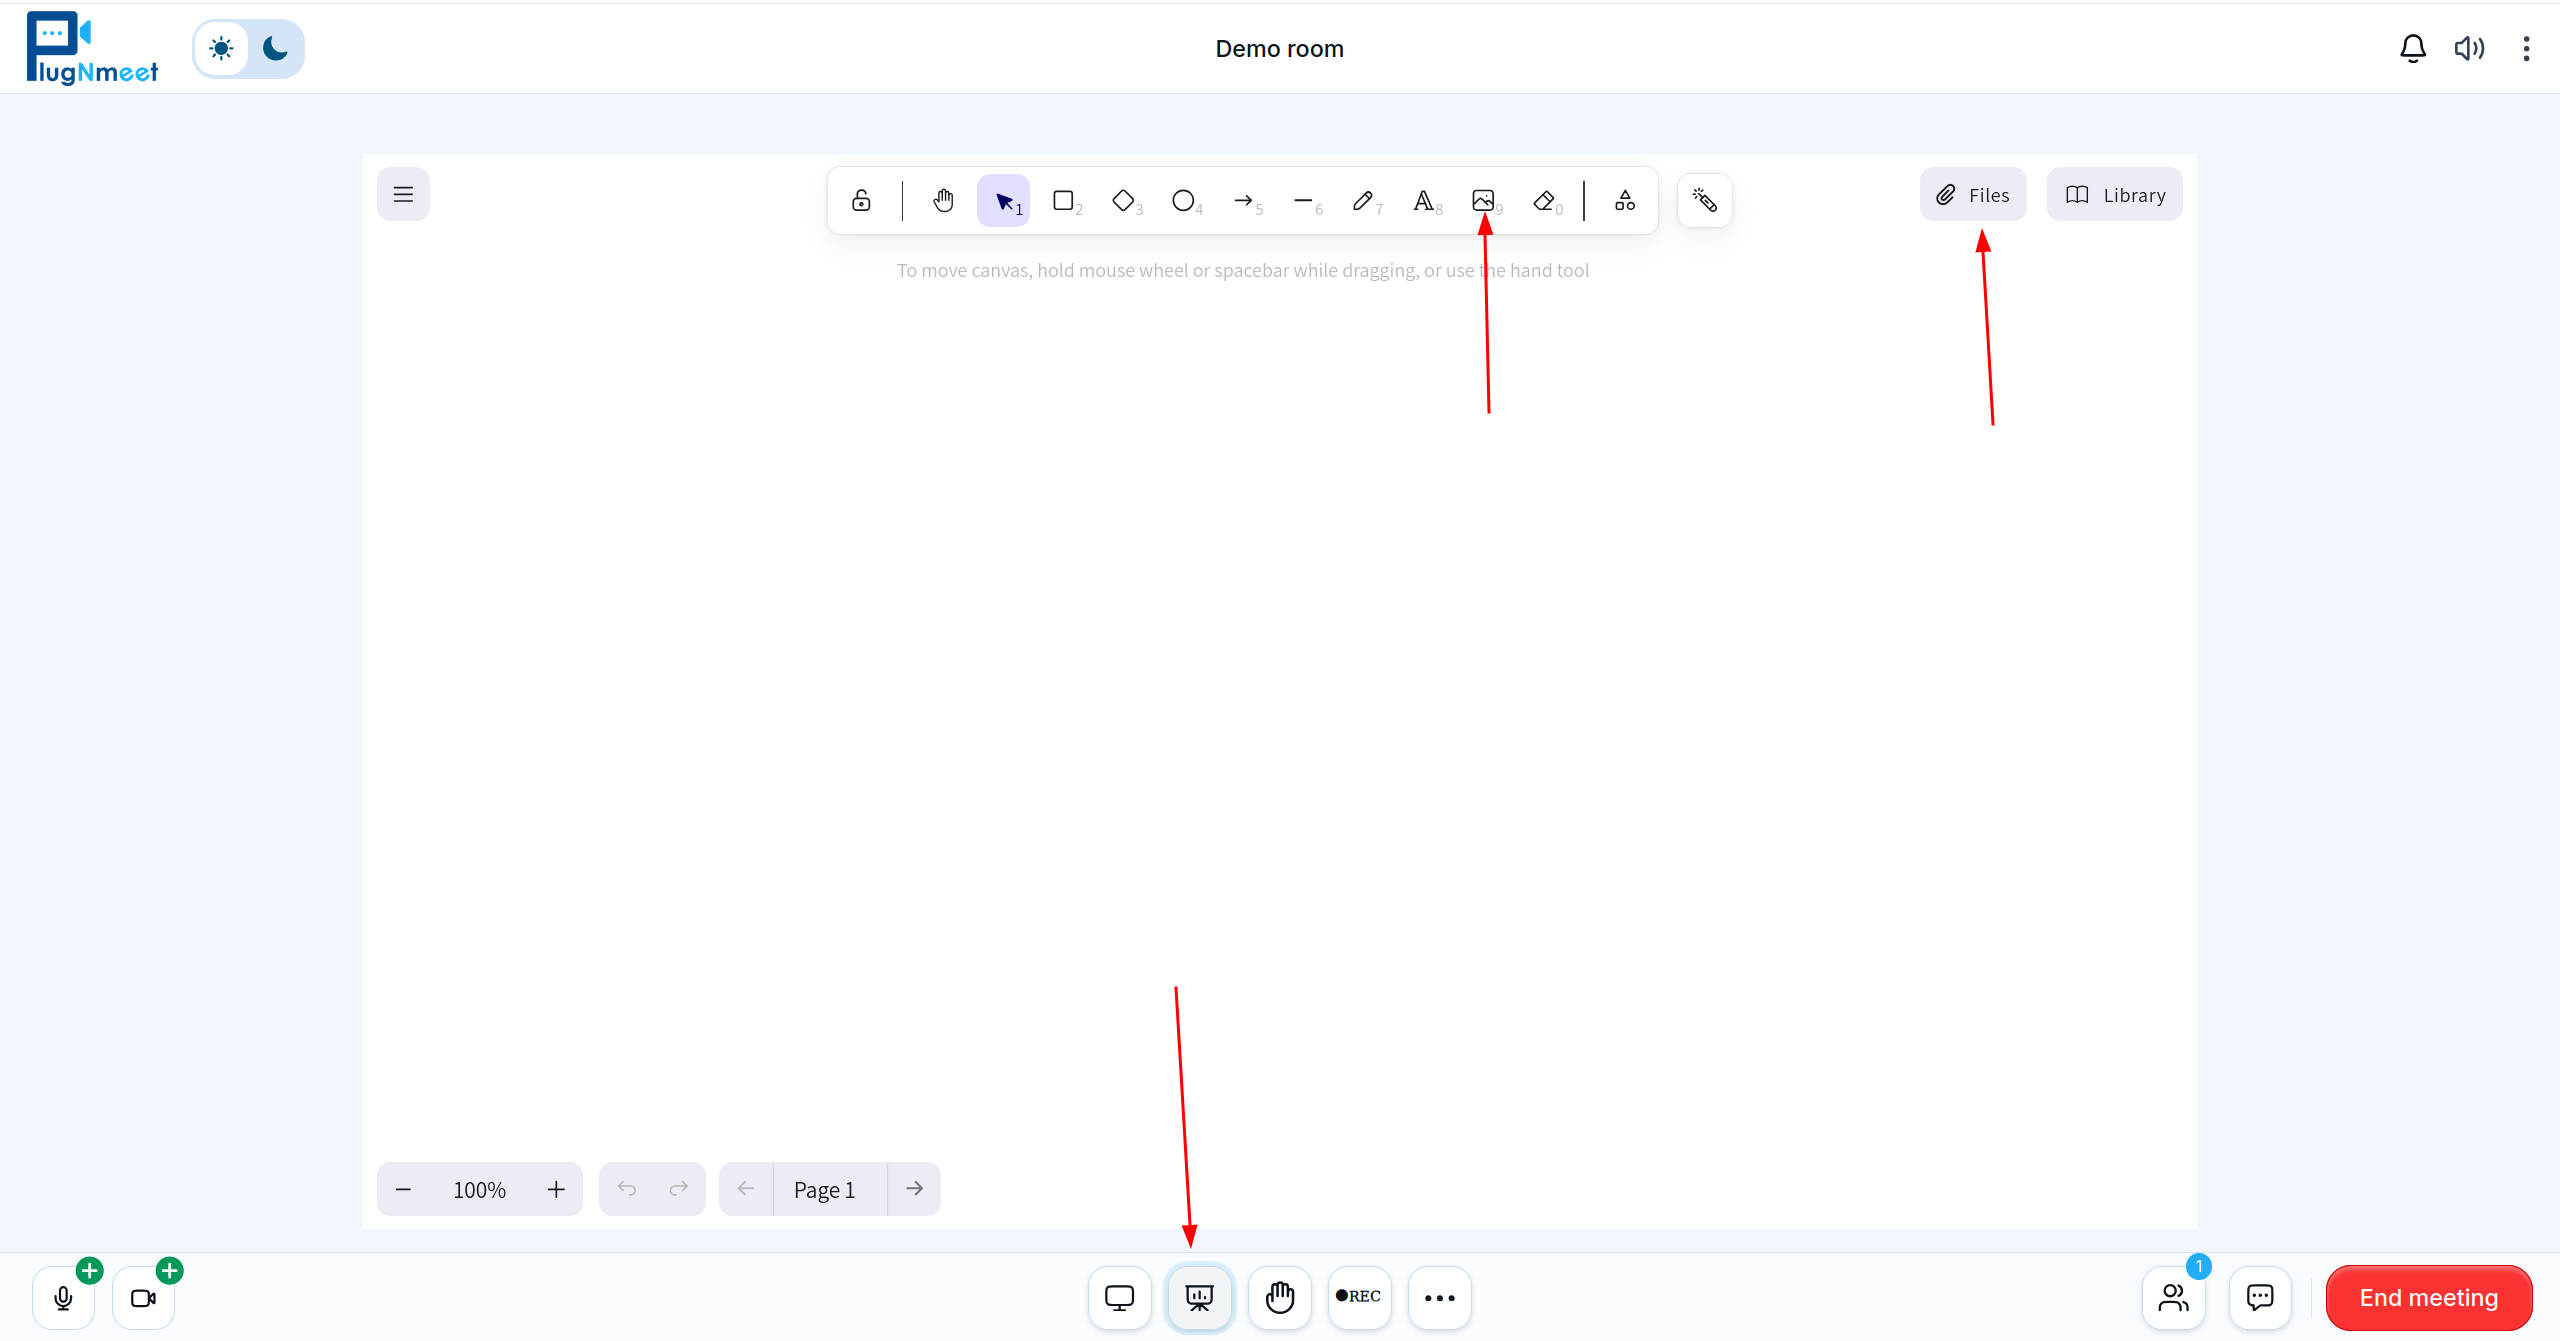
Drawing & Annotation Tools
The toolbar provides a rich set of tools for drawing and brainstorming:
- Use the pen tool to draw freehand.
- Add shapes, arrows, and text to create diagrams.
- Change colors, stroke styles, and more.
- You can export the entire whiteboard canvas as a PNG or SVG file at any time.
Adding Content to the Whiteboard
There are two distinct methods for adding content to the whiteboard: one for images and one for office files.
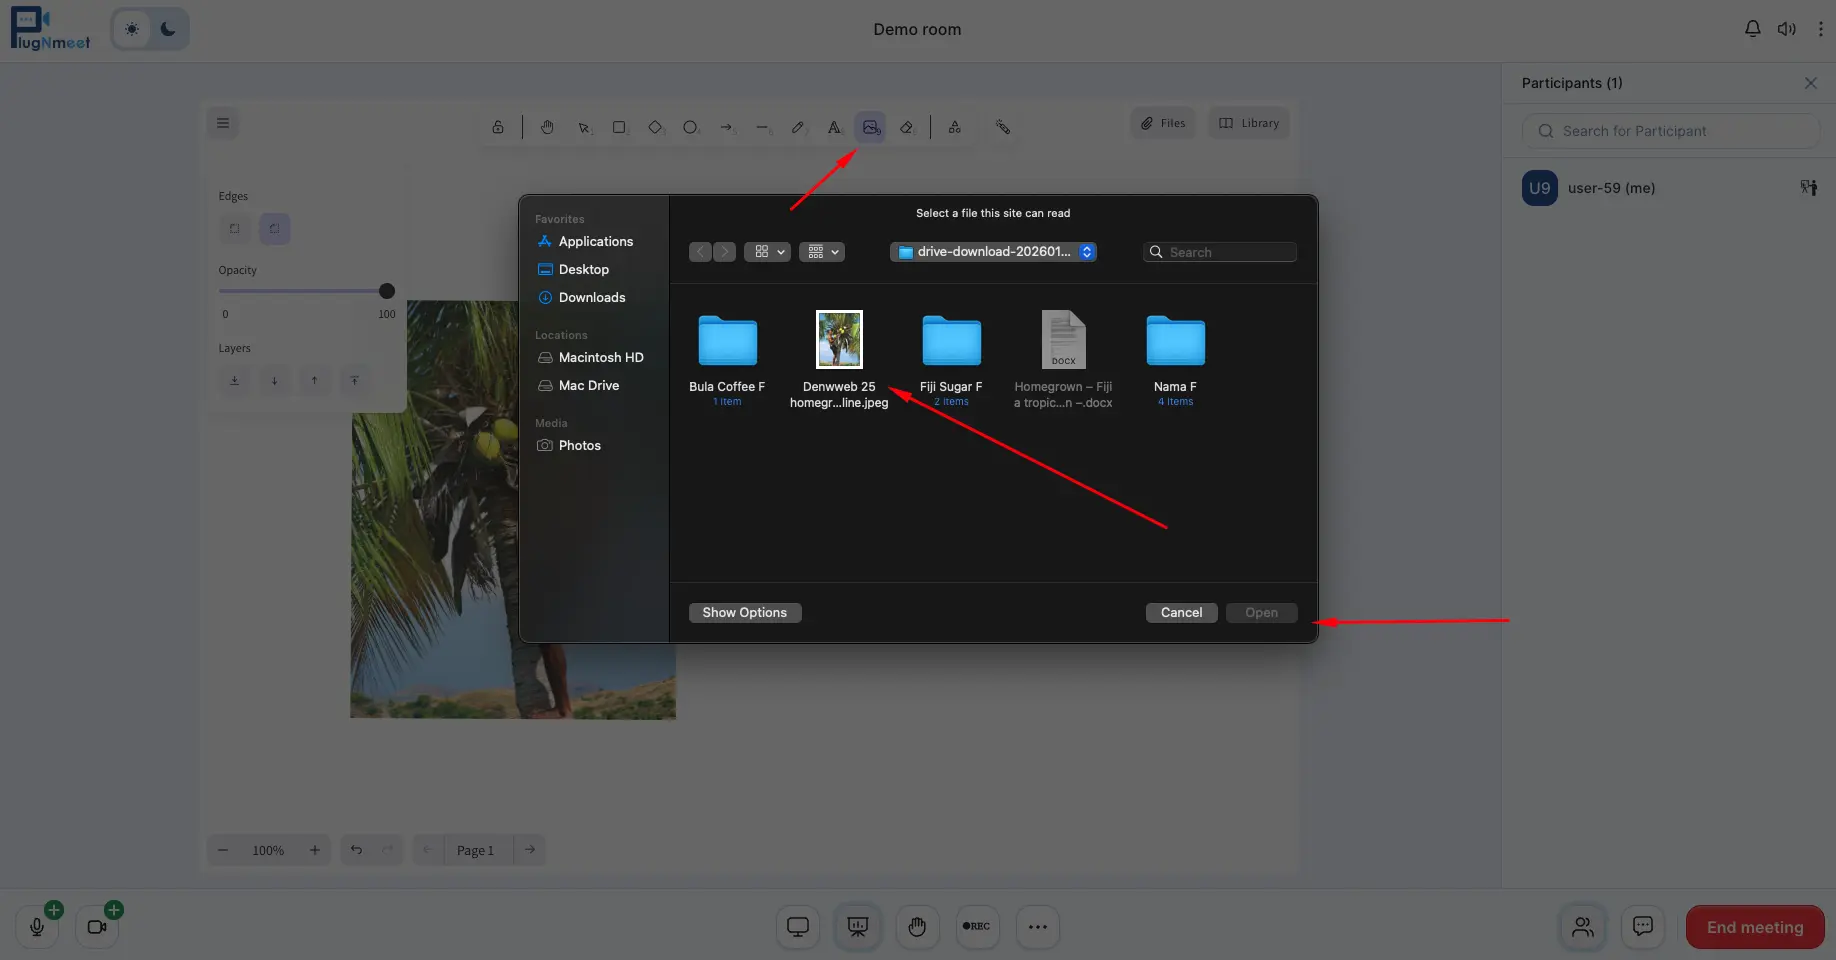
1. Adding Images You can add images (like JPG or PNG) to the whiteboard in several easy ways:
- Drag and Drop: Simply drag an image file from your computer and drop it directly onto the whiteboard canvas.
- Copy and Paste: Copy an image (from a website or a file on your computer) and paste it onto the whiteboard using
Ctrl+V(orCmd+Von Mac). - Toolbar Icon: Click the Image icon in the whiteboard's toolbar to open a file selection window.
2. Adding Office Files & PDFs To present documents like PDFs, Word files, or PowerPoint presentations, you must use the dedicated file uploader.
- Click the Files icon in the whiteboard's toolbar.
- A new panel will open. From here, you can upload your office documents or PDF files.
- Once uploaded, the file will be listed below the upload option. From there, you can select the file you want to display on the whiteboard.
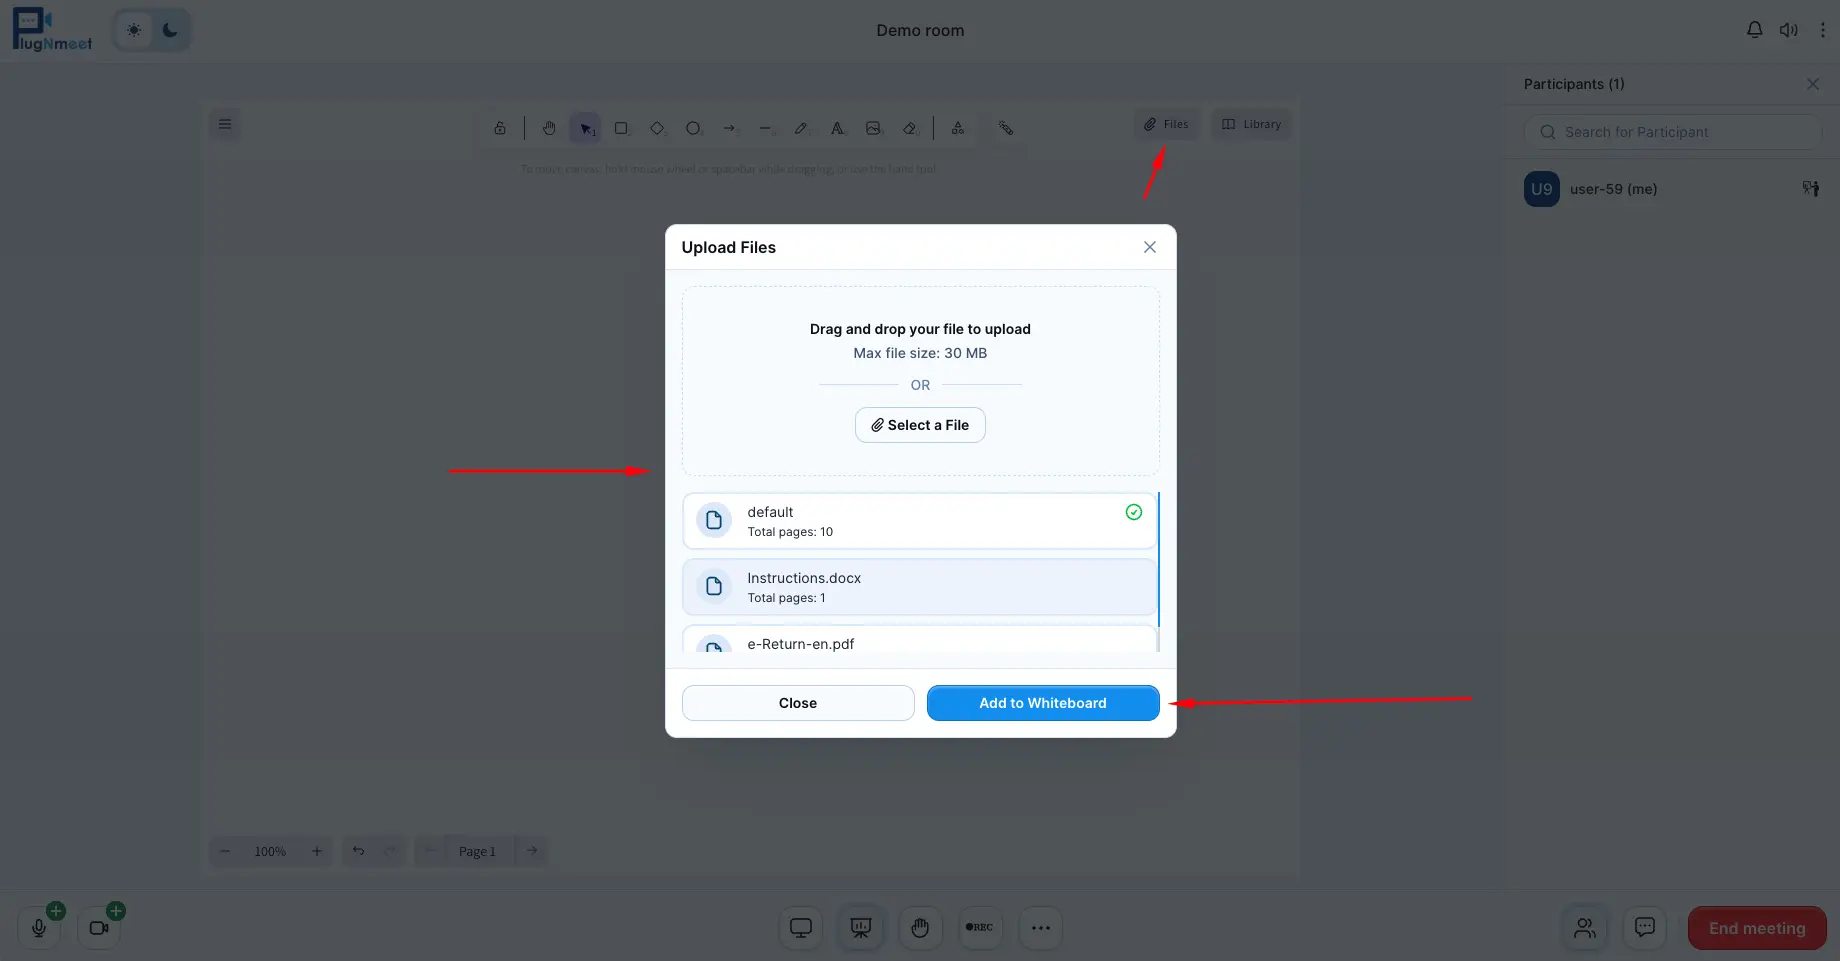
You cannot upload images using the "Files" uploader. It is specifically for office documents and PDFs.
Using the Shared Notepad
- Activate/Hide: Open the More Options menu (...) in the main footer control bar and select Enable shared notepad.
- The shared notepad allows all participants to write and edit text together in real-time. You can format text and import/export the content.

Using AI Assistant
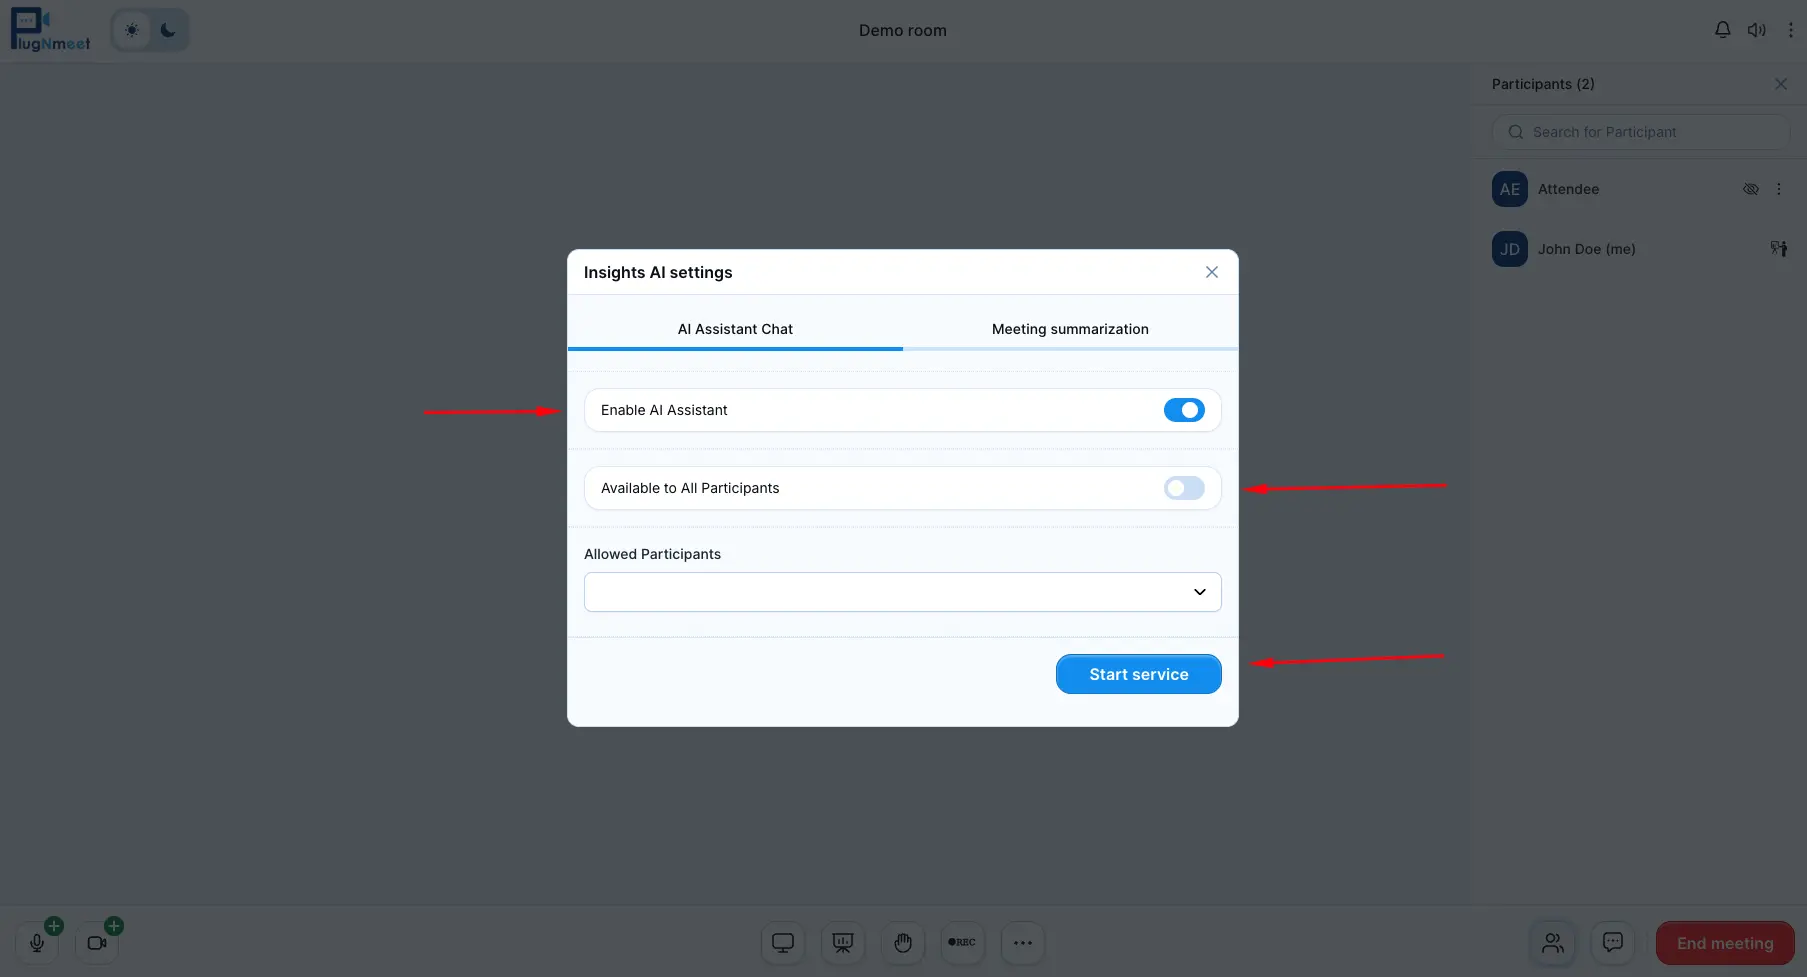
- AI Activation: Open the More Options menu (...) in the main footer control bar and select AI Tools.
- AI Settings: The Insights AI settings popup will appear. Here you can enable or disable the AI assistant, and choose to make it available for all participants or specific users.
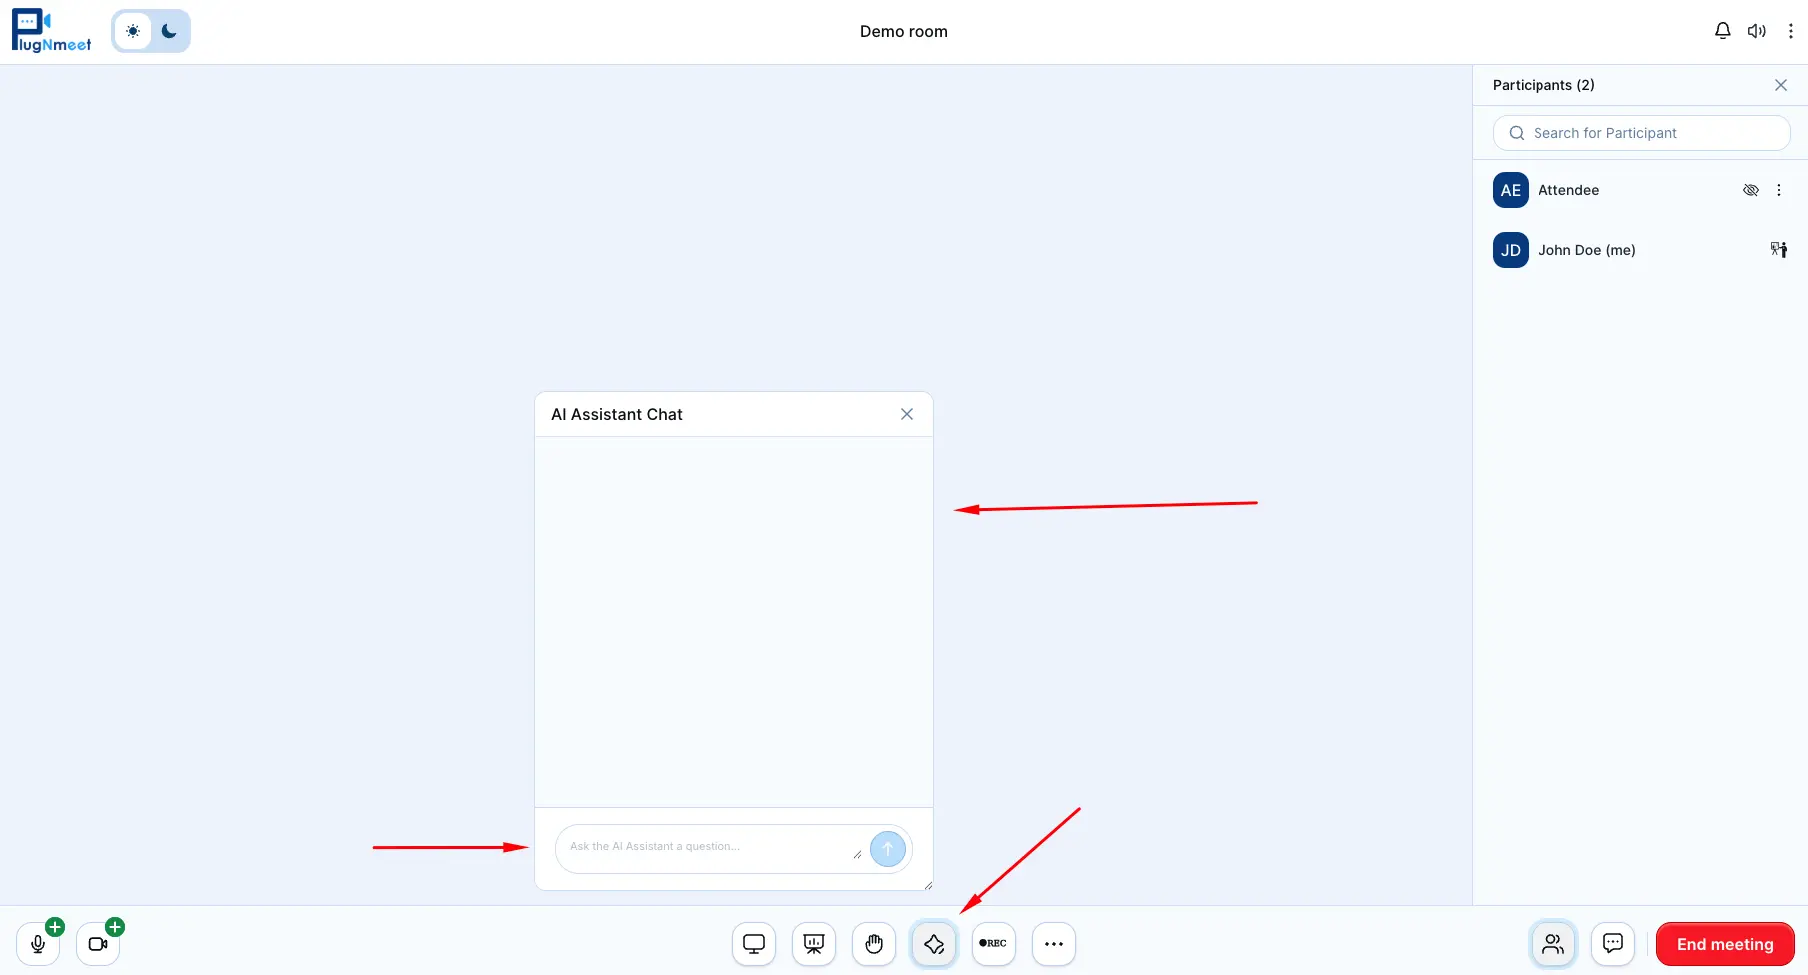
- Show/Hide: Click the AI Chat icon in the main footer control bar to show or hide it.
- Send Message: You can send a message to the AI assistant and get an answer.
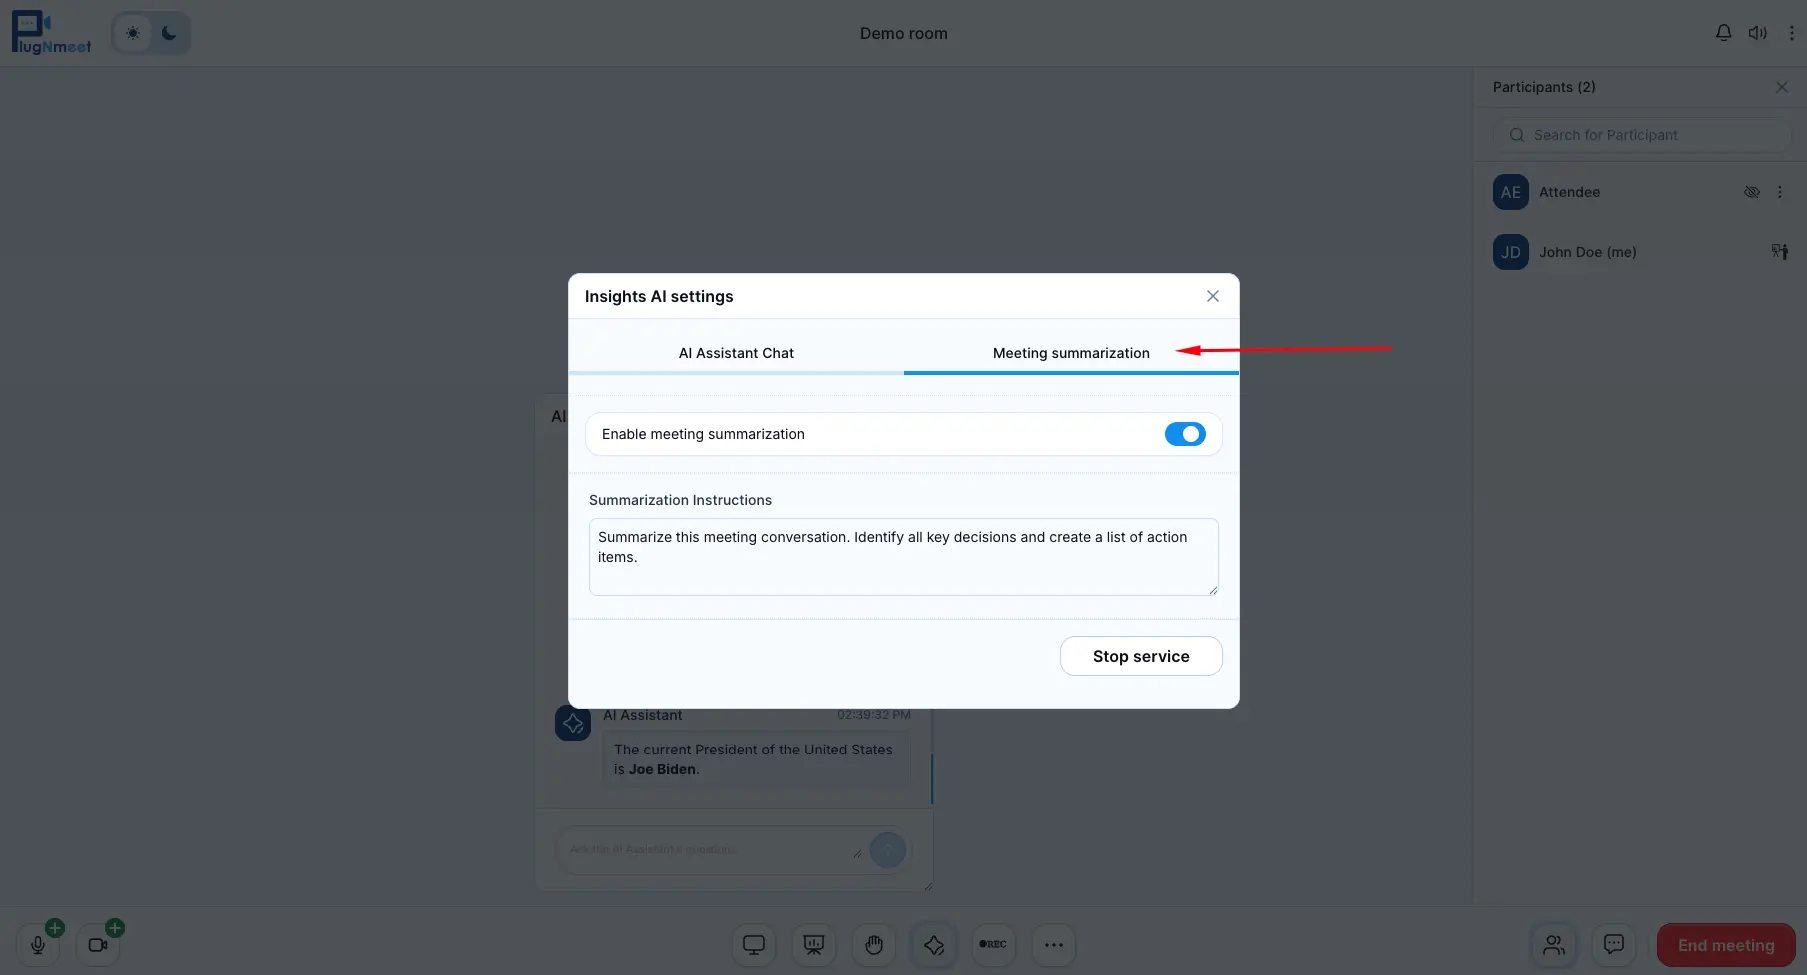
- AI Meeting summarization: Use this feature to summarize the meeting conversation, identify all key decisions, and create a list of action items.
Transcription & Translation
- Activation: Open the More Options menu (...) in the main footer control bar and select Transcription & Translation.
- Settings: The Transcription and Translation Settings popup will appear. Here you can enable or disable Transcription & Translation.
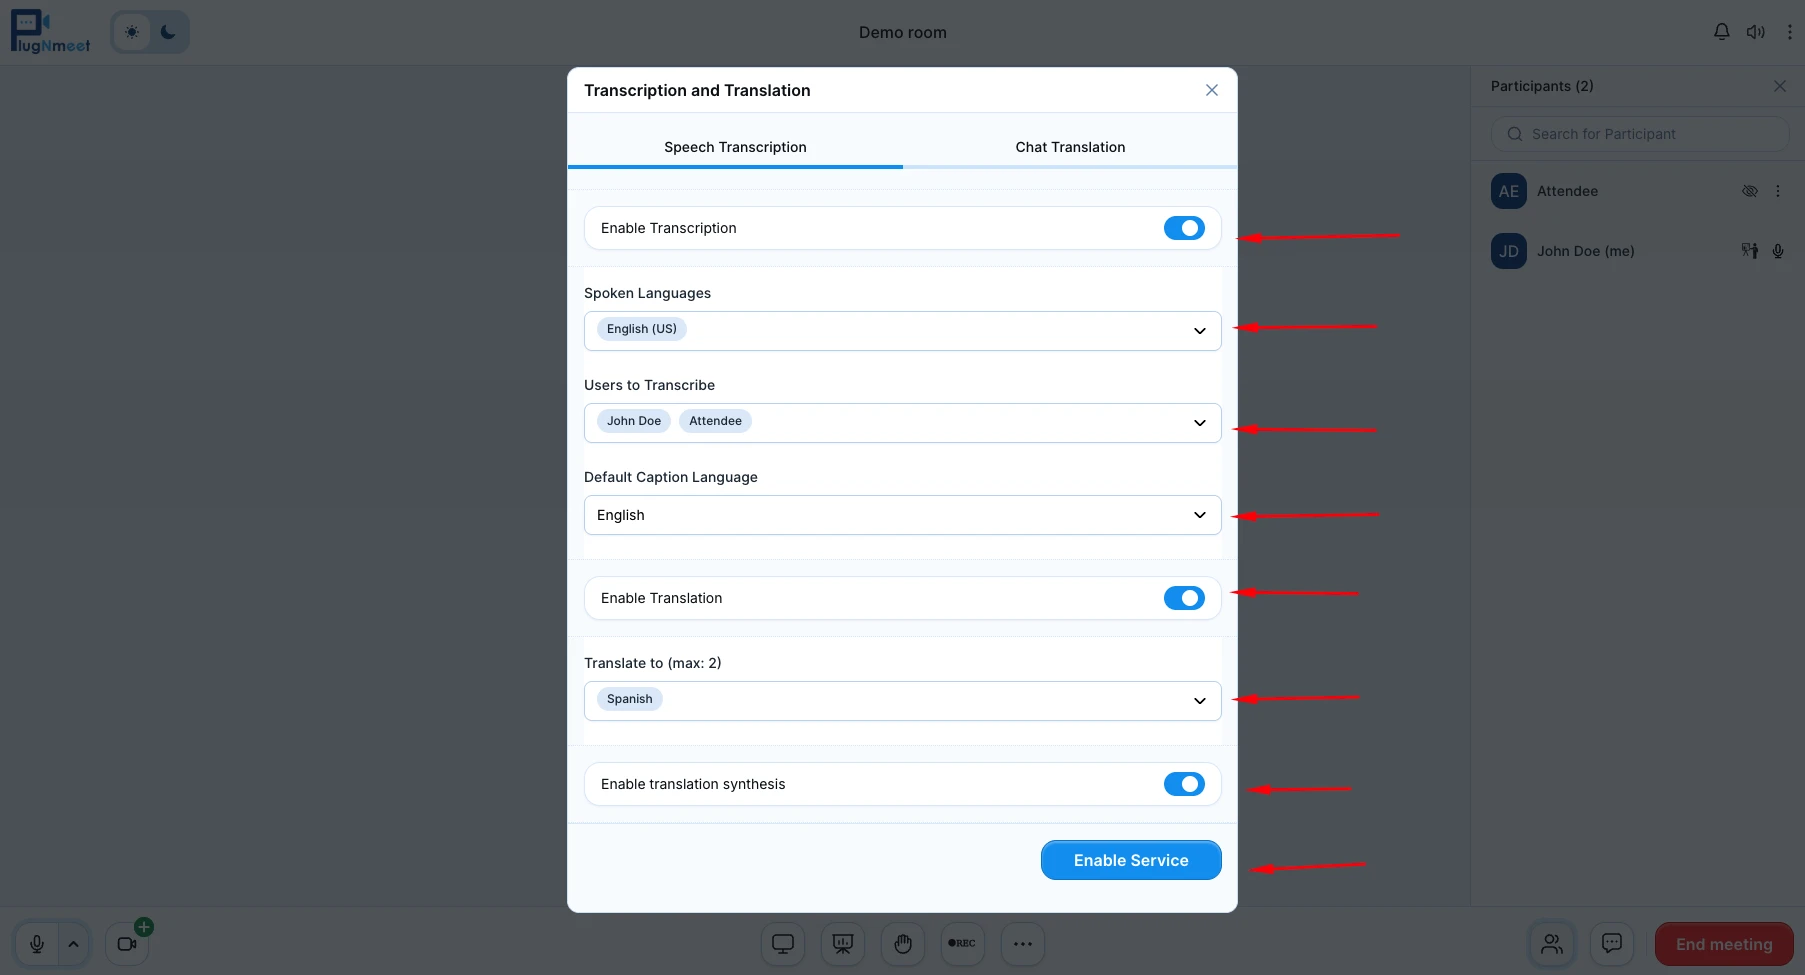
- Start Transcription & Translation: Click the Transcription & Translation Icon in the main footer control bar to start the transcription & translation.

- History: You can view the Live Transcription & Translation in real-time. Click the History icon to see the full transcript history.
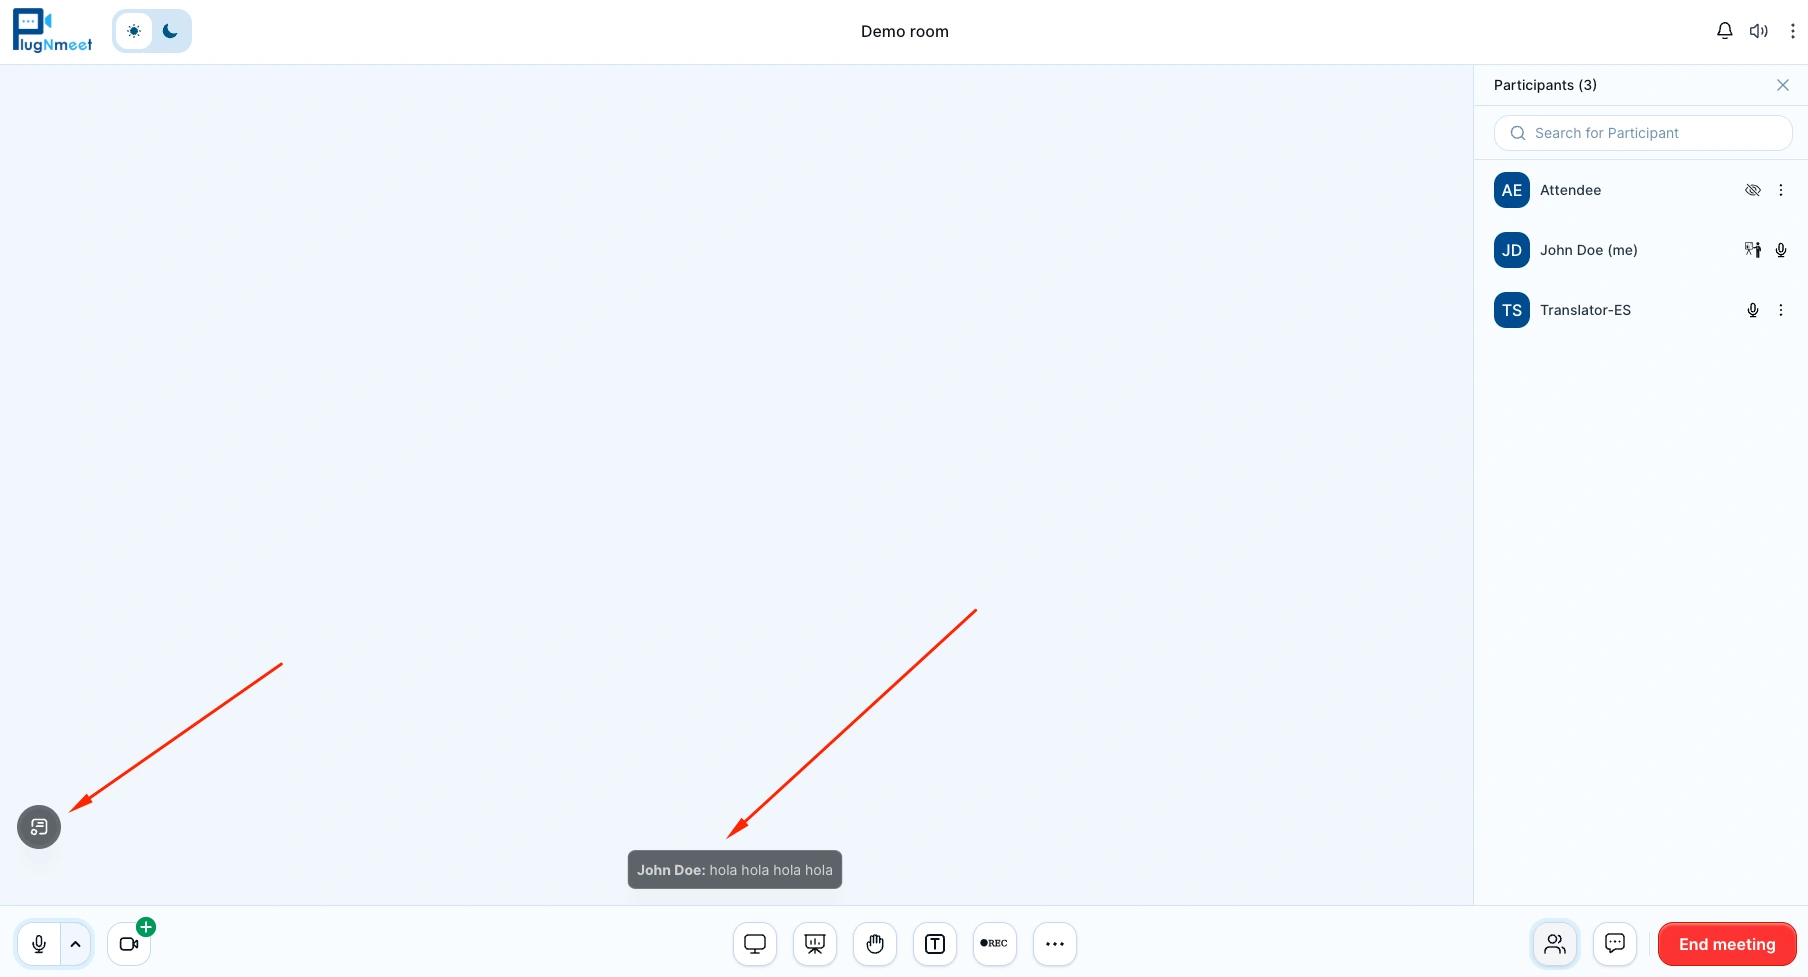
Important: You must Enable Microphone to use Transcription & Translation.
Sharing an External Video
You can share a video from a URL (like YouTube) or a local file.
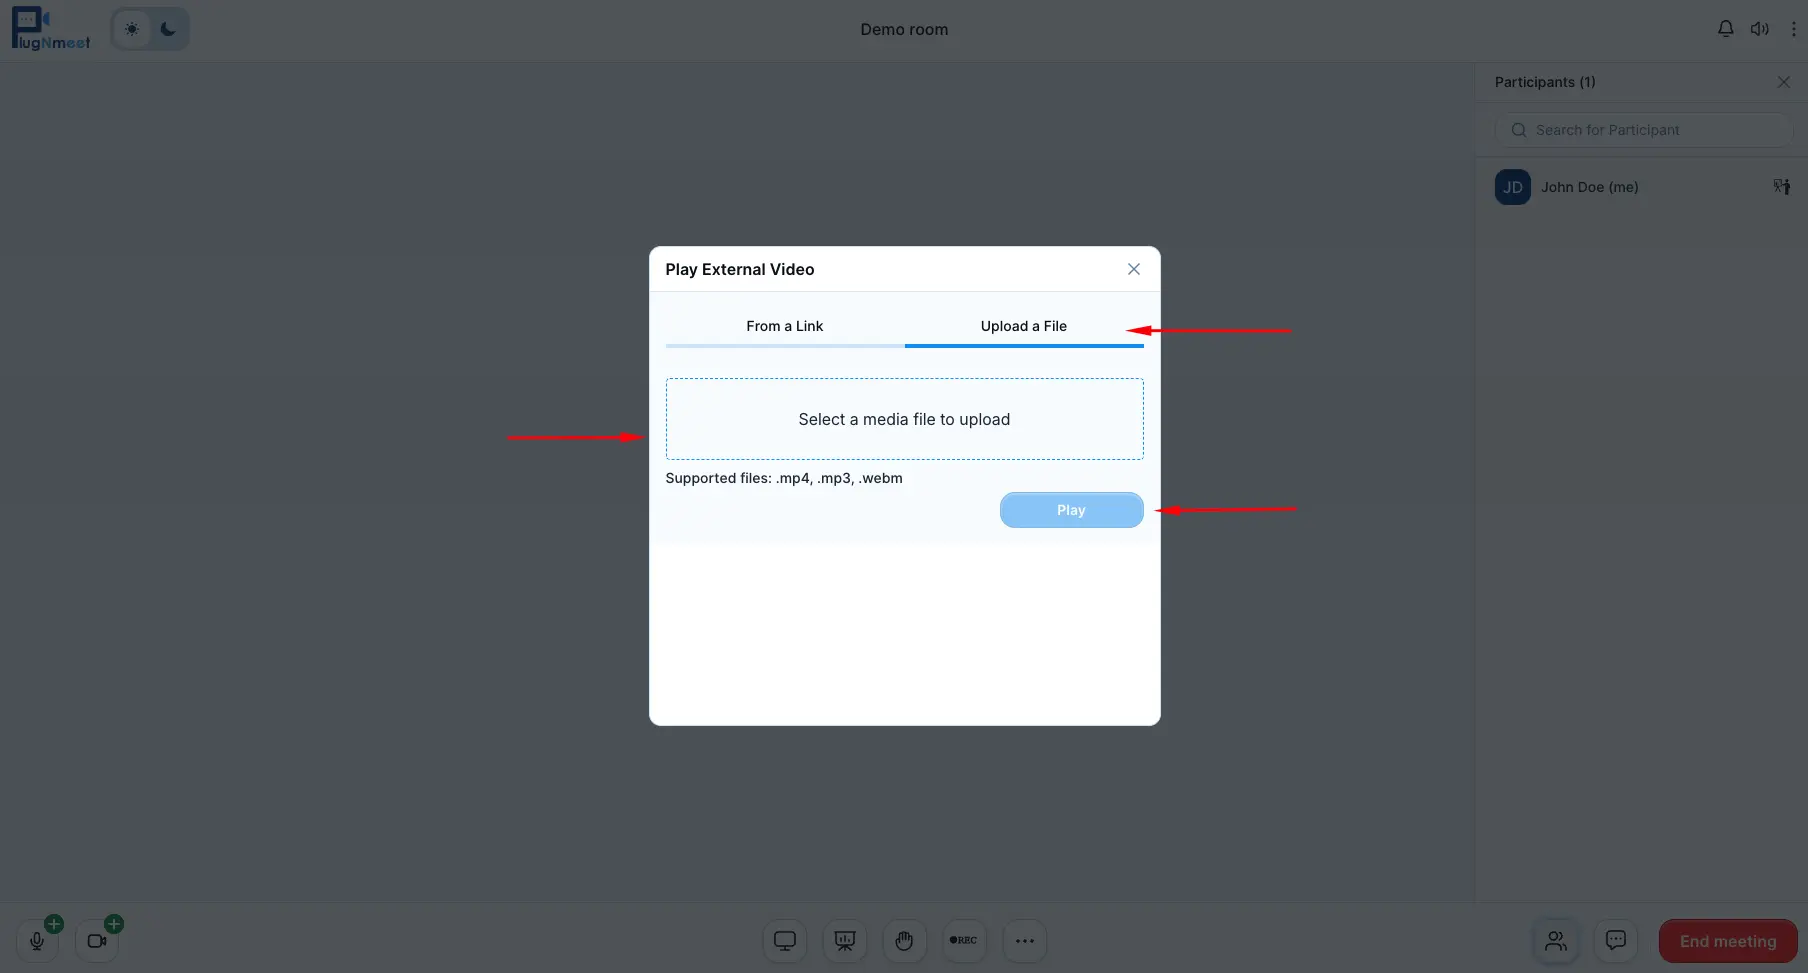
- Open the More Options menu (...) in the main footer control bar and select Play External Video.
- Paste a video URL or upload a video file (MP4, WebM).
- The video will appear for all participants, and you will have playback controls.
Displaying an External Website (iframe)
You can display any website that allows embedding within an iframe.
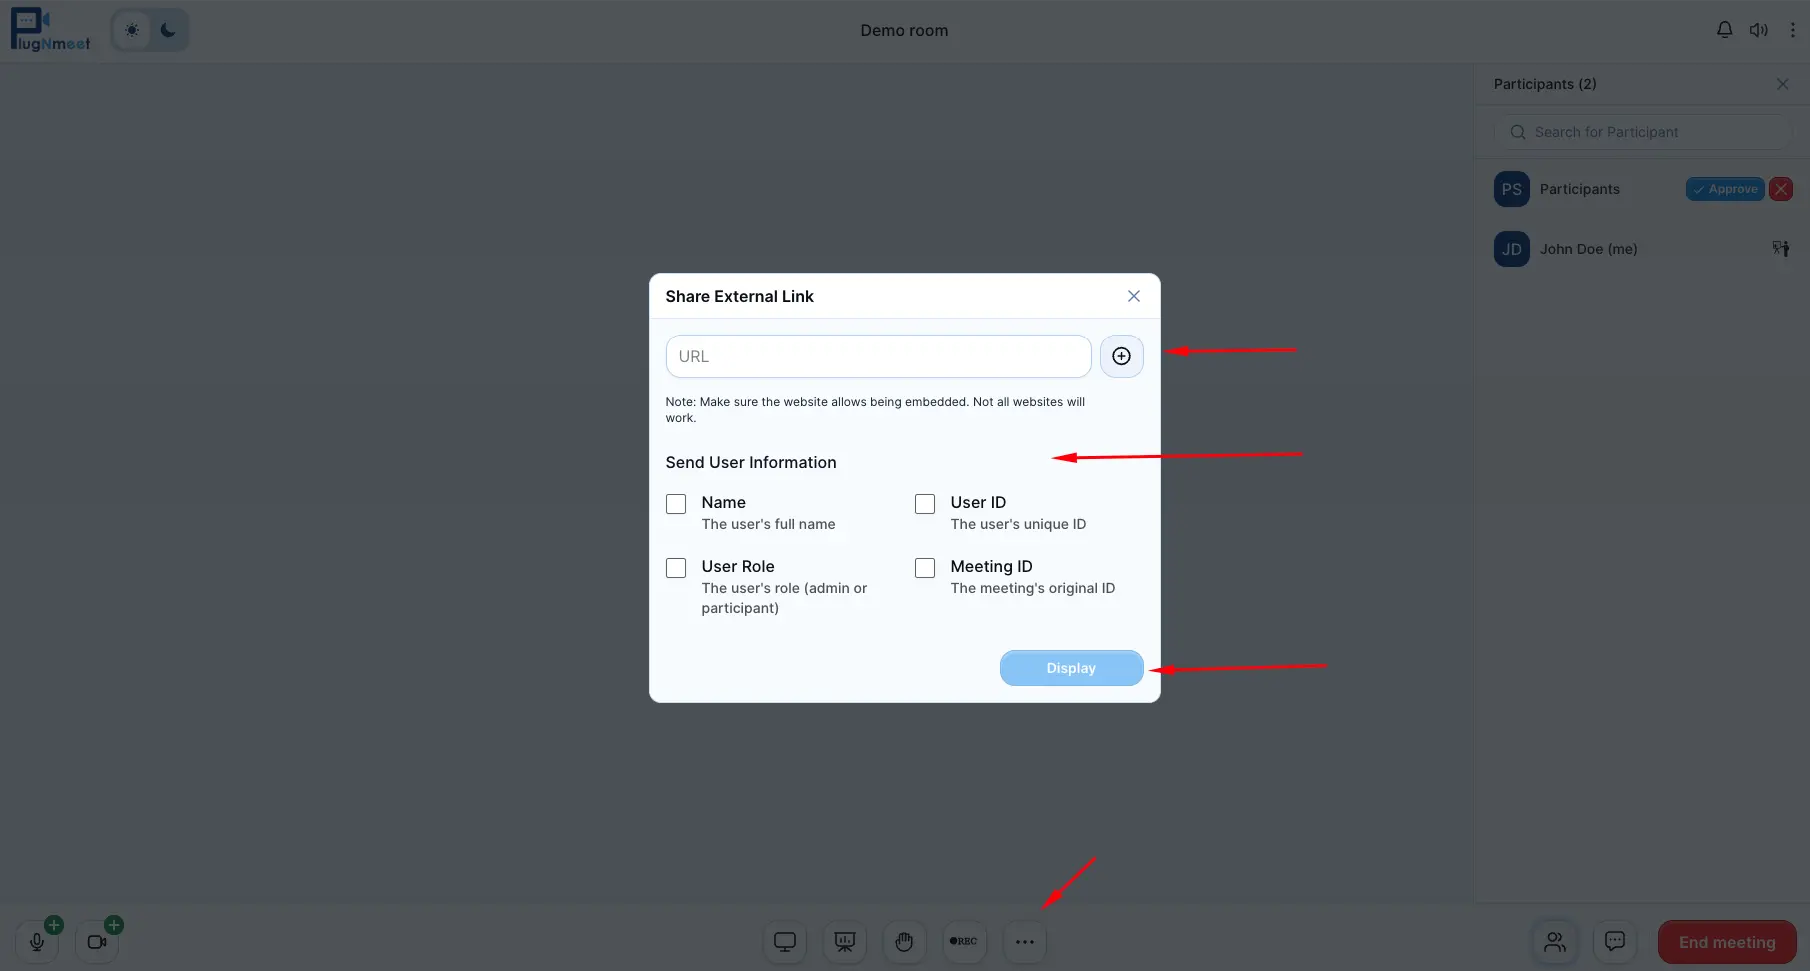
- Open the More Options menu (...) in the footer control bar and select Share External Link.
- Enter the URL of the website you wish to share.
Section 3: Managing Participants
These features allow you to control and interact with your attendees.
Viewing the Participant List
- Click the Participants icon in the footer control bar to open the participant panel. Here you can see everyone in the meeting.
Using the Waiting Room
If the waiting room is enabled, you must approve attendees before they can join.
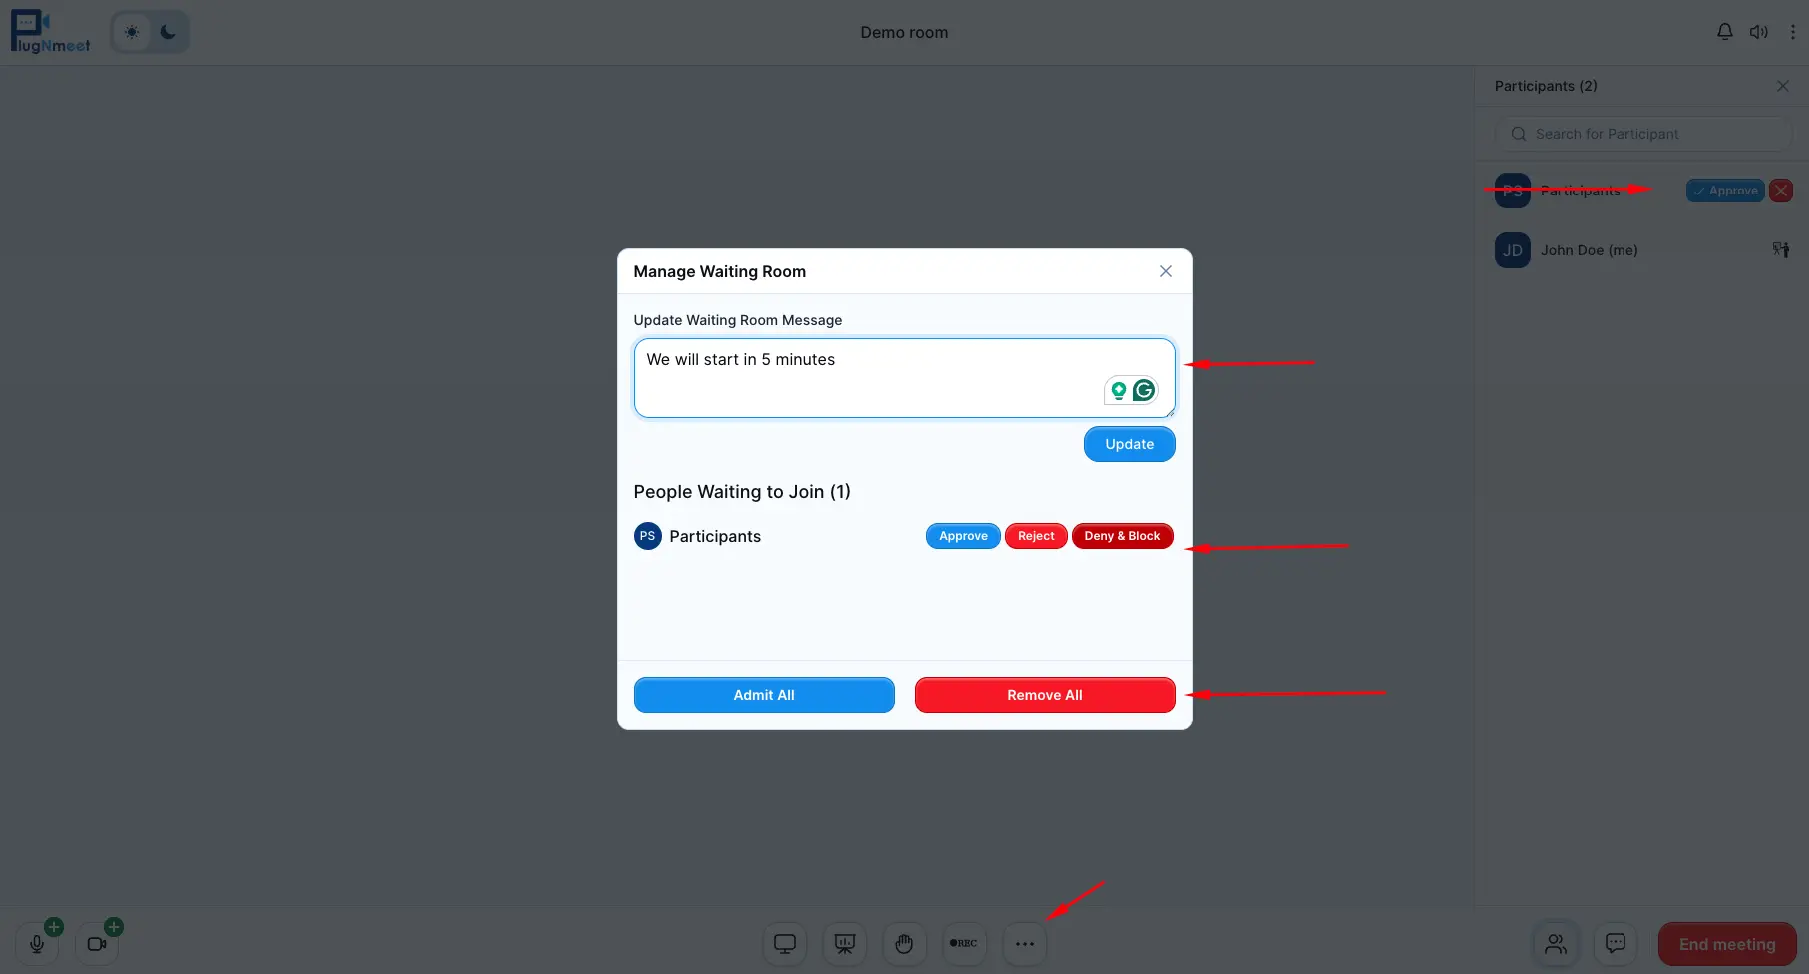
- Open the More Options menu (...) in the footer control bar and select Manage Waiting Room.
- In the waiting room panel, you can see a list of users waiting to enter. You can Accept or Reject them individually, or all at once.
- You can also approve users directly from the participant list.
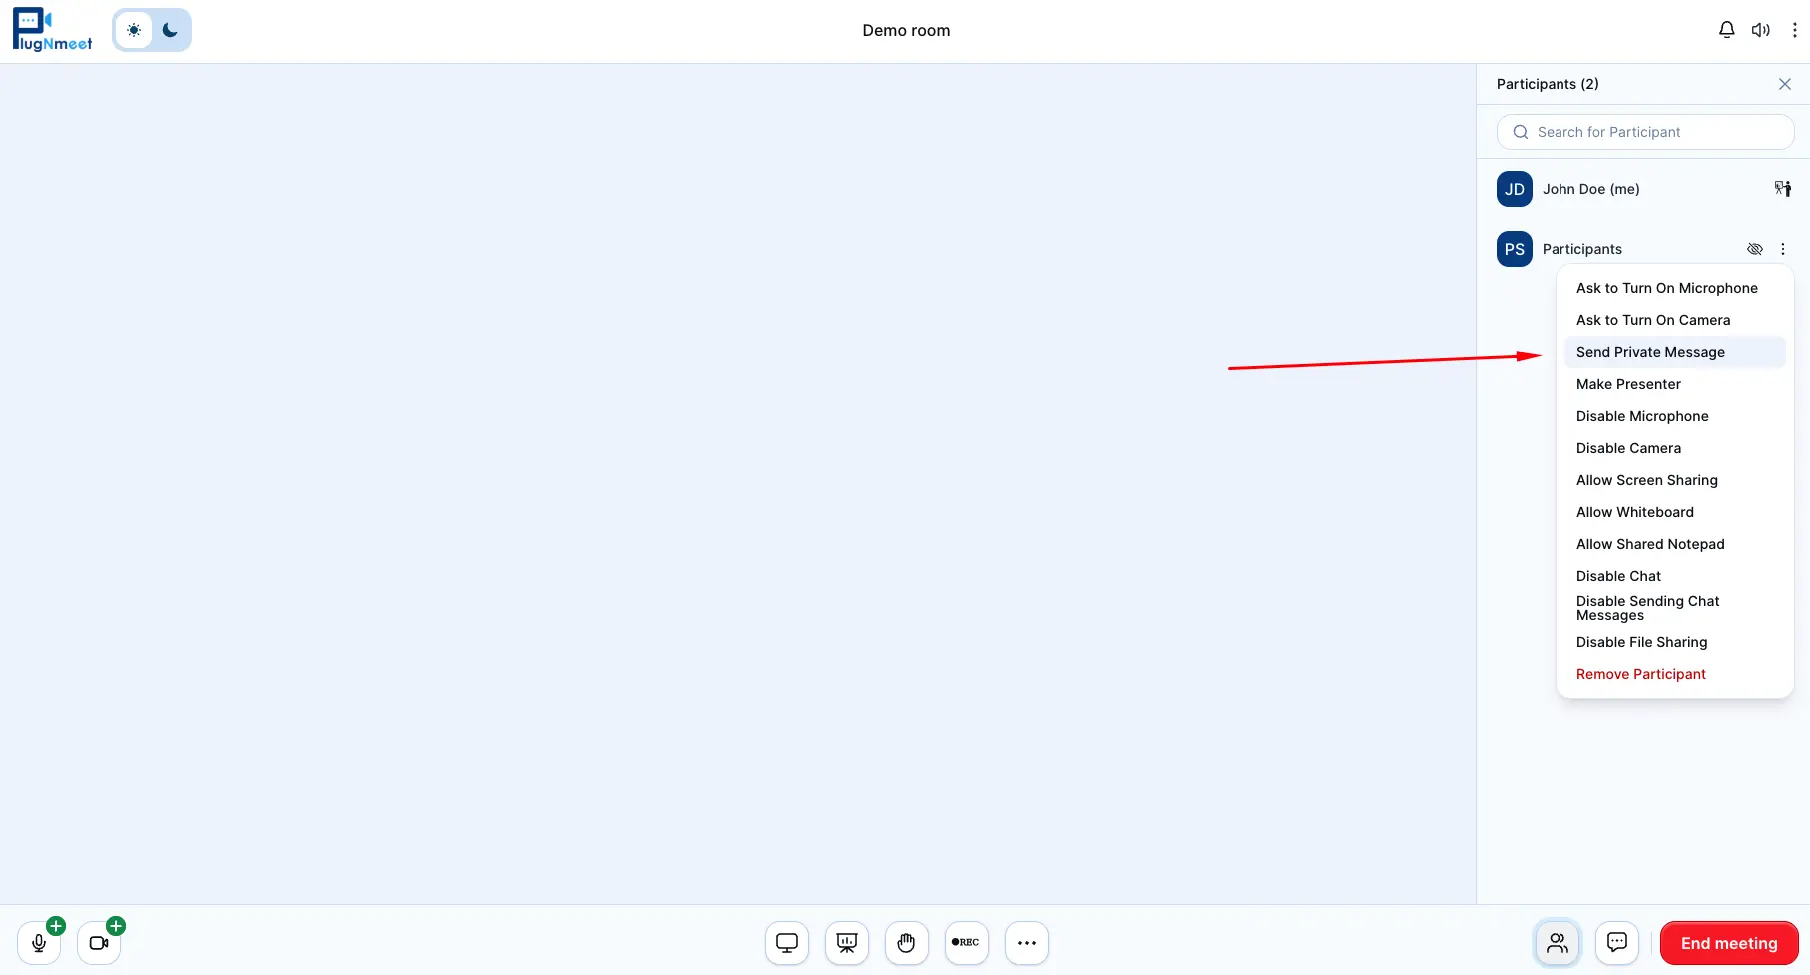
Sending Private Chat Messages
- Open the Participants panel.
- Click the three-dot menu next to a user's name and select Send private message.
- This will open a private chat tab in the chat panel.
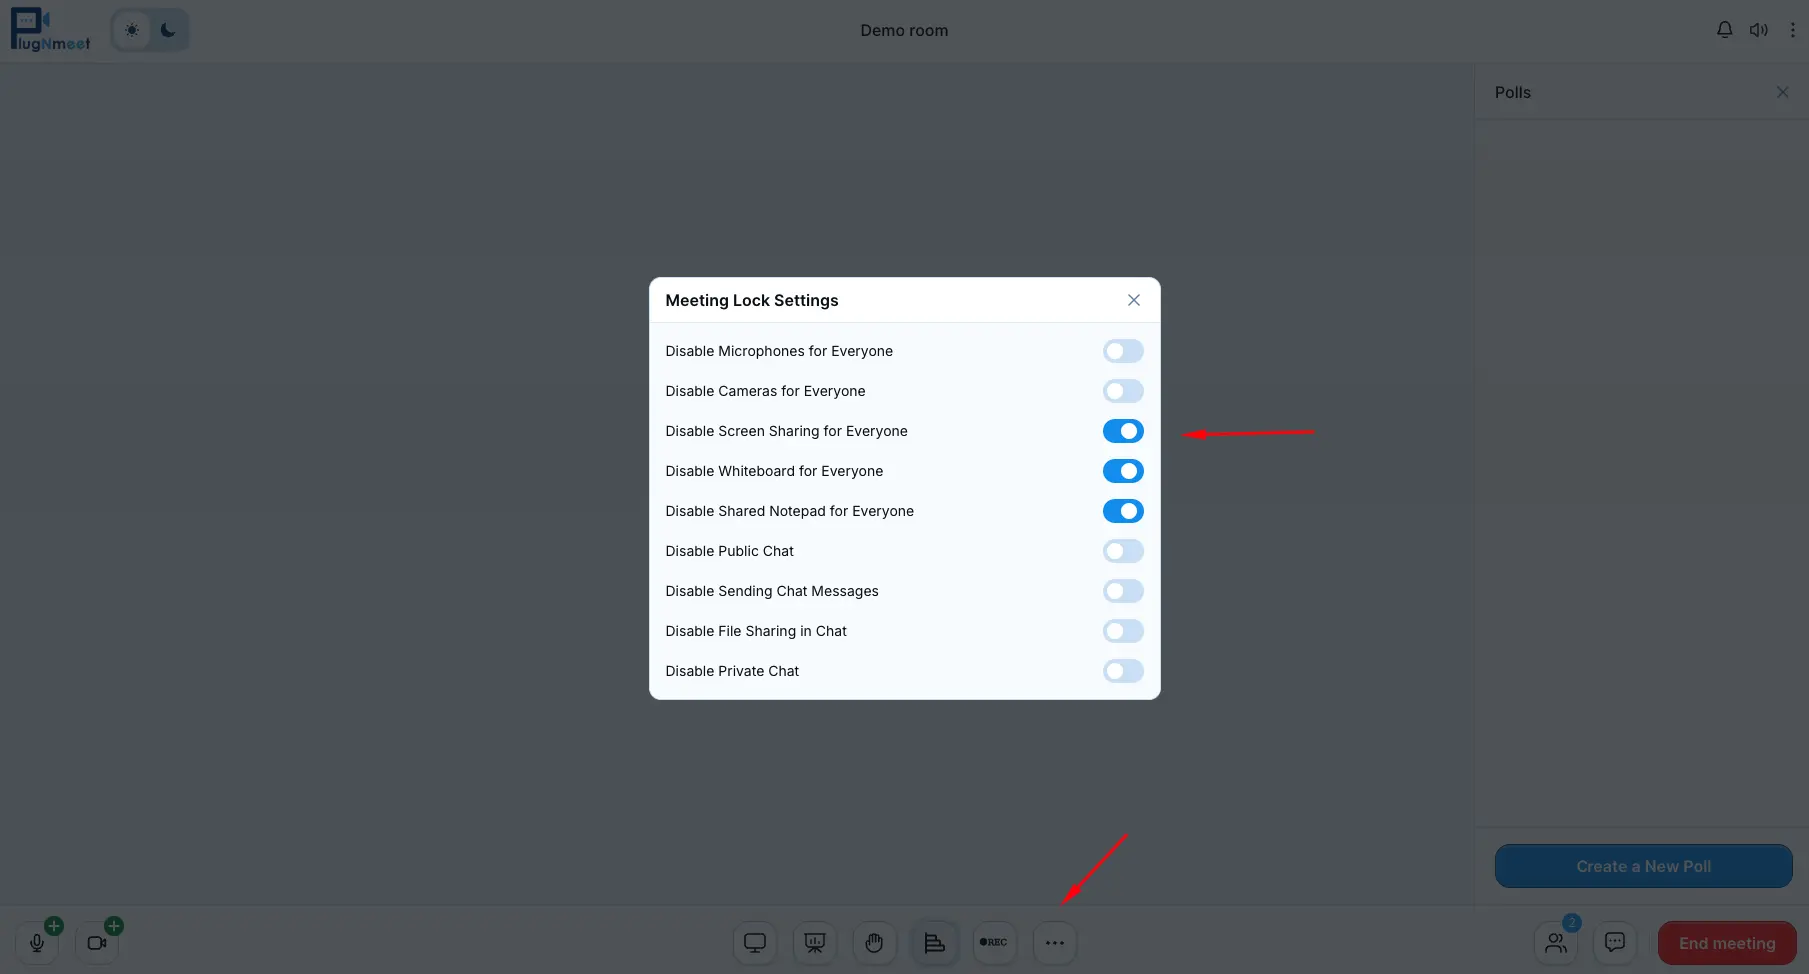
Using Room Lock Settings
This feature allows you to restrict what attendees can do.
- Open the More Options menu (...) in the footer control bar and select Meeting Lock Settings.
- From here, you can lock attendees' microphones, webcams, screen sharing, whiteboard sharing, notepad sharing, and chat abilities.
- These locks do not affect other moderators.
Muting All Users
- To mute all attendees at once, open the More Options menu (...) and select Mute all users.
- This will not mute other moderators.
Section 4: Advanced Engagement Features
Use these tools to create a more interactive and engaging session.
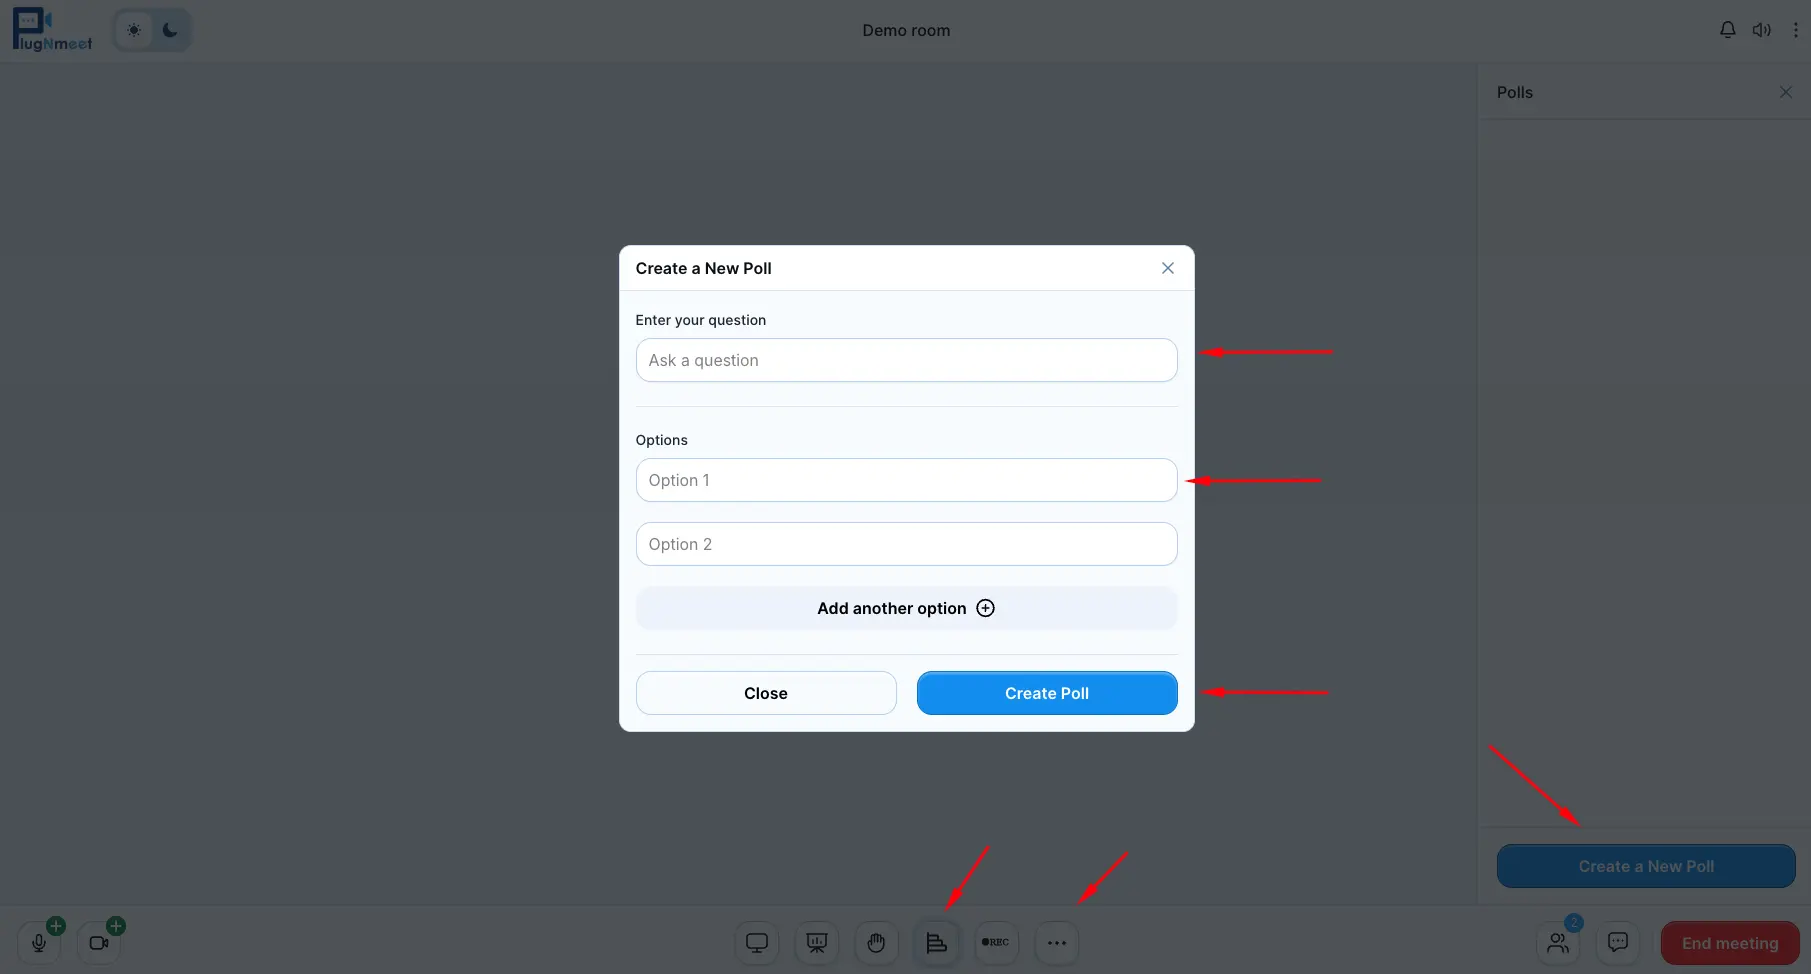
Creating and Managing Polls
- Open the More Options menu (...) in the footer control bar and select Enable Polls. This will enable polls for the meeting and you will see a Polls icon in the main footer control bar.
- Click Create new Poll.
- Define your question and answer options, then click Create poll.
- Attendees will be prompted to vote. You can view the results in real-time, end the poll, and publish the results to the public chat.
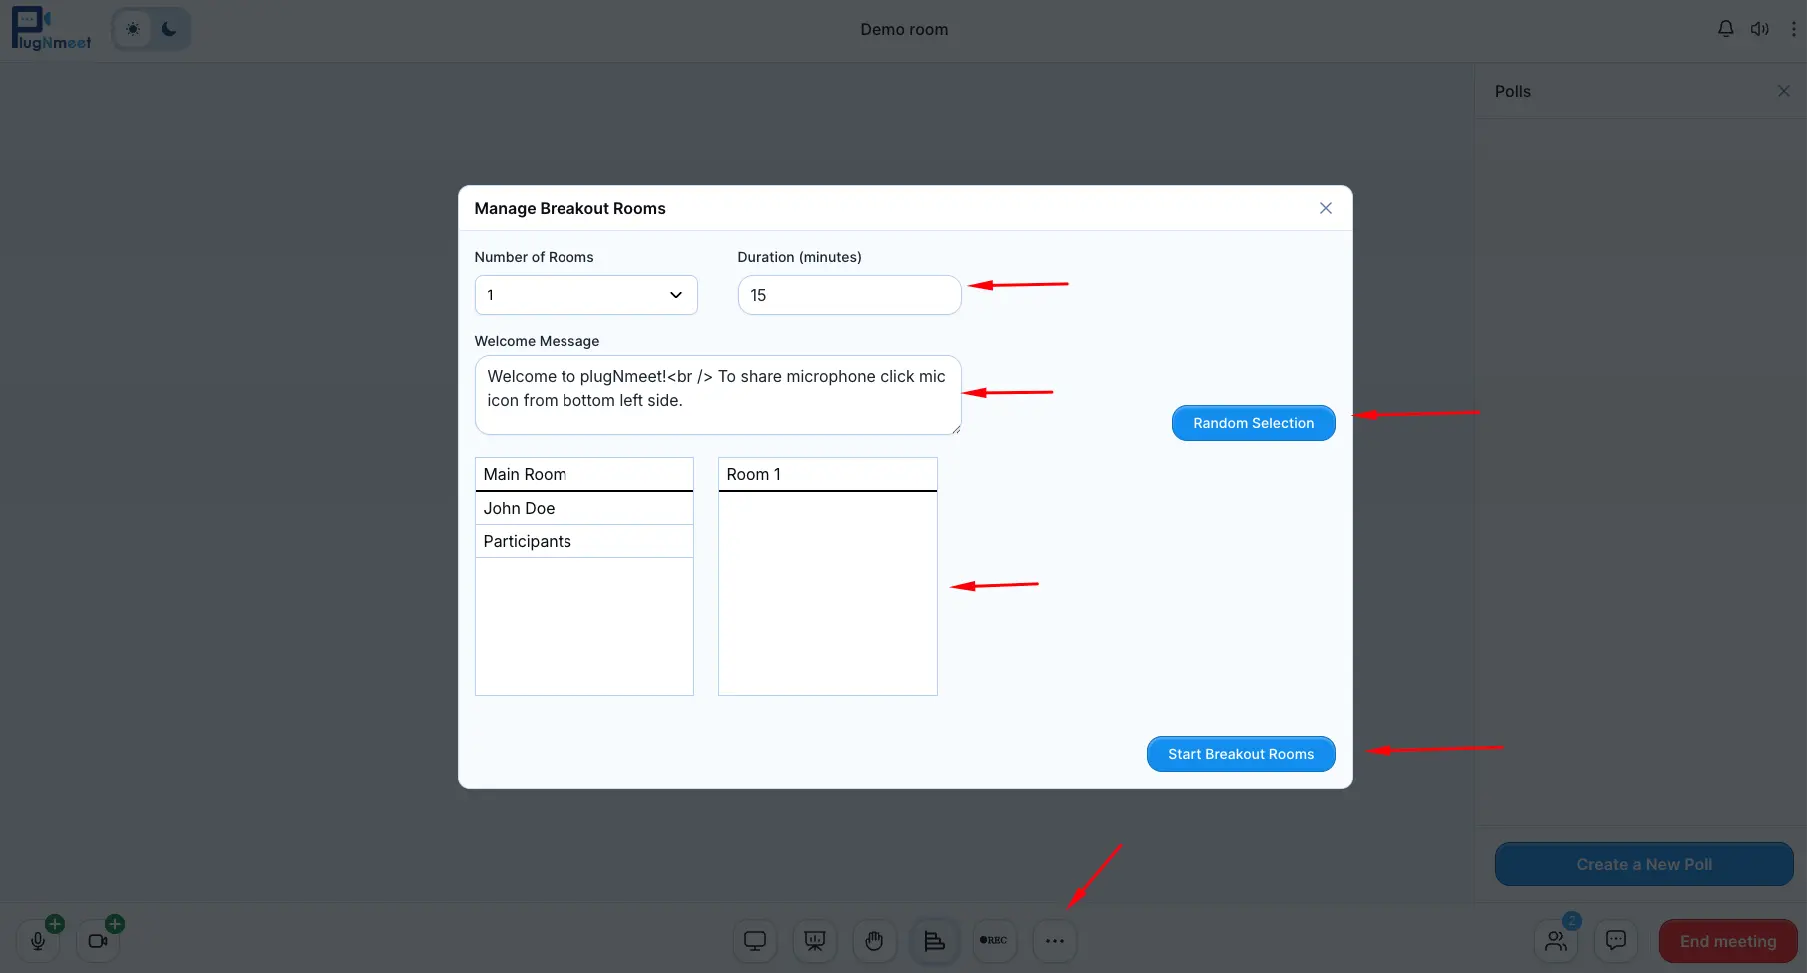
Using Breakout Rooms
Split participants into smaller, temporary groups for focused discussions.
- Open the More Options menu (...) in the footer control bar and select Manage Breakout Rooms.
- Configure the number of rooms, the duration, and assign participants (or use random assignment).
- Click Start breakout rooms.
- While rooms are active, you can broadcast messages to all groups, join specific rooms, or end the breakout session.
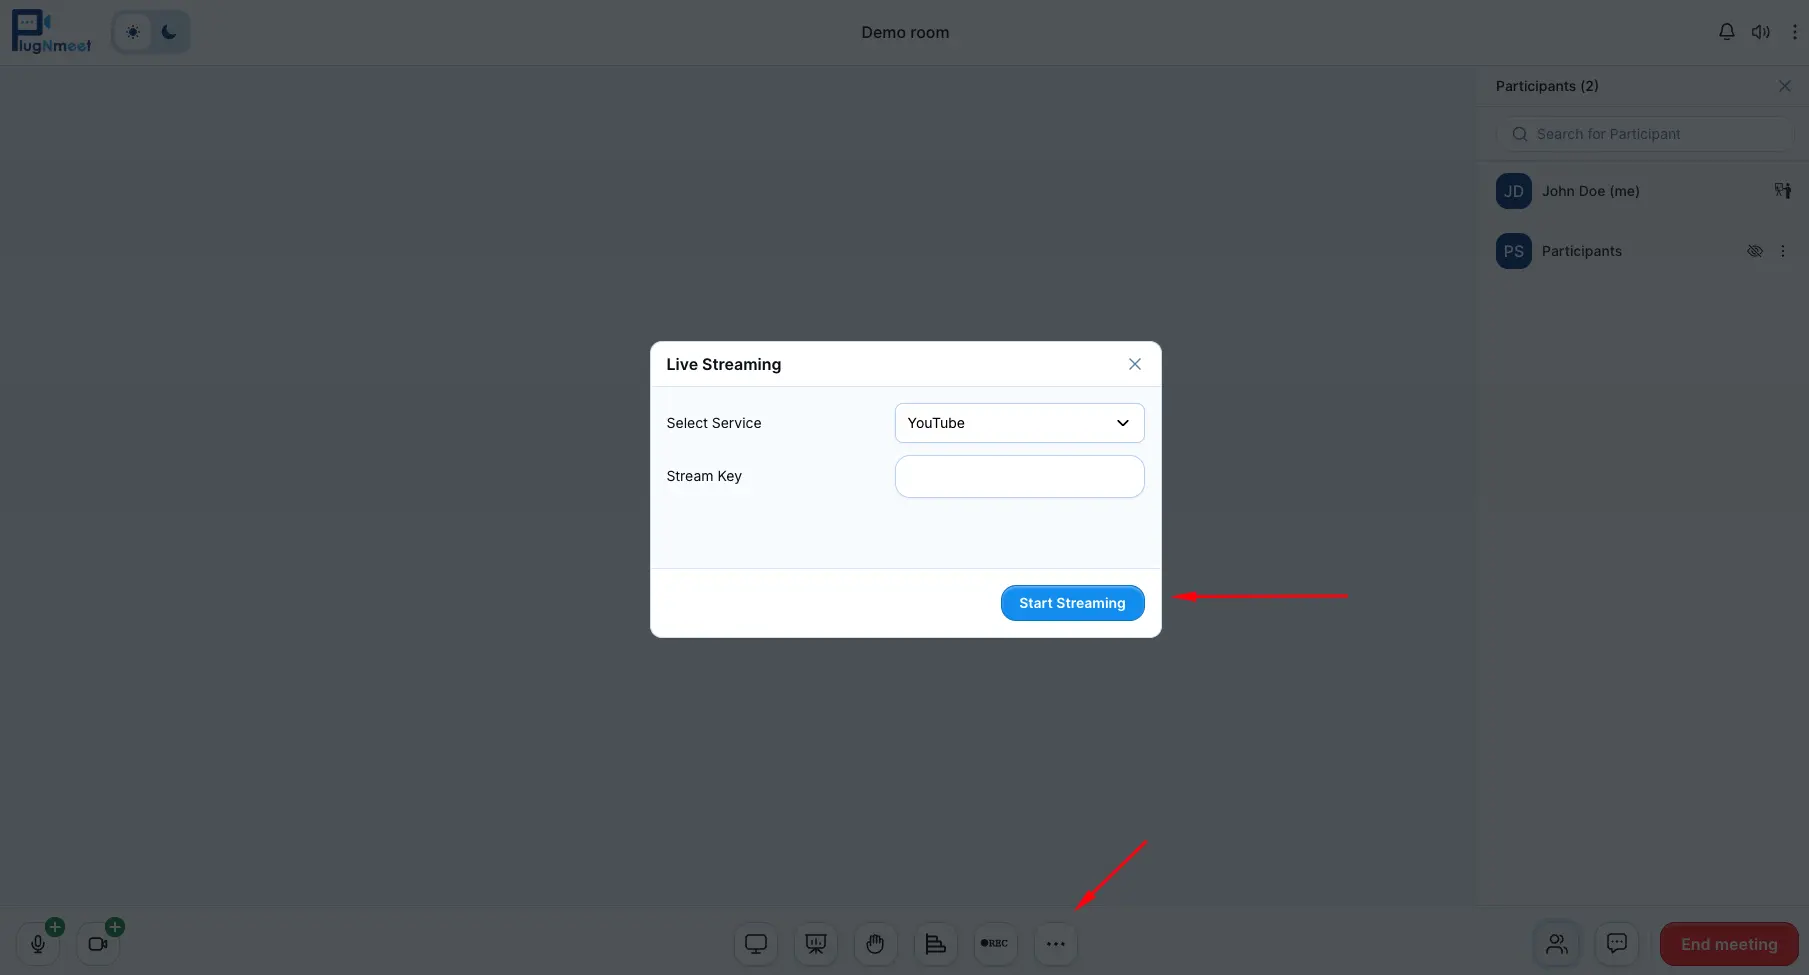
Live Streaming via RTMP
You can broadcast your meeting live to platforms like YouTube or Facebook.
- Open the More Options menu (...) in the footer control bar and select Start Live Stream.
- Enter the Stream Key and Stream URL provided by your streaming platform.
- Click Start Streaming to begin streaming.
Live stream input
Stream Like a Pro: How to Bring OBS into Your plugNmeet Room
Getting started is incredibly easy. Here’s how you do it from within your plugNmeet room:
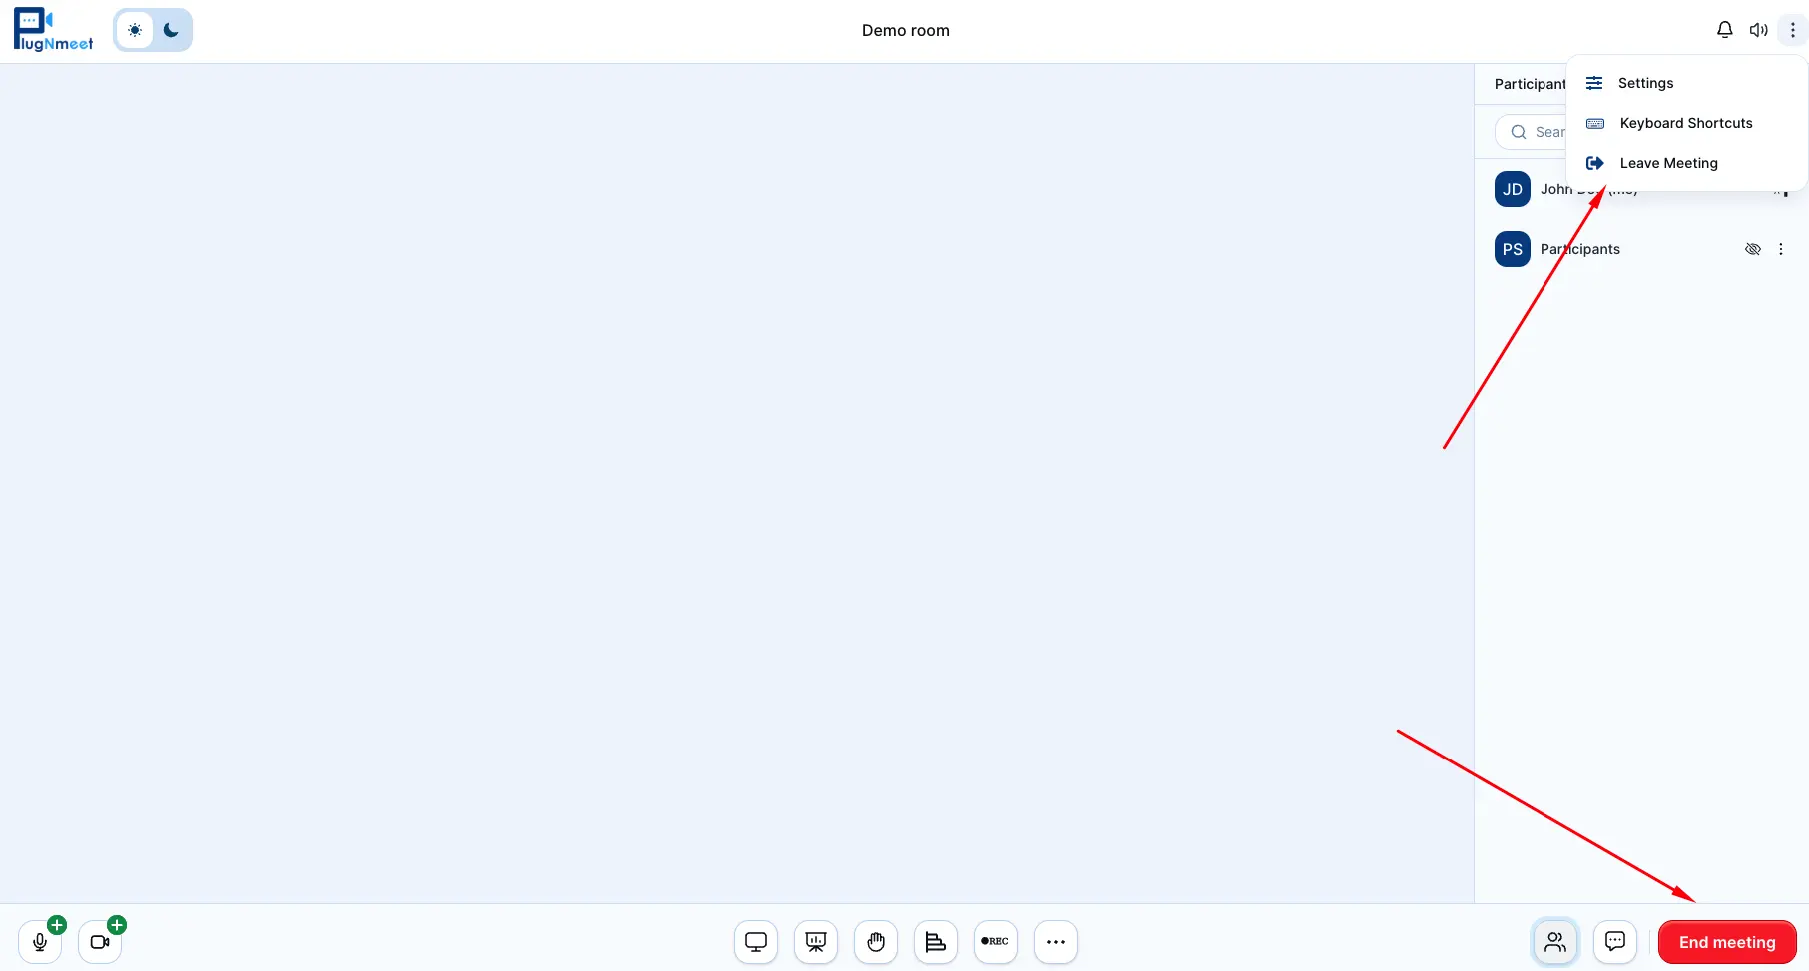
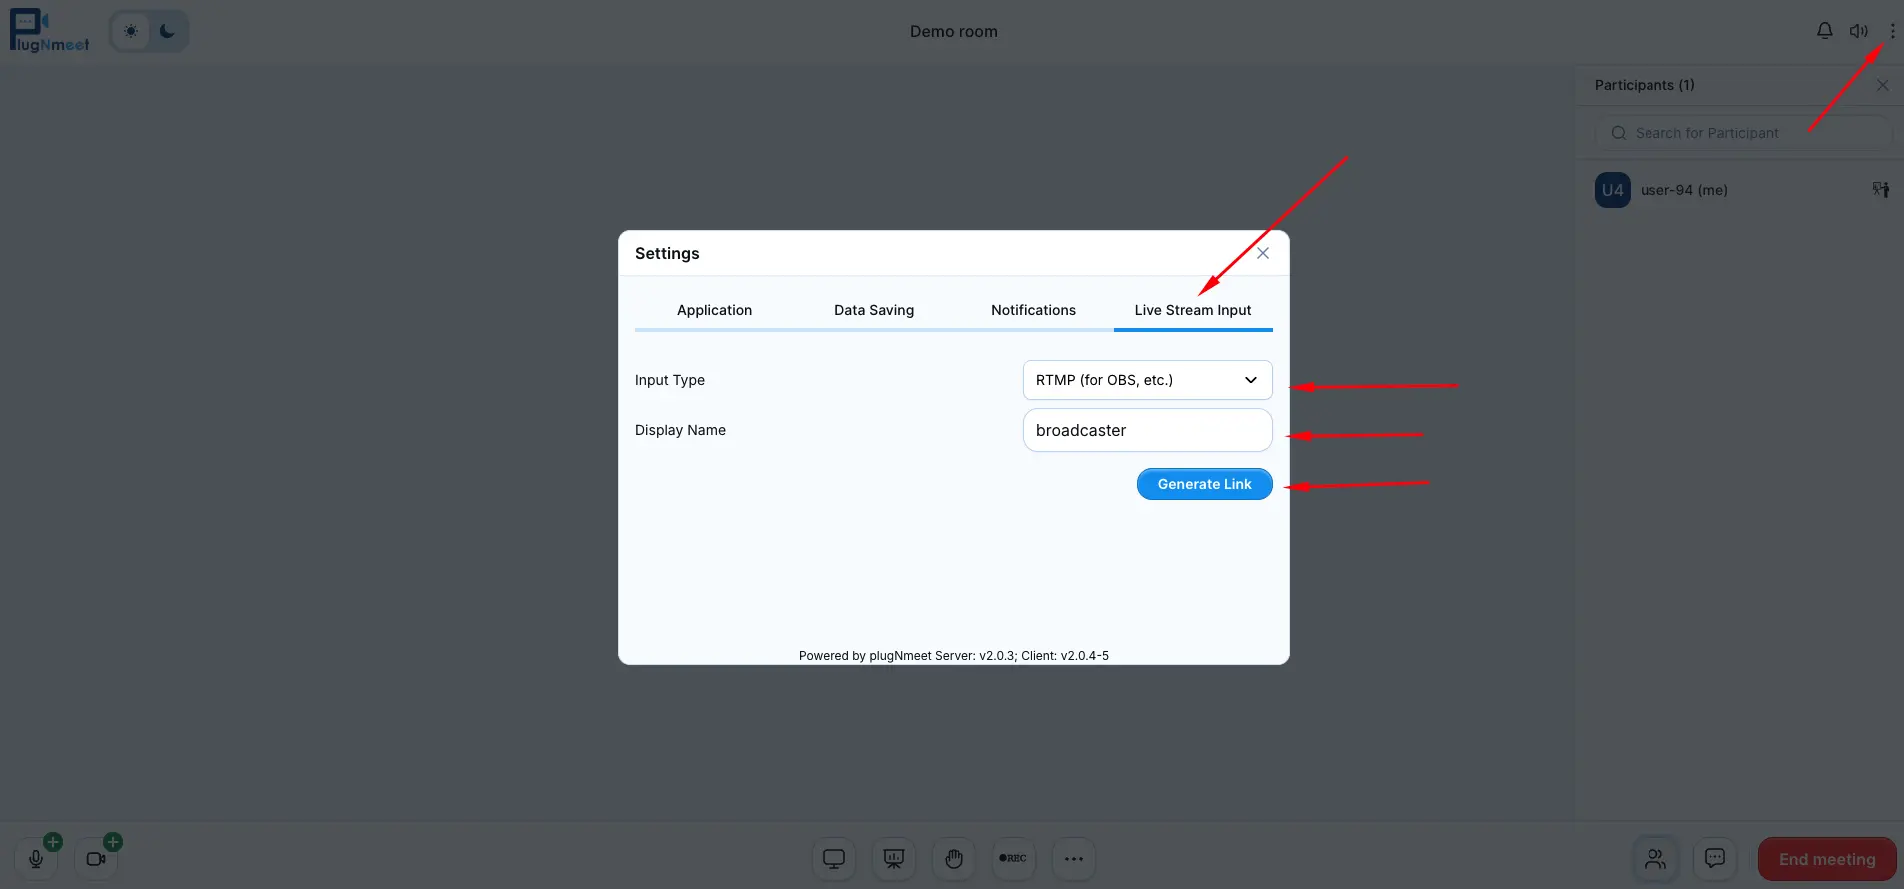
- Click the three-dot menu in the top-right corner and select Settings.
- Find Live Stream Input: In the settings panel, navigate to the Live Stream Input tab.
- Choose Your "Channel" Type (RTMP or WHIP): You'll see an option called "Input Type." This lets you choose the technology for your stream. Think of it like choosing between two types of cables to connect your camera. RTMP is for professional streaming, while WHIP is for live streaming.
- Give Your Stream a Name: In the Display Name field, you can type in a name for your stream. This is the name that will appear in the participant list. For example, "Main Presentation" or "Guest Speaker Cam." If you leave it blank, it will default to "Broadcaster."
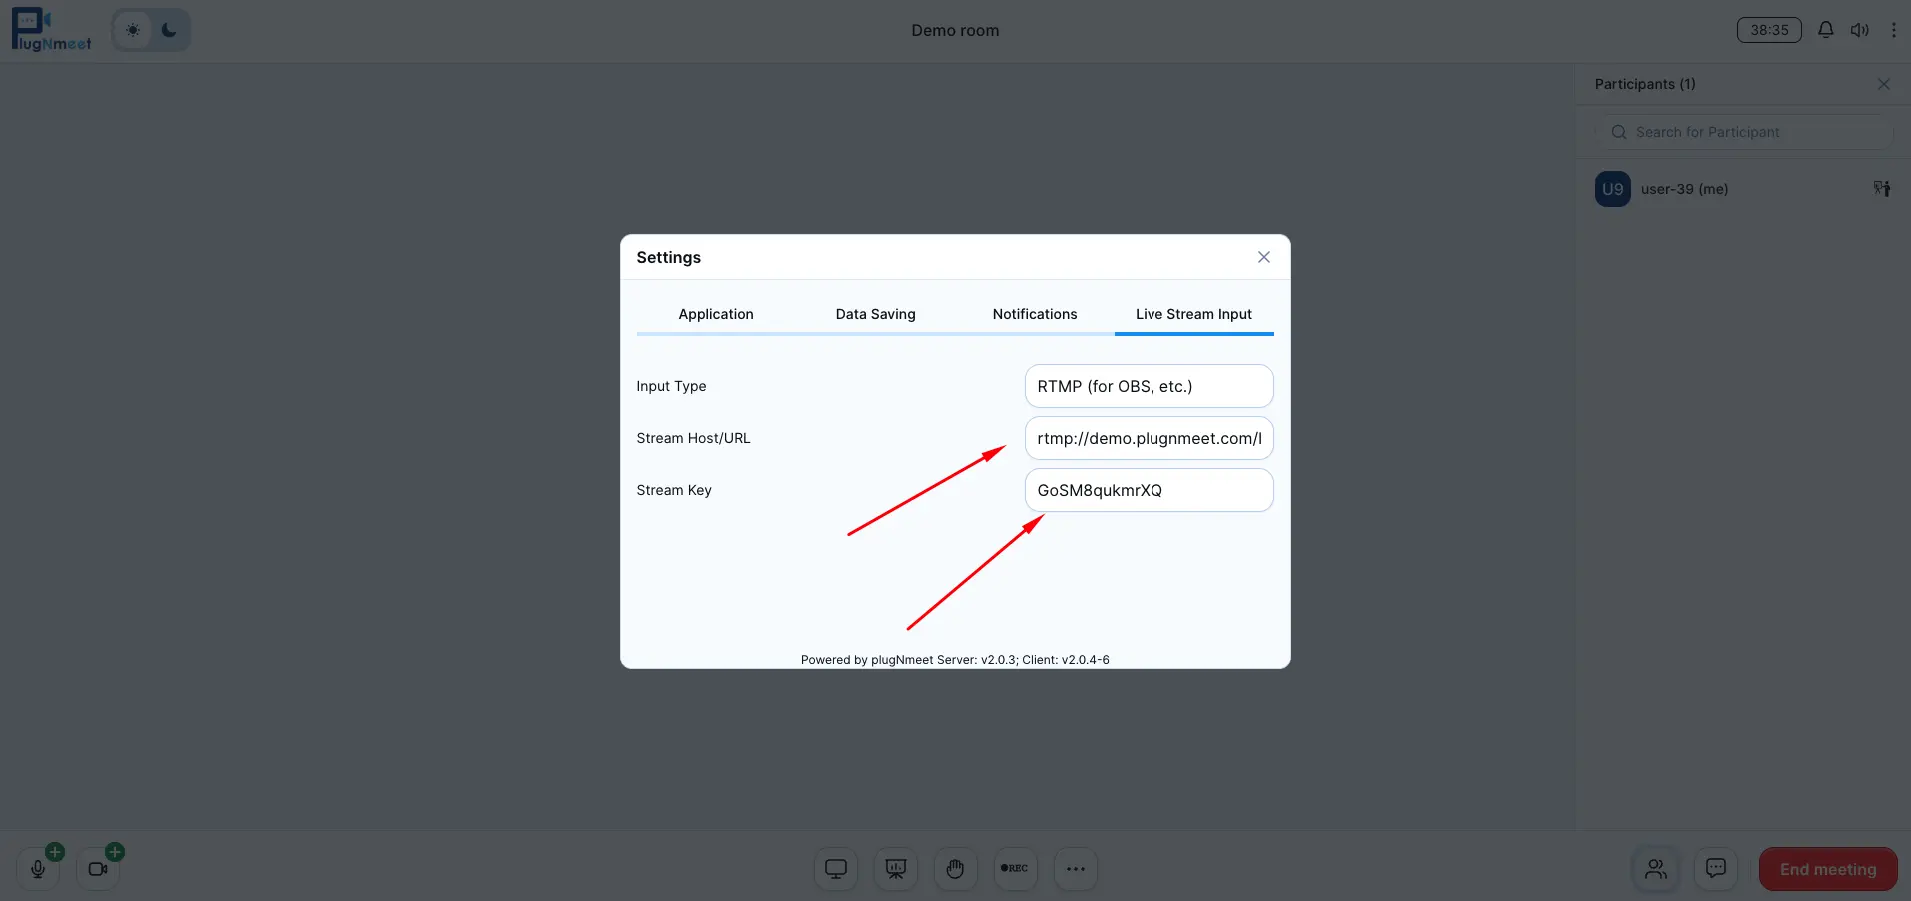
- Generate Your Private Link: Click the Generate link button. plugNmeet will instantly create a unique and secure address for your private stream. You'll see two fields: a URL and a Secret (or "Stream Key").
Connecting Your Streaming Software (like OBS)
Now, you just need to tell your software (we'll use OBS as an example) where to send the stream.
For RTMP (The Universal Standard):
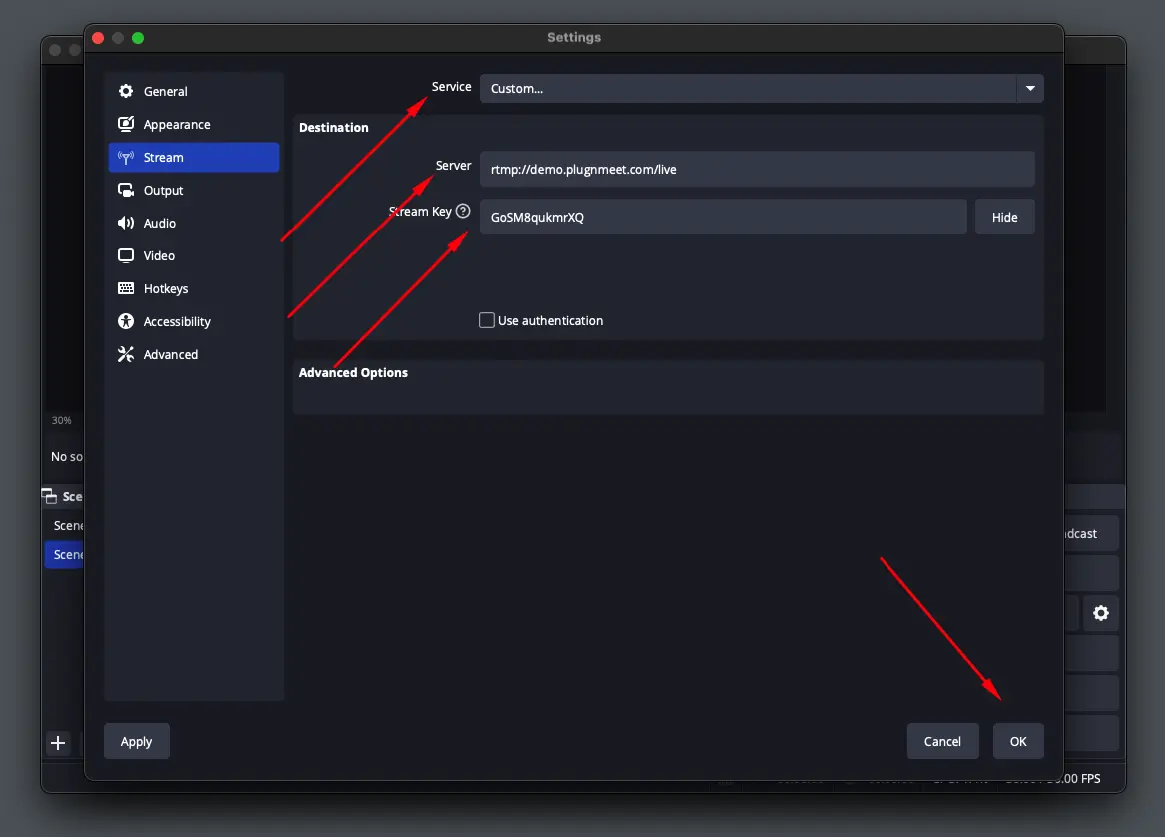
- In OBS settings, go to Stream.
- For Service, choose Custom...
- Copy the URL from plugNmeet and paste it into the Server field in OBS.
- Copy the Secret from plugNmeet and paste it into the Stream Key field in OBS.
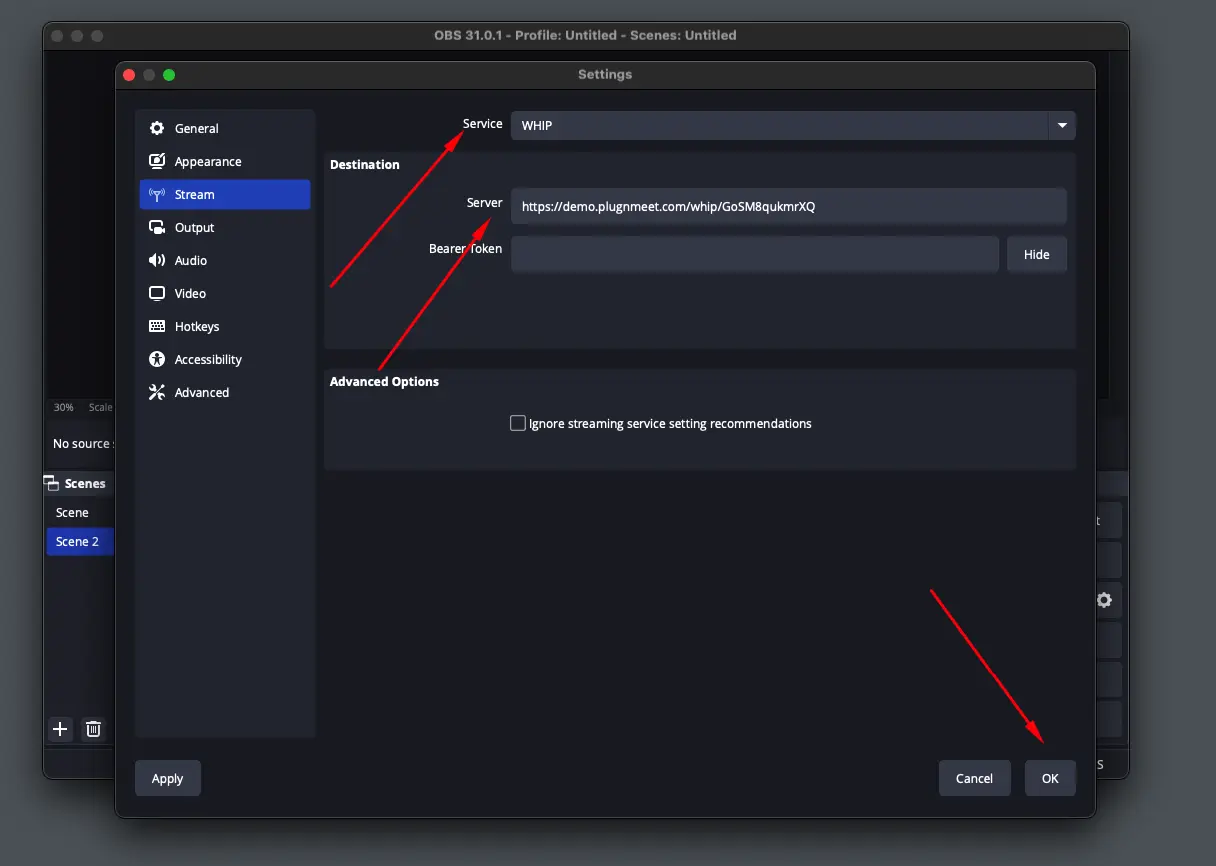
For WHIP (The Modern Choice):
- In OBS settings, go to Stream.
- For Service, choose WHIP.
- Combine the URL and Secret from plugNmeet into a single line. For example:
https://your-plugnmeet-domain.com/whip/A_LONG_SECRET_KEY_HERE - Paste this full, combined address into the Server field in OBS.
- Leave the Bearer Token field in OBS blank.
Once you hit "Start Streaming" in OBS, your stream will magically appear as a new participant in your plugNmeet room for everyone to see! You can checkout our blog post for more details. Stream Like a Pro: How to Bring OBS into Your plugNmeet Room
SIP/VoIP Dial-In
This is an advanced feature that will only be available if your system administrator has configured the SIP integration on the server.
This feature allows participants to join the meeting's audio by dialing a standard telephone number.
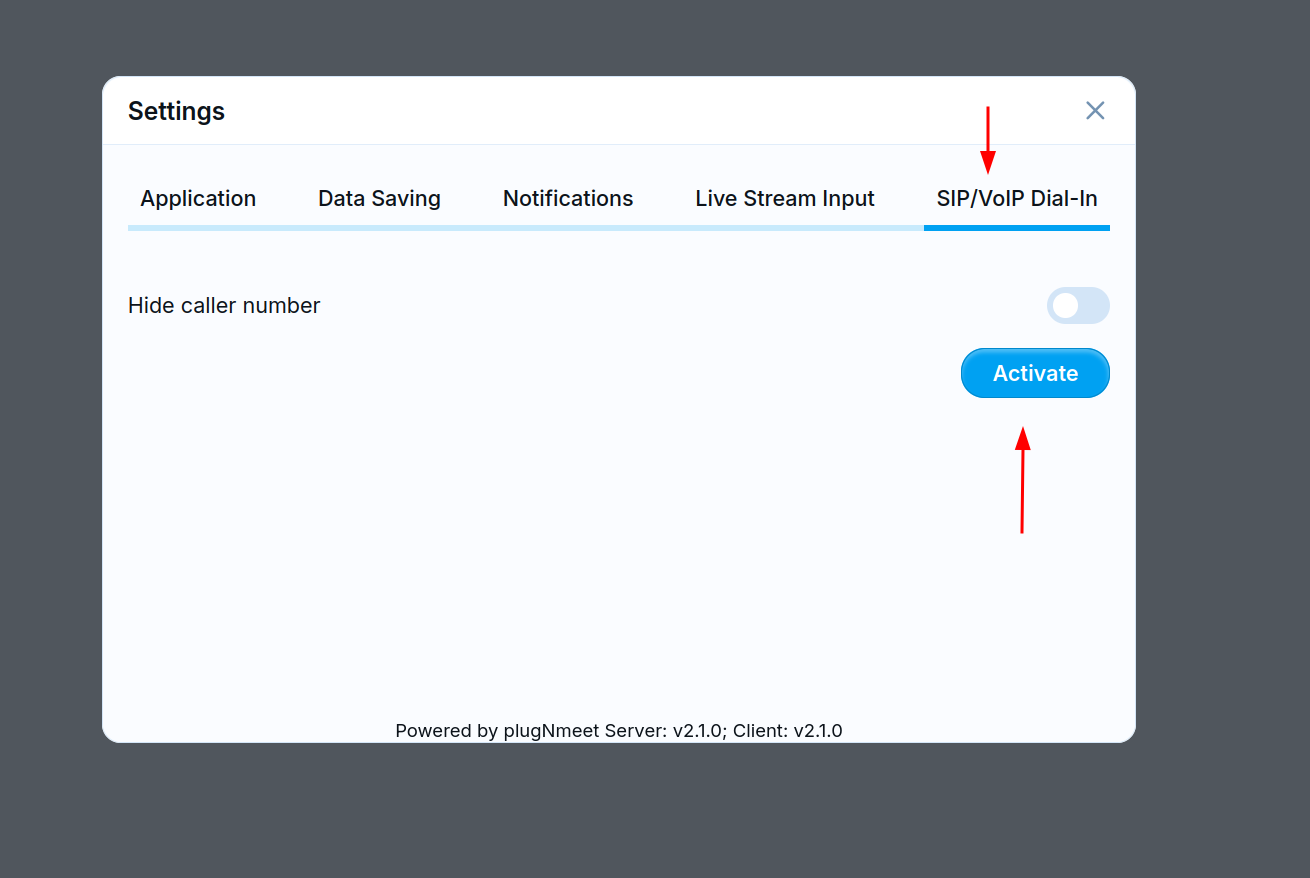
- Click the three-dot menu in the top-right corner and select Settings.
- Navigate to the SIP/VoIP Dial-In tab.
- Enable Service: If the service is not already running, click the Activate button to start the SIP gateway for this session.
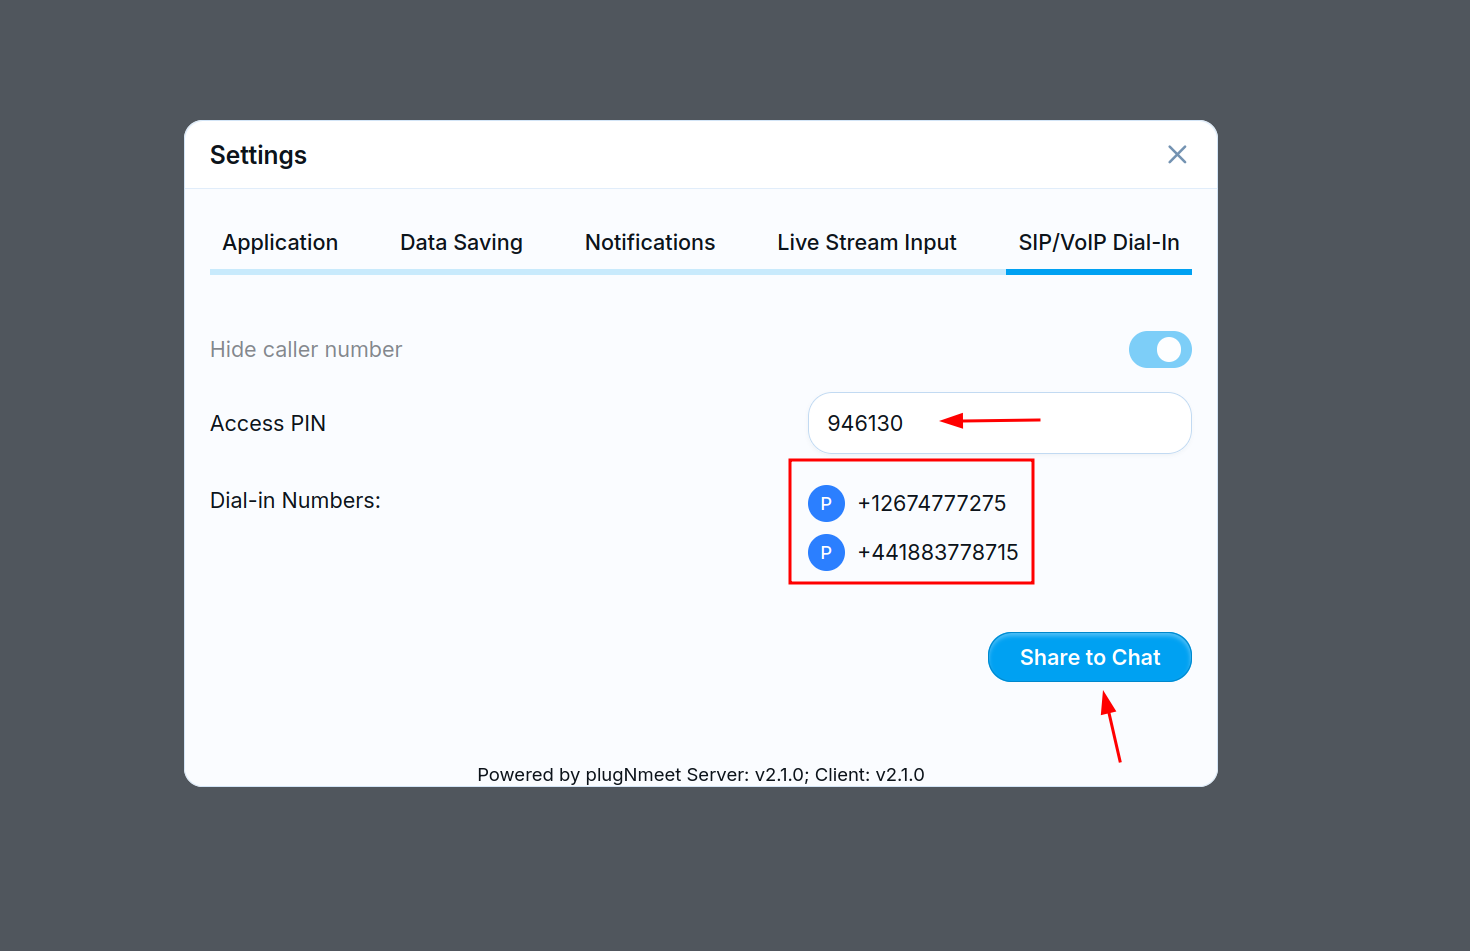
- View Dial-In Information: Once enabled, this panel will display the Dial-in Number(s) and the unique PIN for the current meeting.
- Share in Chat: Click the Share to Chat button to automatically post the dial-in number and PIN to the public chat, making it easy for all participants to see.
Section 5: Session Management
These actions control the overall meeting session.
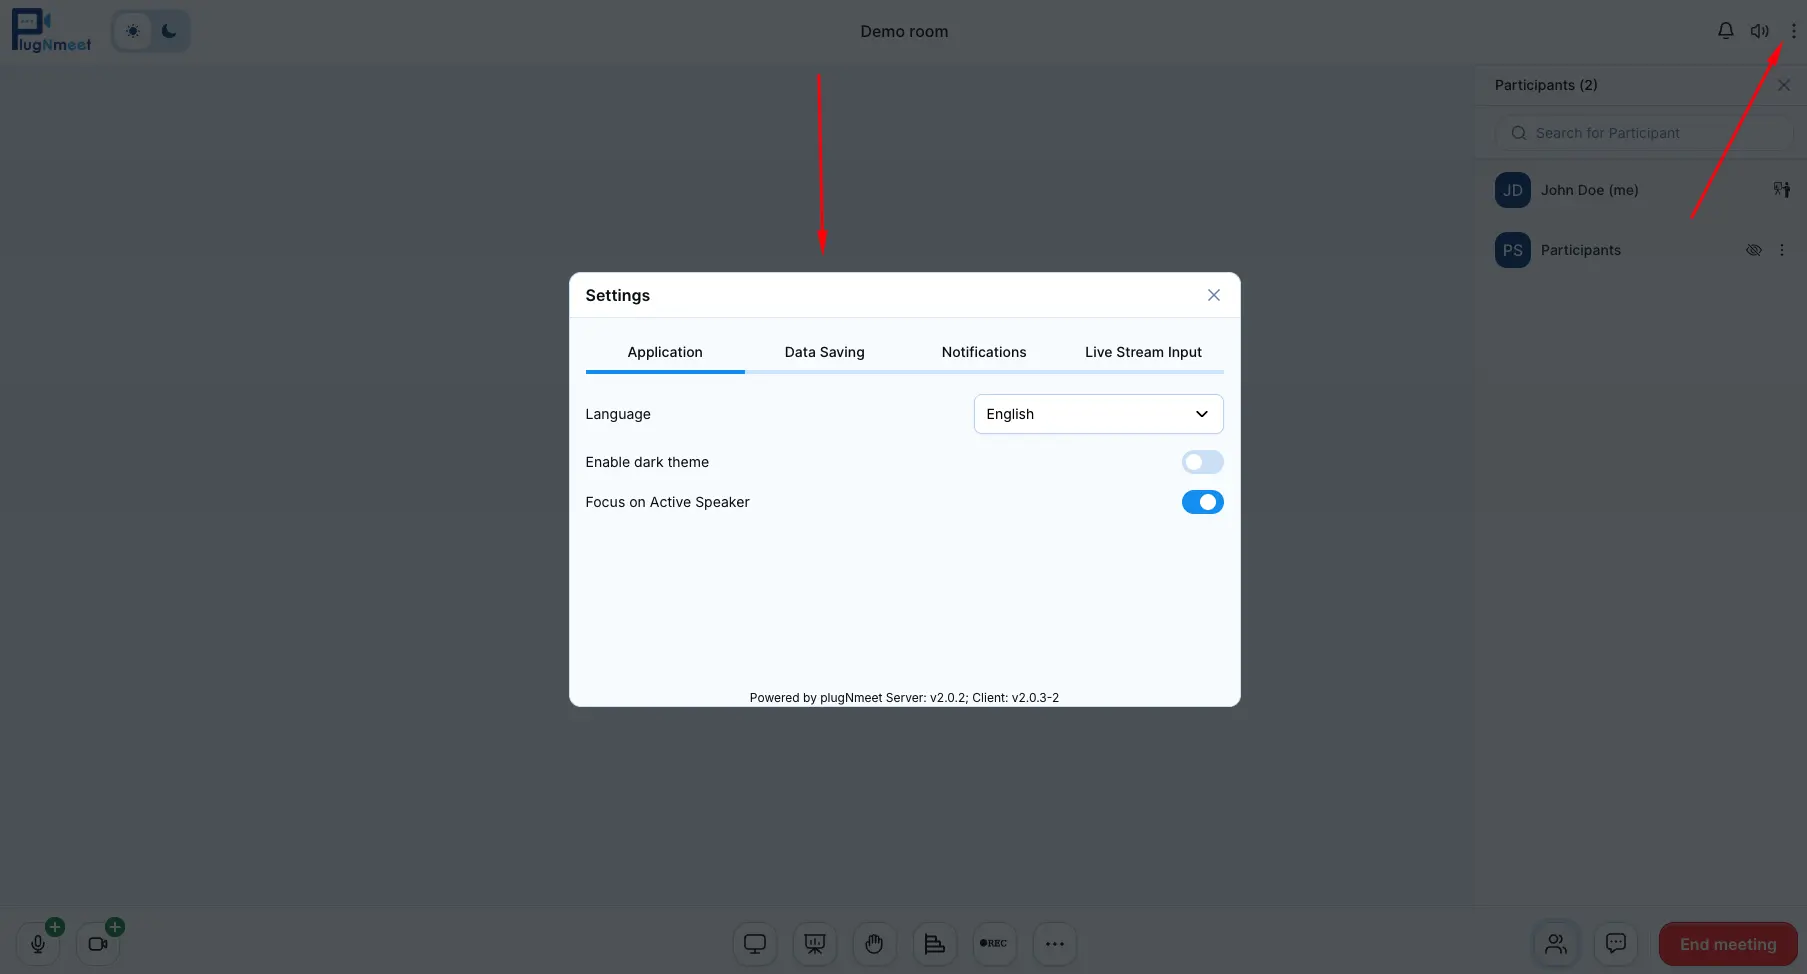
Application Settings
- Click the three-dot menu in the top-right corner and select Settings.
- Here you can change the application language, manage data-saving preferences, toggle notification sounds, and manage Live Stream settings.
Ending vs. Logging Out of a Meeting
- Leave Meeting: If you select Leave Meeting from the top-right menu, you will leave the meeting, but the session will remain active for other participants.
- End Meeting: If you select End meeting, the session will be terminated for everyone.