PHP Quick Start: Create and Join a Meeting
This tutorial provides a complete, step-by-step example of how to use the plugNmeet-sdk-php library to create a new meeting room and generate a secure join token for a user.
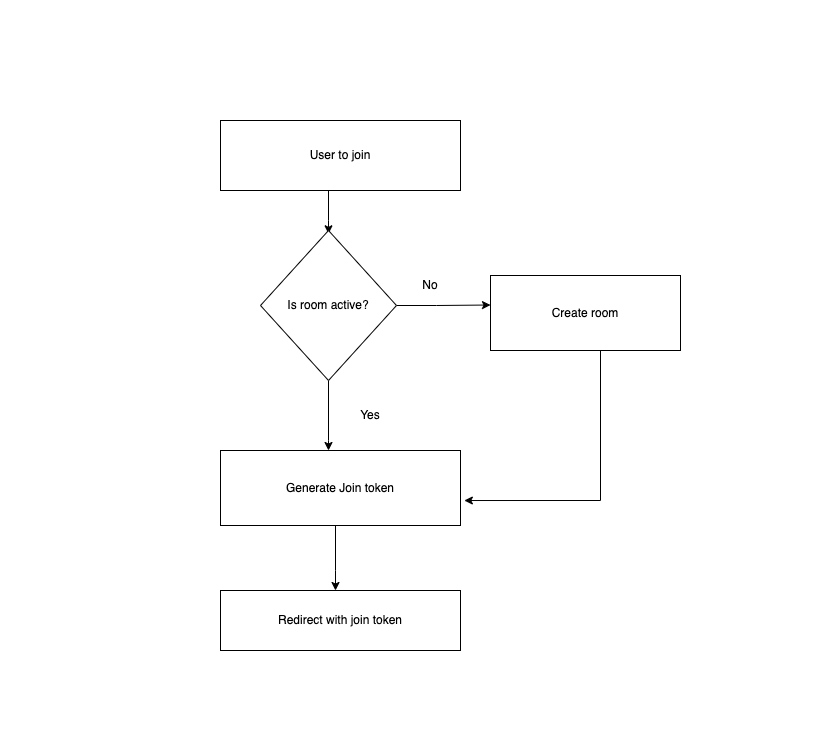
The logic follows a common workflow: check if a room exists, create it if it doesn't, and then generate a URL for a user to join.
Prerequisites
Before you begin, ensure you have the following:
- A working PlugNmeet server with your API Key and Secret.
- The latest version of the plugNmeet-sdk-php library downloaded.
Step 1: Setup & Configuration
First, create a PHP file (e.g., quickJoin.php) and include the plugNmeetConnect.php class from the SDK. Then, create a configuration object with your server details.
<?php
require __DIR__ . "/plugNmeetConnect.php";

// Step 1: Configuration
$config = new stdClass();
$config->plugnmeet_server_url = "http://localhost:8080"; // Your server URL
$config->plugnmeet_api_key = "plugnmeet"; // Your API Key
$config->plugnmeet_secret = "zumyyYWqv7KR2kUqvYdq4z4sXg7XTBD2ljT6"; // Your API Secret

$connect = new plugNmeetConnect($config);
Step 2: Define Room & User Parameters
Next, define the basic parameters for the room you want to create and the user who will be joining. The $roomMetadata array allows you to customize every aspect of the room's features, from enabling webcams to setting default lock permissions.
// Step 2: Room and User definitions
$roomId = "room01"; // Must be unique. You can also use $connect->getUUID();
$max_participants = 0; // 0 = no limit
$user_full_name = "Your Name";
$userId = "your-unique-user-id"; // Must be unique for each user.
$isAdmin = true;

// Define all the features for this specific room.
$roomMetadata = array(
    "room_features" => array(
        "allow_webcams" => true,
        "mute_on_start" => false,
        "allow_screen_share" => true,
        "allow_rtmp" => true,
        "allow_view_other_webcams" => true,
        "allow_view_other_users_list" => true,
        "admin_only_webcams" => false,
        "enable_analytics" => true,
        "room_duration" => 0, // in minutes. 0 = no limit/unlimited
        "allow_virtual_bg" => true,
        "allow_raise_hand" => true,
        // if false then you'll need to provide unique user id
        "auto_gen_user_id" => true,
        "recording_features" => array(
            "is_allow" => true,
            "is_allow_cloud" => true,
            "is_allow_local" => true,
            "enable_auto_cloud_recording" => false
        ),
        "chat_features" => array(
            "is_allow" => true,
            "is_allow_file_upload" => true
        ),
        "shared_note_pad_features" => array(
            "is_allow" => true
        ),
        "whiteboard_features" => array(
            "is_allow" => true,
            //"preload_file" => "https://mydomain.com/text_book.pdf"
        ),
        "external_media_player_features" => array(
            "is_allow" => true
        ),
        "waiting_room_features" => array(
            "is_active" => false,
        ),
        "breakout_room_features" => array(
            "is_allow" => true,
            "allowed_number_rooms" => 2
        ),
        "display_external_link_features" => array(
            "is_allow" => true,
        ),
        "ingress_features" => array(
            "is_allow" => true,
        ),
        "polls_features" => array(
            "is_allow" => true,
        ),
        "insights_features" => array(
            "is_allow" => true,
            "transcription_features" => array(
                "is_allow" => true,
                "is_allow_translation" => true,
                "is_allow_speech_synthesis" => true,
            ),
            "chat_translation_features" => array(
                "is_allow" => true,
            ),
            "ai_features" => array(
                "is_allow" => true,
                "ai_text_chat_features" => array(
                    "is_allow" => true,
                ),
                "meeting_summarization_features" => array(
                    "is_allow" => true,
                )
            )
        ),
        "end_to_end_encryption_features" => array(
            "is_enabled" => false,
            "enabled_self_insert_encryption_key" => false,
            "included_chat_messages" => false,
            // this may use more CPU for the user end.
            // do not enable it unless really necessary
            "included_whiteboard" => false,
        ),
    ),
    "default_lock_settings" => array(
        "lock_microphone" => false,
        "lock_webcam" => false,
        "lock_screen_sharing" => true,
        "lock_whiteboard" => true,
        "lock_shared_notepad" => true,
        "lock_chat" => false,
        "lock_chat_send_message" => false,
        "lock_chat_file_share" => false,
        "lock_private_chat" => false // user can always send private message to moderator
    ),
    // copyright_conf will only work if server config has been
    // set true for `allow_override` otherwise this will ignore
    "copyright_conf" => array(
        "display" => true,
        "text" => "Powered by <a href=\"https://www.plugnmeet.org\" target=\"_blank\">plugNmeet</a>"
    )
);
Step 3: The Logic Flow - Check, Create, Join
The following code blocks implement the core logic.
3.1 Check if the Room is Active
First, we call the API to see if a room with the specified $roomId already exists and is active.
$isRoomActive = false;
$output = new stdClass();
$output->status = false;

try {
    $res = $connect->isRoomActive($roomId);
    if (!$res->getStatus()) {
        $output->msg = $res->getMsg();
    } else {
        $isRoomActive = $res->getIsActive();
        $output->status = true;
    }

} catch (Exception $e) {
    $output->msg = $e->getMessage();
}
3.2 If Not, Create the Room
If the room is not active, we proceed to create it using the parameters we defined earlier.
if (!$isRoomActive && $output->status) {
    try {
        $create = $connect->createRoom($roomId, "Test room", $roomMetadata, "Welcome to room", "", "", $max_participants);

        $isRoomActive = $create->getStatus();
        $output->status = $create->getStatus();
        $output->msg = $create->getMsg();
    } catch (Exception $e) {
        $output->msg = $e->getMessage();
    }
}
3.3 Generate the Join Token
Once we have confirmed the room is active (either because it already existed or we just created it), we can generate a secure, single-use join token for our user.
if ($isRoomActive && $output->status) {
    try {
        $join = $connect->getJoinToken($roomId, $user_full_name, $userId, $isAdmin);

        if ($join->getStatus()) {
            $output->token = "<br>" . $join->getToken();
            $output->url = "<br>" . $config->plugnmeet_server_url . "?access_token=" . $join->getToken();
            // or you can set cookie name `pnm_access_token` with that token & redirect
        }
        $output->status = $join->getStatus();
        $output->msg = $join->getMsg();
    } catch (Exception $e) {
        $output->msg = $e->getMessage();
    }
}
Step 4: Redirecting the User
After successfully generating the join token, the complete meeting URL will be in the $output->url variable. You can now redirect your user to this URL to join the meeting.
if ($output->status) {
    header("Location: " . $output->url);
    exit;
} else {
    echo $output->msg;
}
Next Steps
This quick start guide uses the simplest method to get a user into a room. For a more deeply integrated experience, you can build a custom client interface using the getClientFiles() API method. This allows you to host the client on your own page without using an iframe.
See the conference.php file in our PHP-SDK for a complete example.