Moderator
1. Entering the room
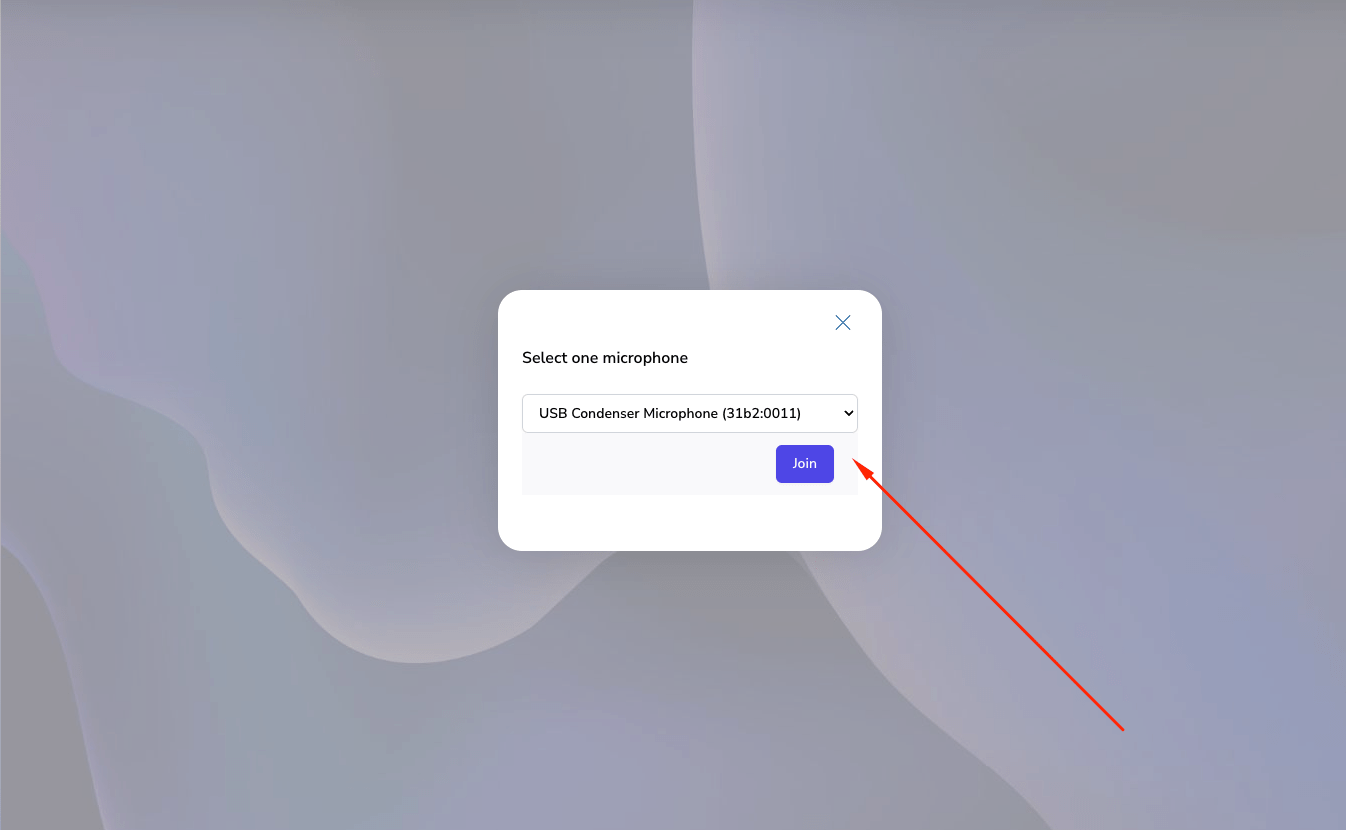
When we enter the room, two options will appear: "Microphone" and "Listen only". If we press on "Microphone", it means that we want to actively participate by audio in the meeting.
Whereas, if we select "Listen only", you can only hear what the other participants say, but you will not be able to participate by audio.
-
Microphone
- After having selected the "Microphone" option, it will tell you through a box to select the microphone you want to use. It is here, where you can select the source of your microphone, either the microphone of the device you use or the headphones you have connected.
- Finally, you click "Join" and you will be able to talk in the meeting.
-
Listen only
If you click on the "listen only" option, immediately afterwards it will direct you to the meeting so that you can only listen to the interventions of the other participants.
Important: The option you choose at the start of the meeting, either "Microphone" or "listen only", does not mean that it will be final for the entire meeting. Since, then you can change the settings again during the meeting.

2. Audio
-
Turn Microphone on or off
Being inside the meeting, we can choose whether to activate or deactivate the microphone. How you can do this will depend on how you entered the room.
- If "Microphone" was chosen at the time of entering the Room
- What you will have to do is go to the bottom left, find the microphone icon.
- Then, you can mute/unmute the microphone by click the Microphone icon.
- And in case you want to do more settings on your microphone, you can click that small down arrow icon to see more options.
- If "listen only" was chosen at the time of entering the Room
- What you will have to do is go to the lower left part, locate the microphone icon, and click on it.
- A box will immediately appear in which you will need to select the microphone of your preference. Finally, you will need to click on "Join".
- At that point your microphone will be activated.
- Then you can mute/unmute the microphone by click the Microphone icon or click that down arrow icon to see more options.
- If "Microphone" was chosen at the time of entering the Room
-
Select the microphone of preference
While by the time you entered the meeting, you may have already set up the microphone of preference, you can do it again while the meeting is being held. For that, you need to go to the microphone icon and then select within the first options of the drop-down list, the microphone you prefer to use.
This way of choosing the microphone can be used if the microphone has already been activated.
3. Video
When the meeting is taking place, you can choose to turn on the webcam.
-
Activate webcam
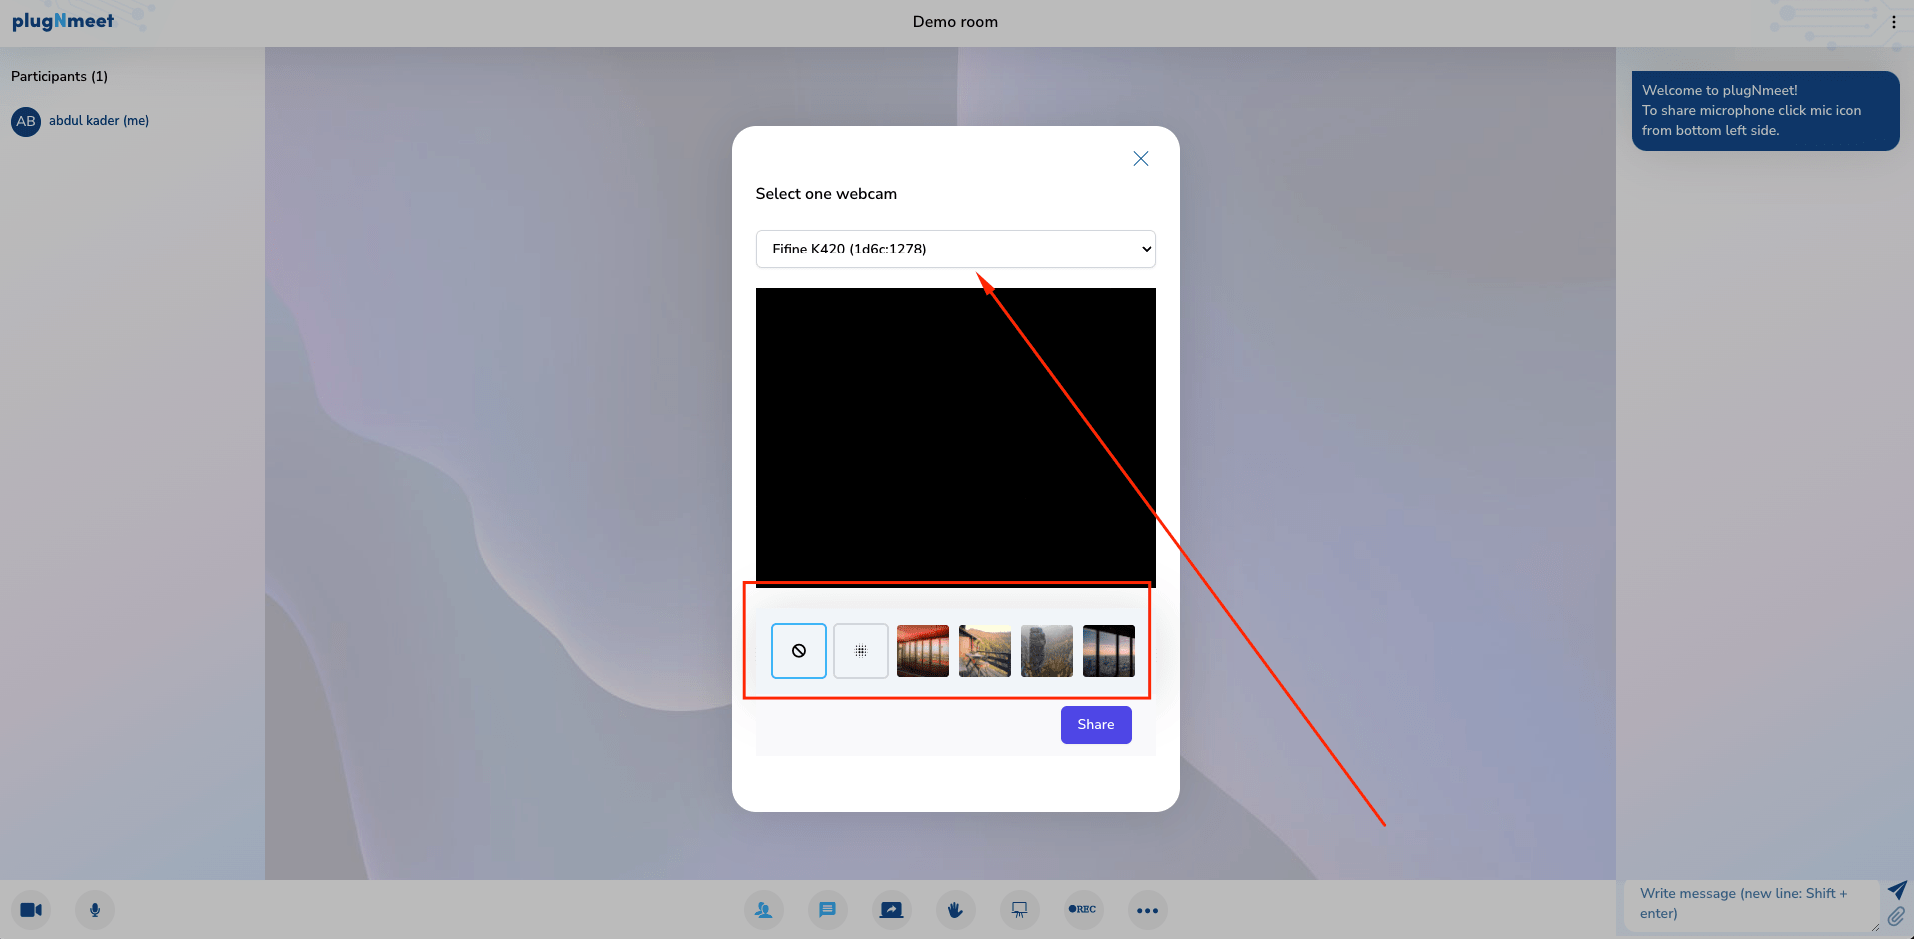
- To do this you need to go to the bottom left and press on the camera icon.
- After that, you will be asked “ plugNmeet requires you to give it access permission to your camera ”, in which you will have to select "Allow".
- Immediately afterwards, it will be able to display you on your screen.
- Below your video image, you will see some options, these are virtual background options. You can choose a virtual background options if you want.
- Finally, you click on "Share".
This is how you will have already activated your webcam.
- Turn off webcam
- In case you no longer want to share your webcam, what you will have to do is go to the camera icon.
- Just click the camera icon once
- Your webcam will no longer be shared immediately.
4. Share Screen
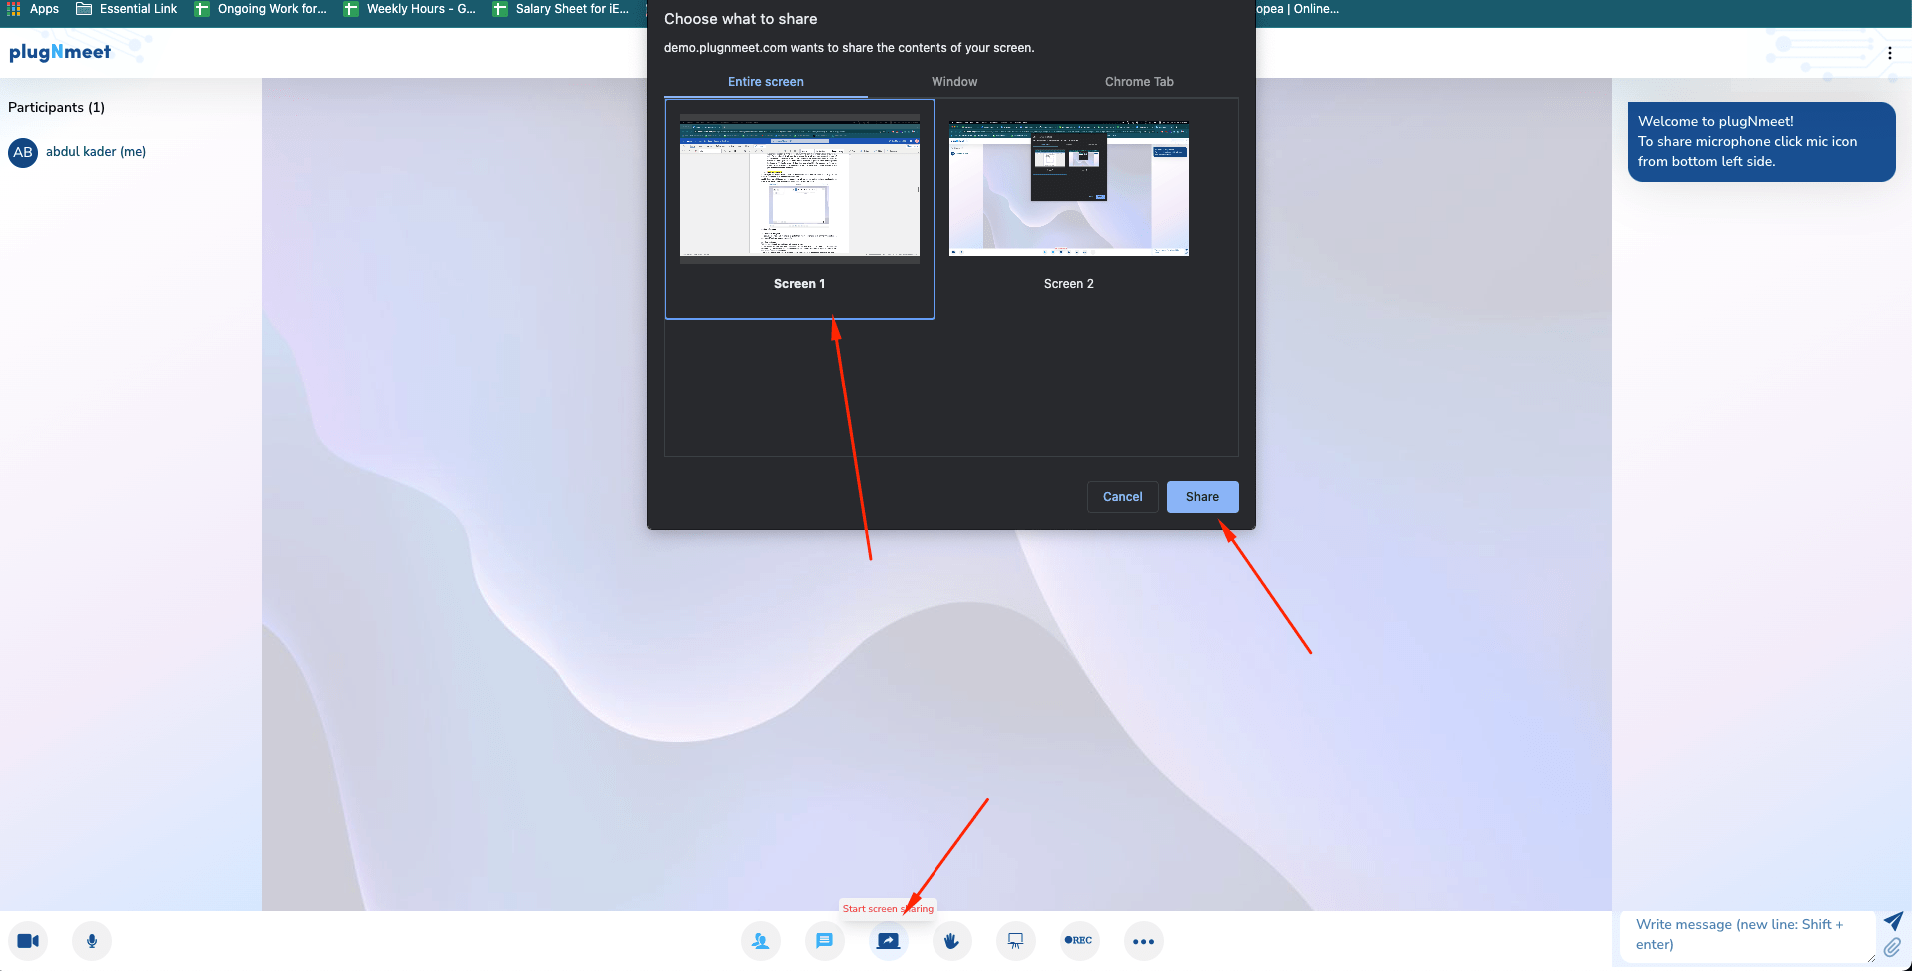
- To share, you will have to go to the bottom center and select the icon of a laptop with an arrow.
- Then, a box will appear where you can select which window, browser tab or screen you want to share.
- You click on “Share”.
- Screen sharing will now be taking place.
- Later, in case you want to stop sharing the screen, you must go again to the icon of a laptop with an arrow.
5. Whiteboard
In the meeting it is possible to use a shared whiteboard among all participants.
-
Activate whiteboard
To activate the whiteboard, you have to go to the bottom center and click on the whiteboard icon. And the whiteboard will have already been activated.
-
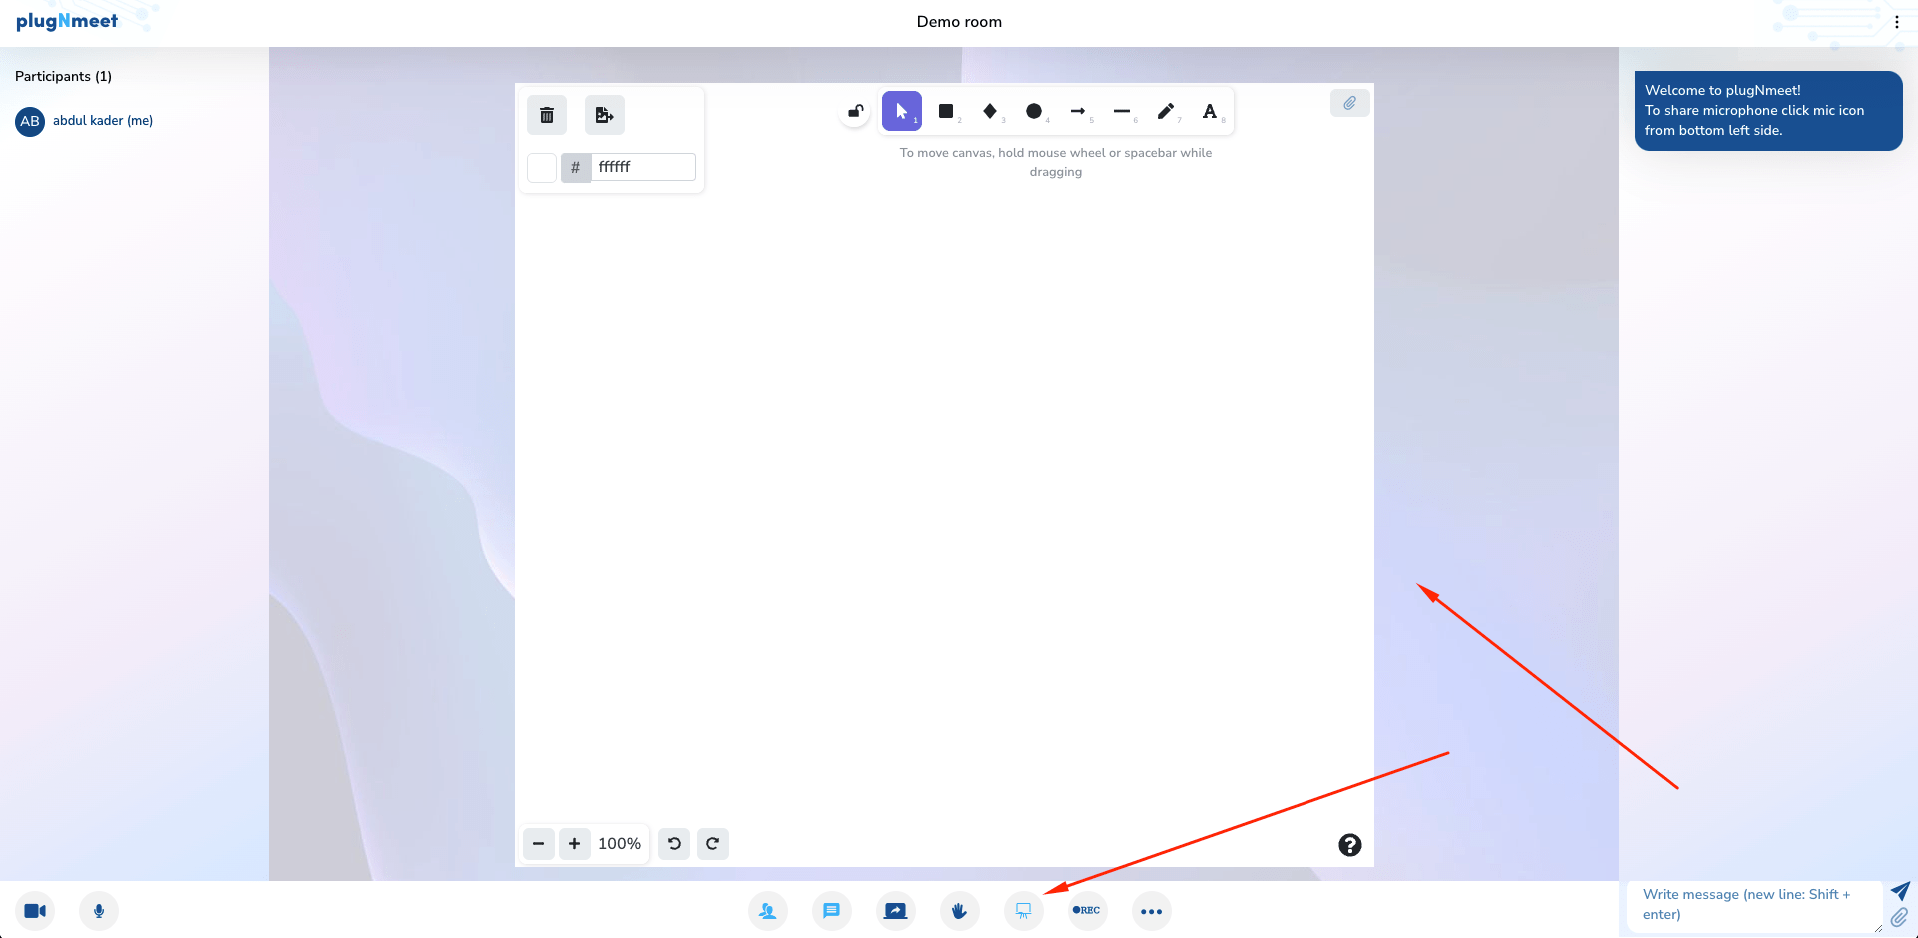
Use whiteboard
Inside the whiteboard, several tools will appear to use.
- Zoom or zoom out: Its location is in the lower left, where with the symbol "+" you can zoom, while if you select "-" it will move away.
- Undo or Redo: Its location is in the lower left. If the arrow is on the left, it means that you want to undo the last change made; on the other hand, if the arrow is to the right, it means that you want to redo the last change you had discarded.
- Shapes: Its location is in the upper central part. The shape that is selected is the one that can be drawn on the board and customized depending on the size and color you want.
- Pencil: Its location is in the upper central part. With the icon of a pencil. It will allow you to write freely, with the color you want.
- Text: Its location is in the upper central part. With the "A" icon. It will allow you to write text, with the color, size, and font you want.
- Upload Multi-Files:In the meeting you can upload different files (PDF, Word, Excel, or Power Point) on the board. These files can be quickly switched between them.
- Images: Its location is in the upper right. Allows you to attach images to display on the board. You will only have to click on the "Clip" icon and select the image you want to appear on the whiteboard and then be able to zoom in and out.
- Delete: Your location is at the top left. With the icon of a bin. Pressing will cause everything that was done on the whiteboard to be erased.
- Export: Its location is in the upper left. With the icon of an image with an arrow to the right. When clicked, it will lead to a window in which you can choose the type of format in which you want to export the content of the whiteboard (PNG or SVG), as well as the scale (1x, 2x 3x) and whether you want to place a white or transparent background. To finally export it, the final step should be to choose the format to export, which will lead to a window in which one must select the location of where you want the file to be exported.
-
Hide whiteboard
In case you no longer want to use the whiteboard, what you will have to do is go to the bottom center and click on the whiteboard icon.
And if there are still traces on the board, they will not be eliminated, but can continue to be used in the same place that was left when the board is reactivated.
6. Share Notepad
- Activate notepad
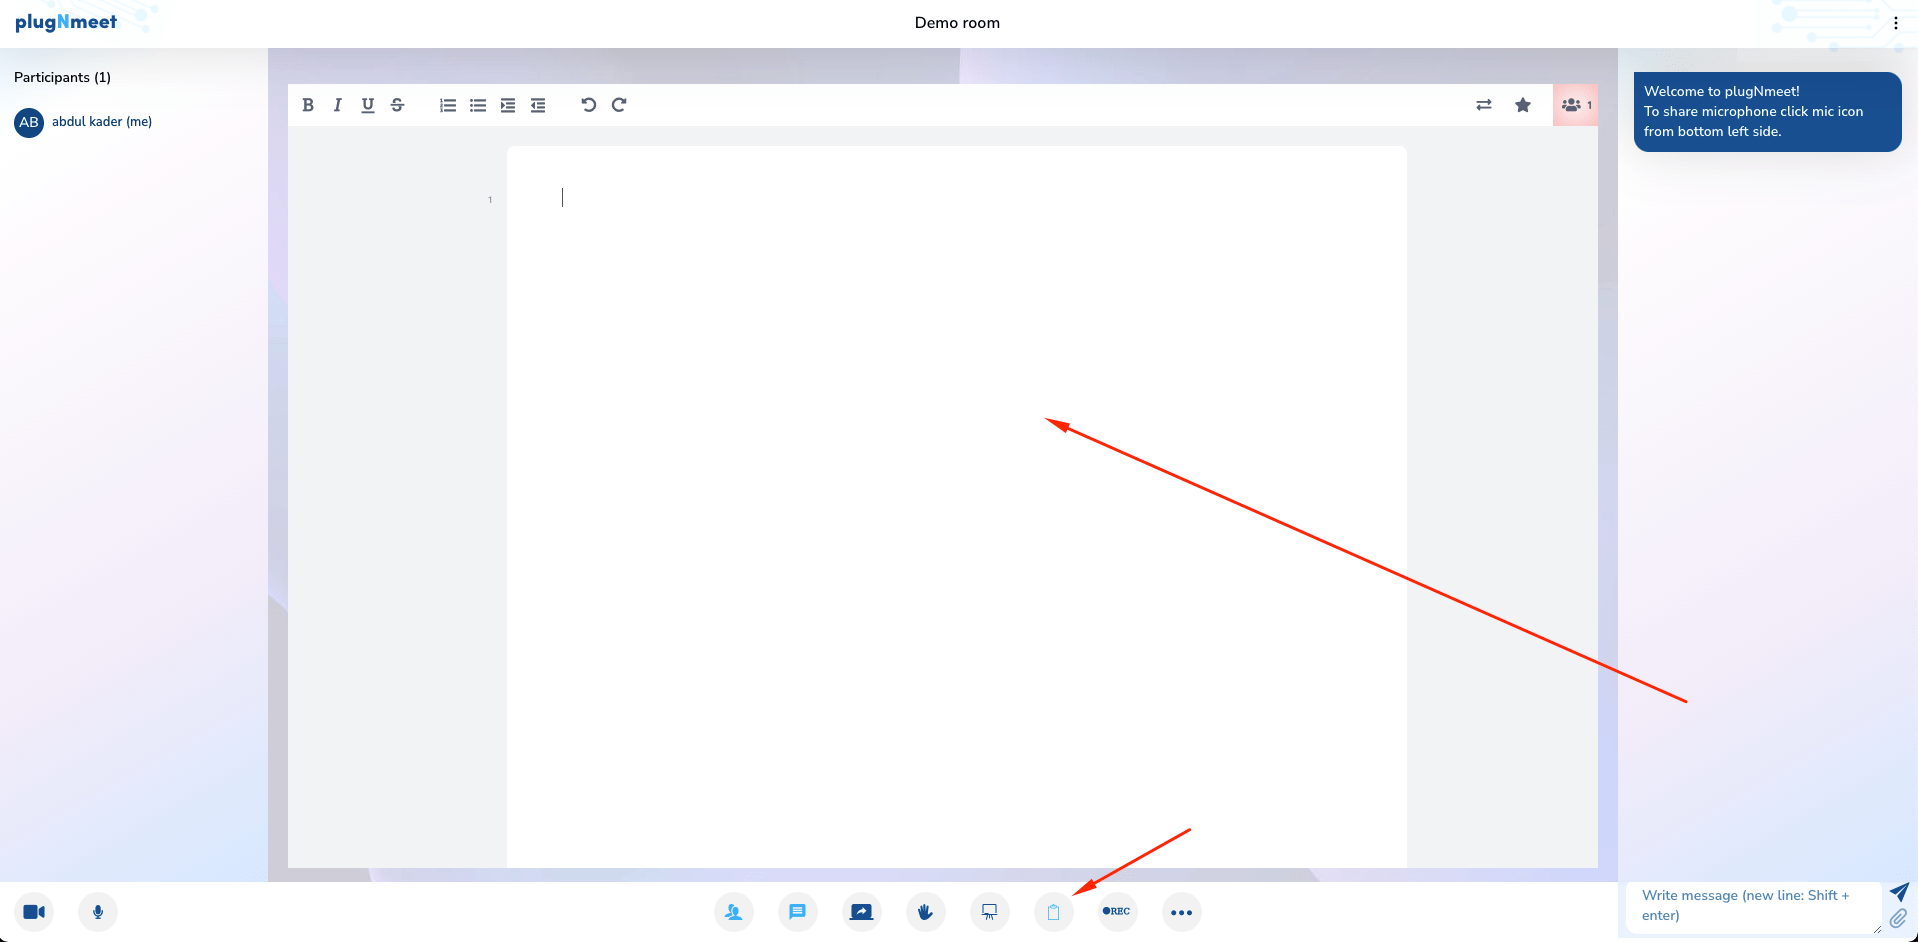
To activate the notepad, you have to go to the bottom center and click on the three dots icon and select "activate shared notepad". - Use notepad
Within the notepad, several tools will appear to use.
In the upper left you can see the options to put the text in bold, italic, underlined and strikethrough. In addition, you can enumerate, list the text, modify the alignment of the text and make use of undo or redo.
Also, in the central part, where you can see a blank sheet, is where you can write the text.
Finally, to export the document or import an existing one, you have to go to the top right and click on the arrow icon to choose the option you want. - Hide notepad
In case you no longer want to use the notepad, what you will have to do is go to the bottom center and click on the icon of a sheet to write.
And if there is still text in the notepad, it will not be deleted, but can continue to be used when the notepad is reactivated.
7. RTMP
-
Start Streaming
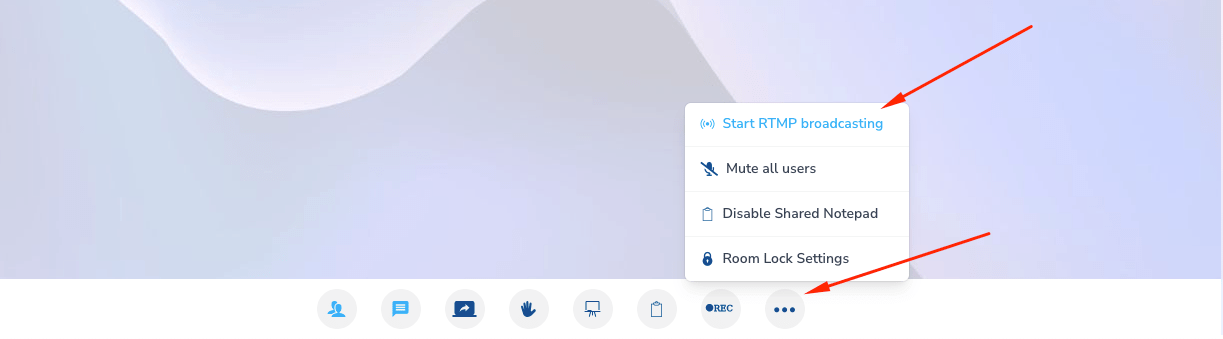
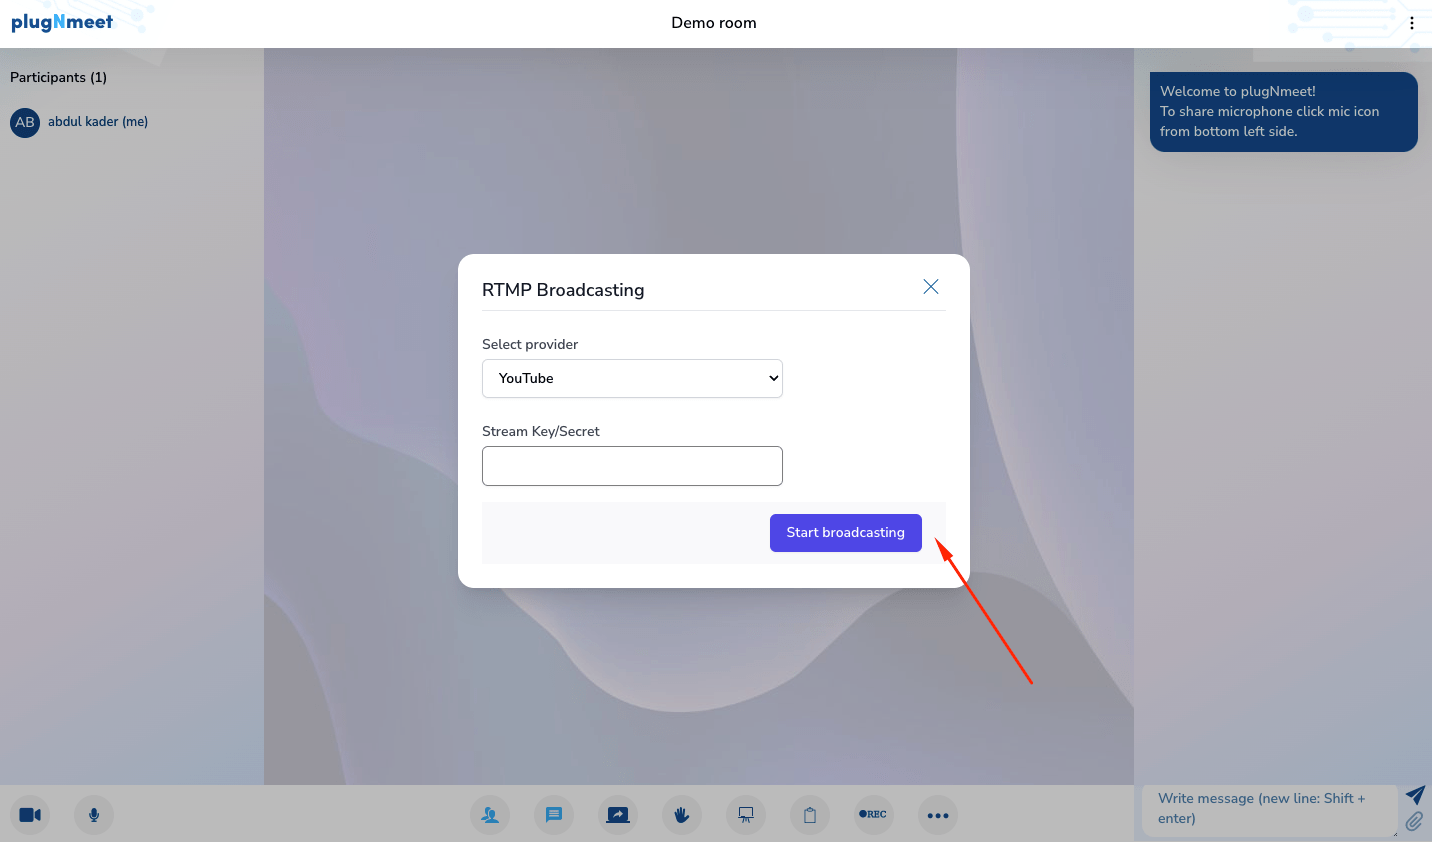
- To make a live broadcast from Plugnmeet to Facebook, Youtube or another similar, what you need to do is go to the bottom center and select the three-dot icon and choose "Start RTMP broadcasting".
- Then, in the box that will appear, you can choose the provider of your preference and you will have to enter the Stream Key to start the transmission.
- Ready! Now you'll be able to stream everything you'll do in Plugnmeet, from your webcam to the shared whiteboard.
- To make a live broadcast from Plugnmeet to Facebook, Youtube or another similar, what you need to do is go to the bottom center and select the three-dot icon and choose "Start RTMP broadcasting".
-
Finalize transmission
You will press on the three-dot icon and select "Stop RTMP broadcasting".
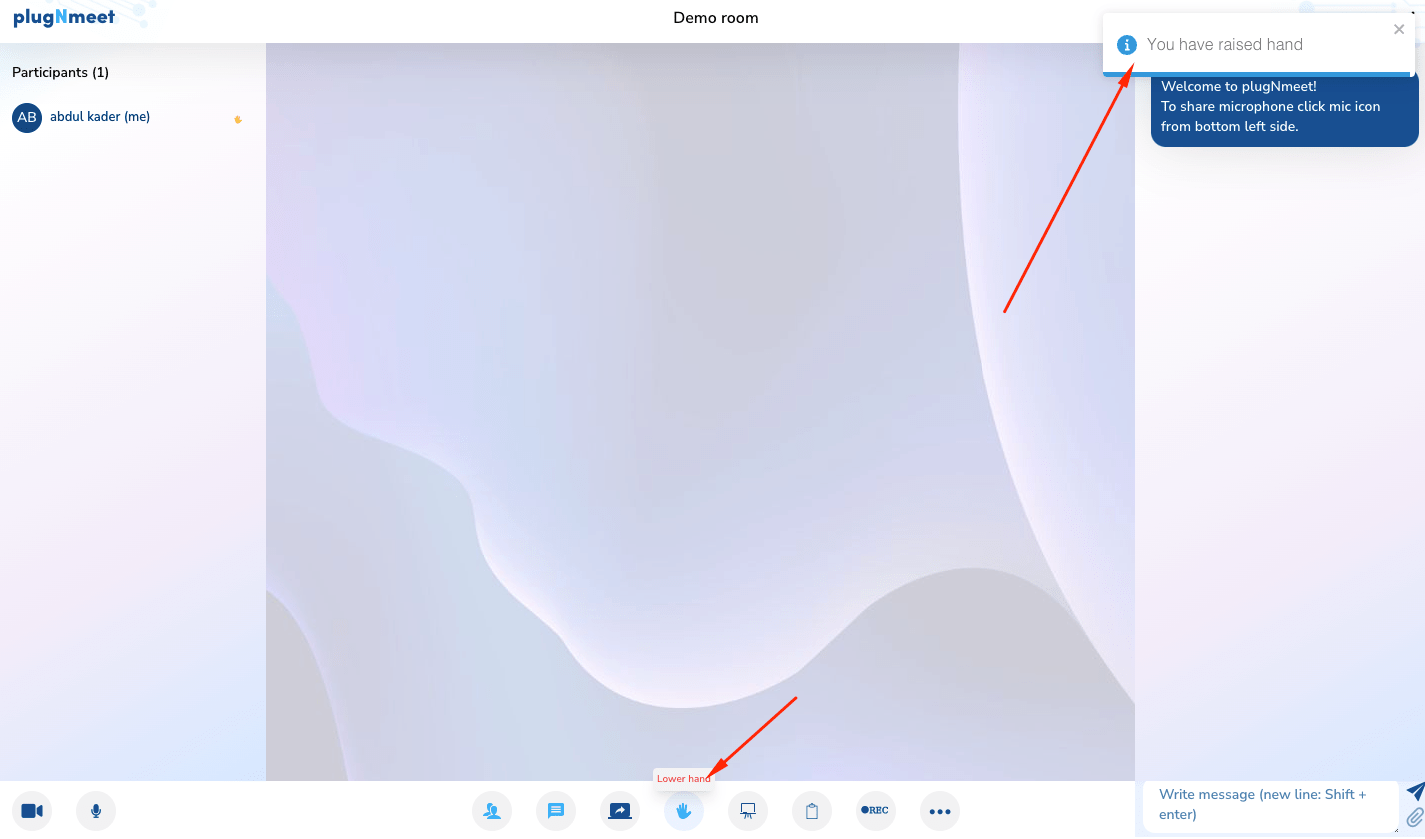
8. Raise your hand
- To raise your hand, you will have to go to the bottom center and select the hand icon.
- Then, it will notify you that you have raised your hand.
- Then, if you no longer want to have your hand raised, you must go back to the hand icon and press to lower the hand.
9. Share videos
To present videos to all participants and be able to watch them at the same time, you must do the following:
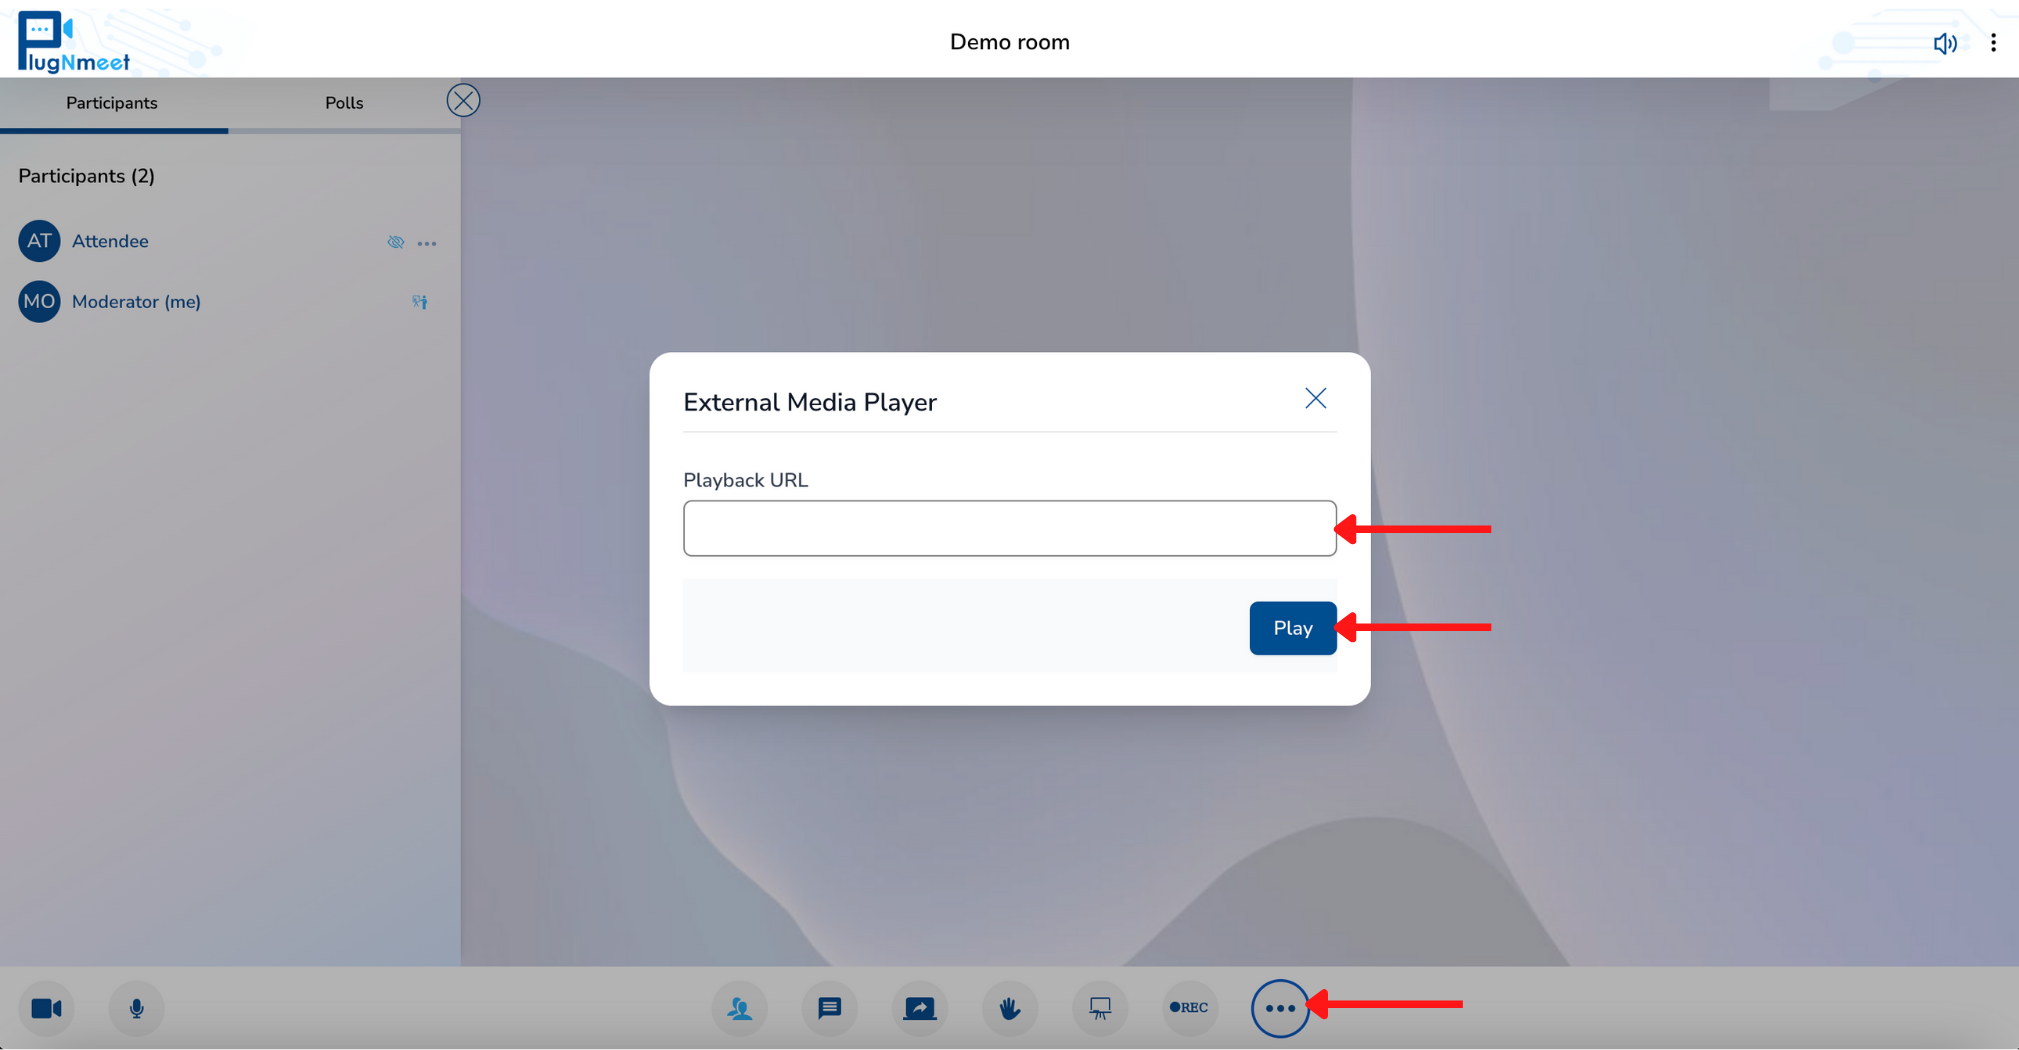
- Go to the bottom center and click on "...".
- Then, select the "Start external Media Player" option.
- Next, a dialog box will appear in which you can insert the URL of the video you want to share. The video can be one from Youtube,Vimeo or any other direct video url link.
- You click "Play".
- The video will automatically appear in the center of the room.
- Now you can play or stop the video whenever you want.
If you no longer want to continue sharing the video, you must do the following:
- Go to the bottom center and click on "...".
- Then, select the "Stop external Media Player" option.
- A box will appear, and you will have to click "Ok".
That way you will stop sharing the video.
You also can share video via external video file.
To play a video that is in a file on your computer, you must do the following:
- Click on "...".
- Select "Start external Media Player".
- Click on "Upload".
- Select the file to play. Can be in mp4, mp3 or webm format.
- Click on "Upload and play".
This way you can play the video for all meeting participants.

10. Breakout room
The meeting can be divided into groups, which are rooms with the same functionalities. To do this you must do the following:
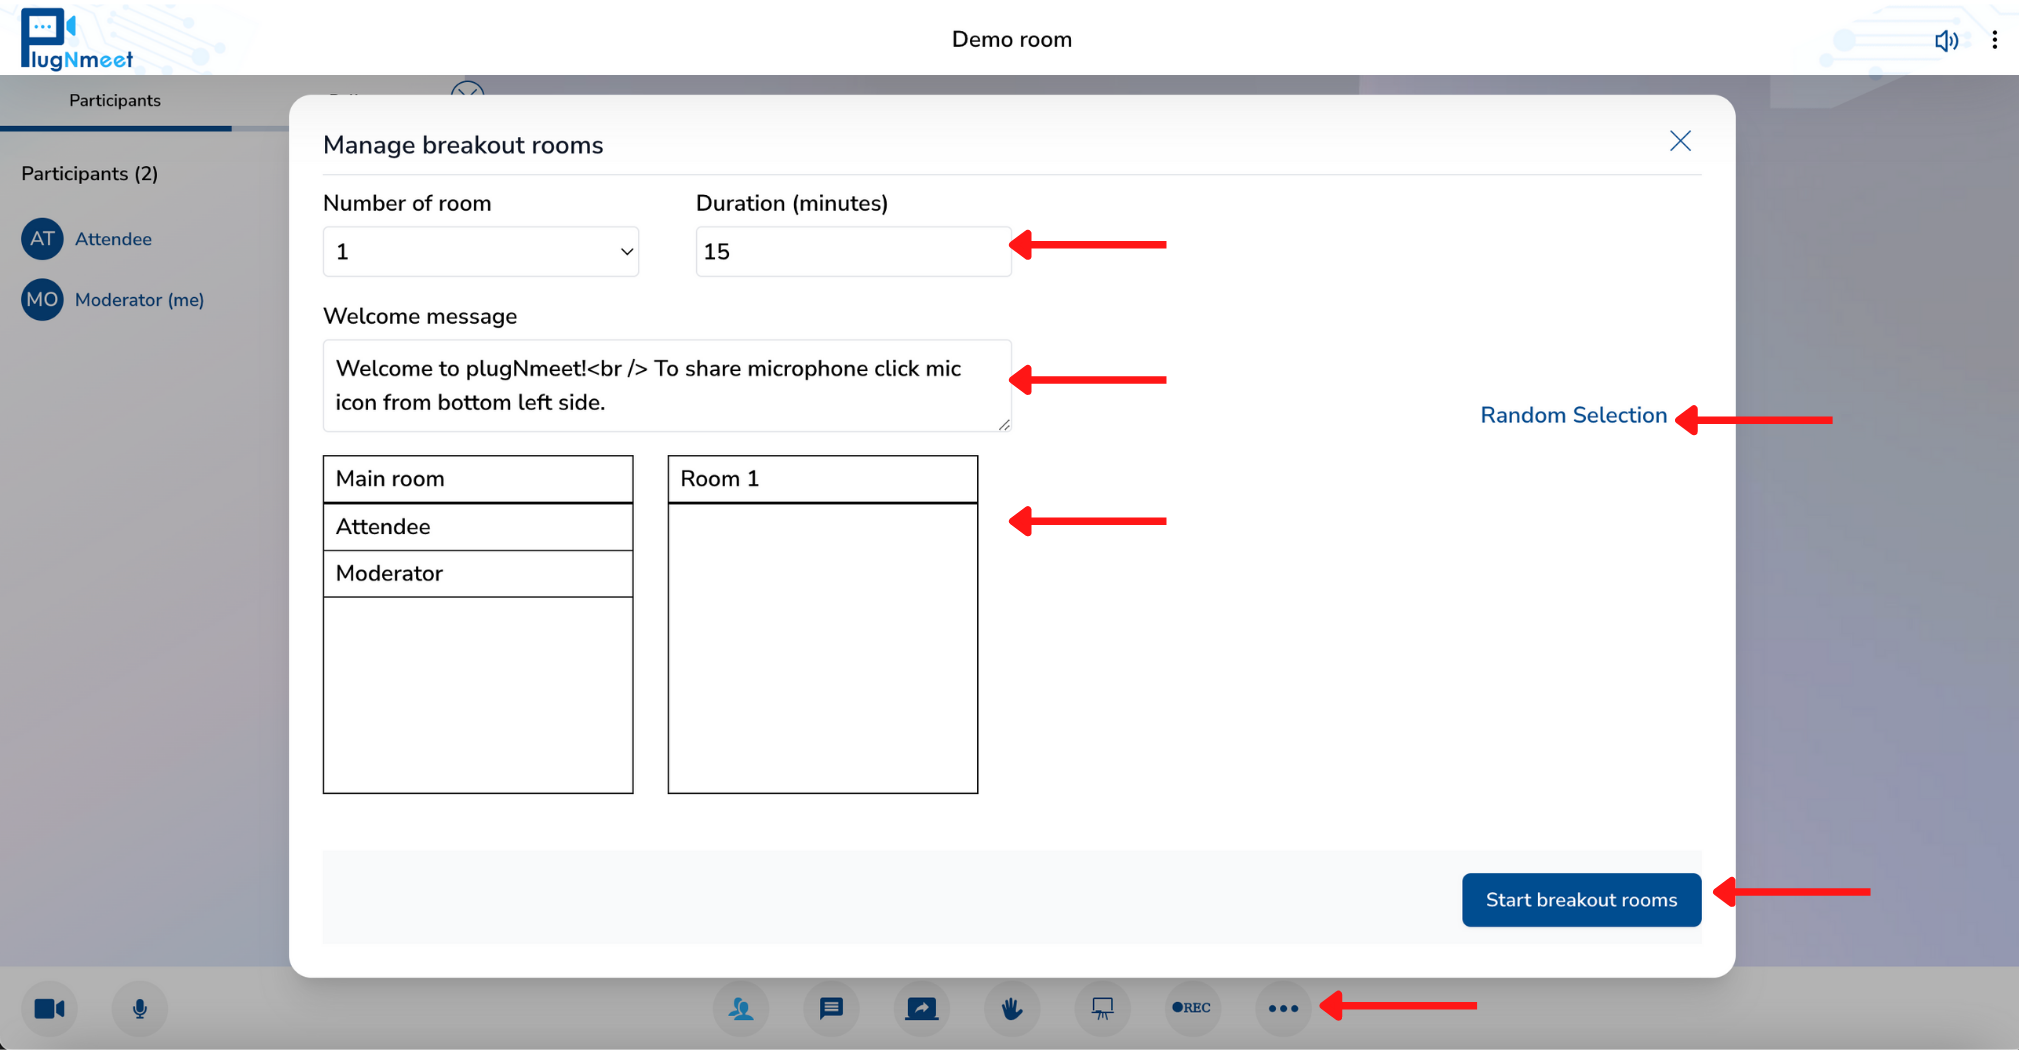
- Go to the bottom center and click on "...".
- Select the "Manage breakout room" option.
- A dialog box will open in which you can select:
- The number of groups
- Duration of the group session in minutes
- Welcome message when they enter your group
- Which participant will go in each group or if you prefer a random distribution, you can click on "Random selection”.
- Finally, you will click on "Start breakout rooms".
The breakout rooms will start and while they are in progress, you can also perform additional actions:
- To do this, you will have to go back to the bottom center and click on "..." and choosethe option "Manage breakout room".
- A dialog box will open in which you can select:
- A message for all groups with "Broadcast message".
- Extend the duration of time in breakout rooms.
- Join one of the groups by clicking "Join"
- End all breakout rooms with the "End all rooms" button.
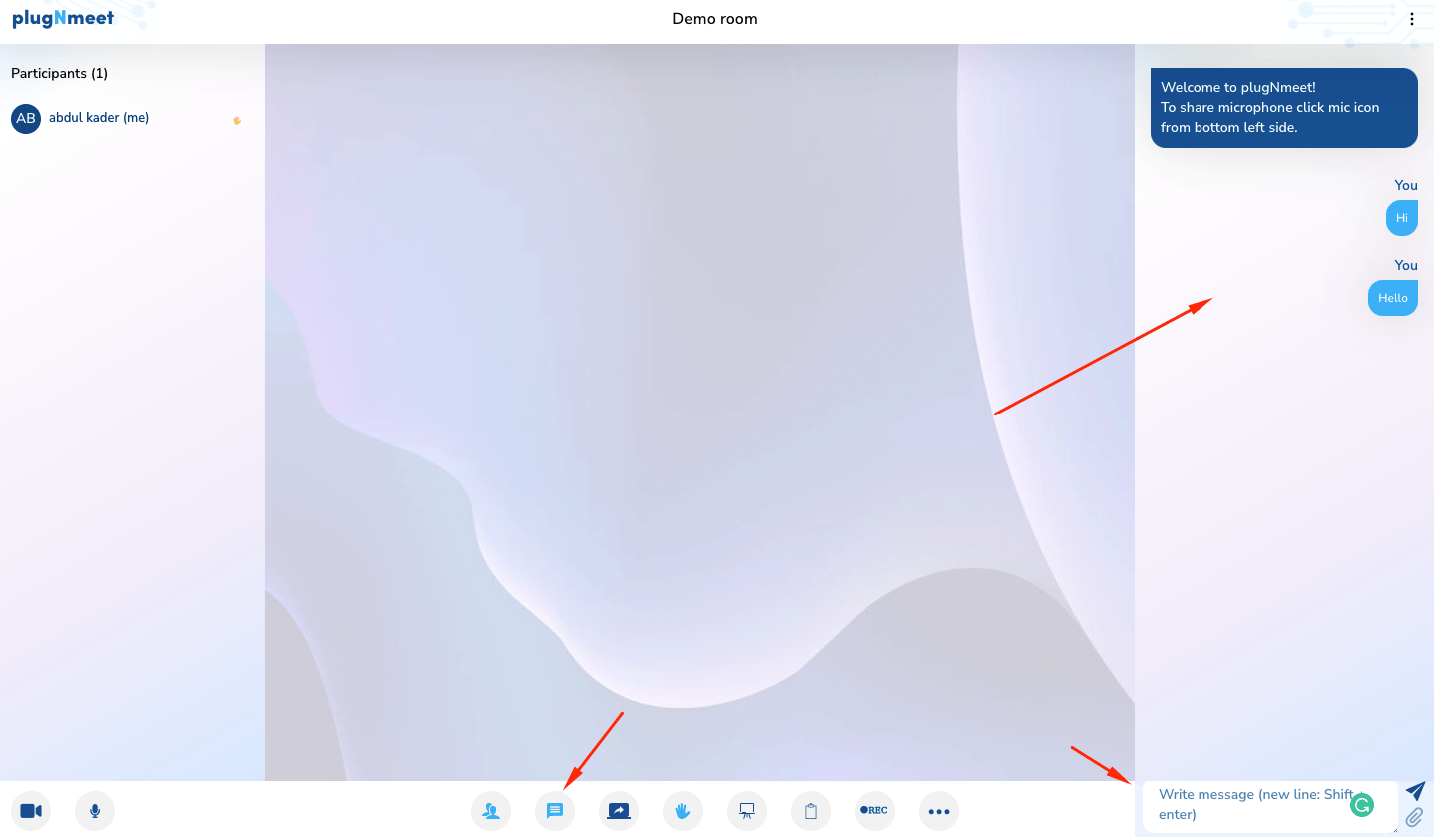
11. Public Chat
- To be able to view the chat, you must go to the bottom center and select the icon of a message.
- Then, you will be able to see that you can write messages in the chat.
- In addition, you can send files. To do this, within the chat, you will see a clip icon. You press on it.
- Then, you select the file, and you will see that in the chat the link of your file will appear so that the other participants can download it.
12. Private Chat
During the meeting you can send private messages to the users who are present in the video call:
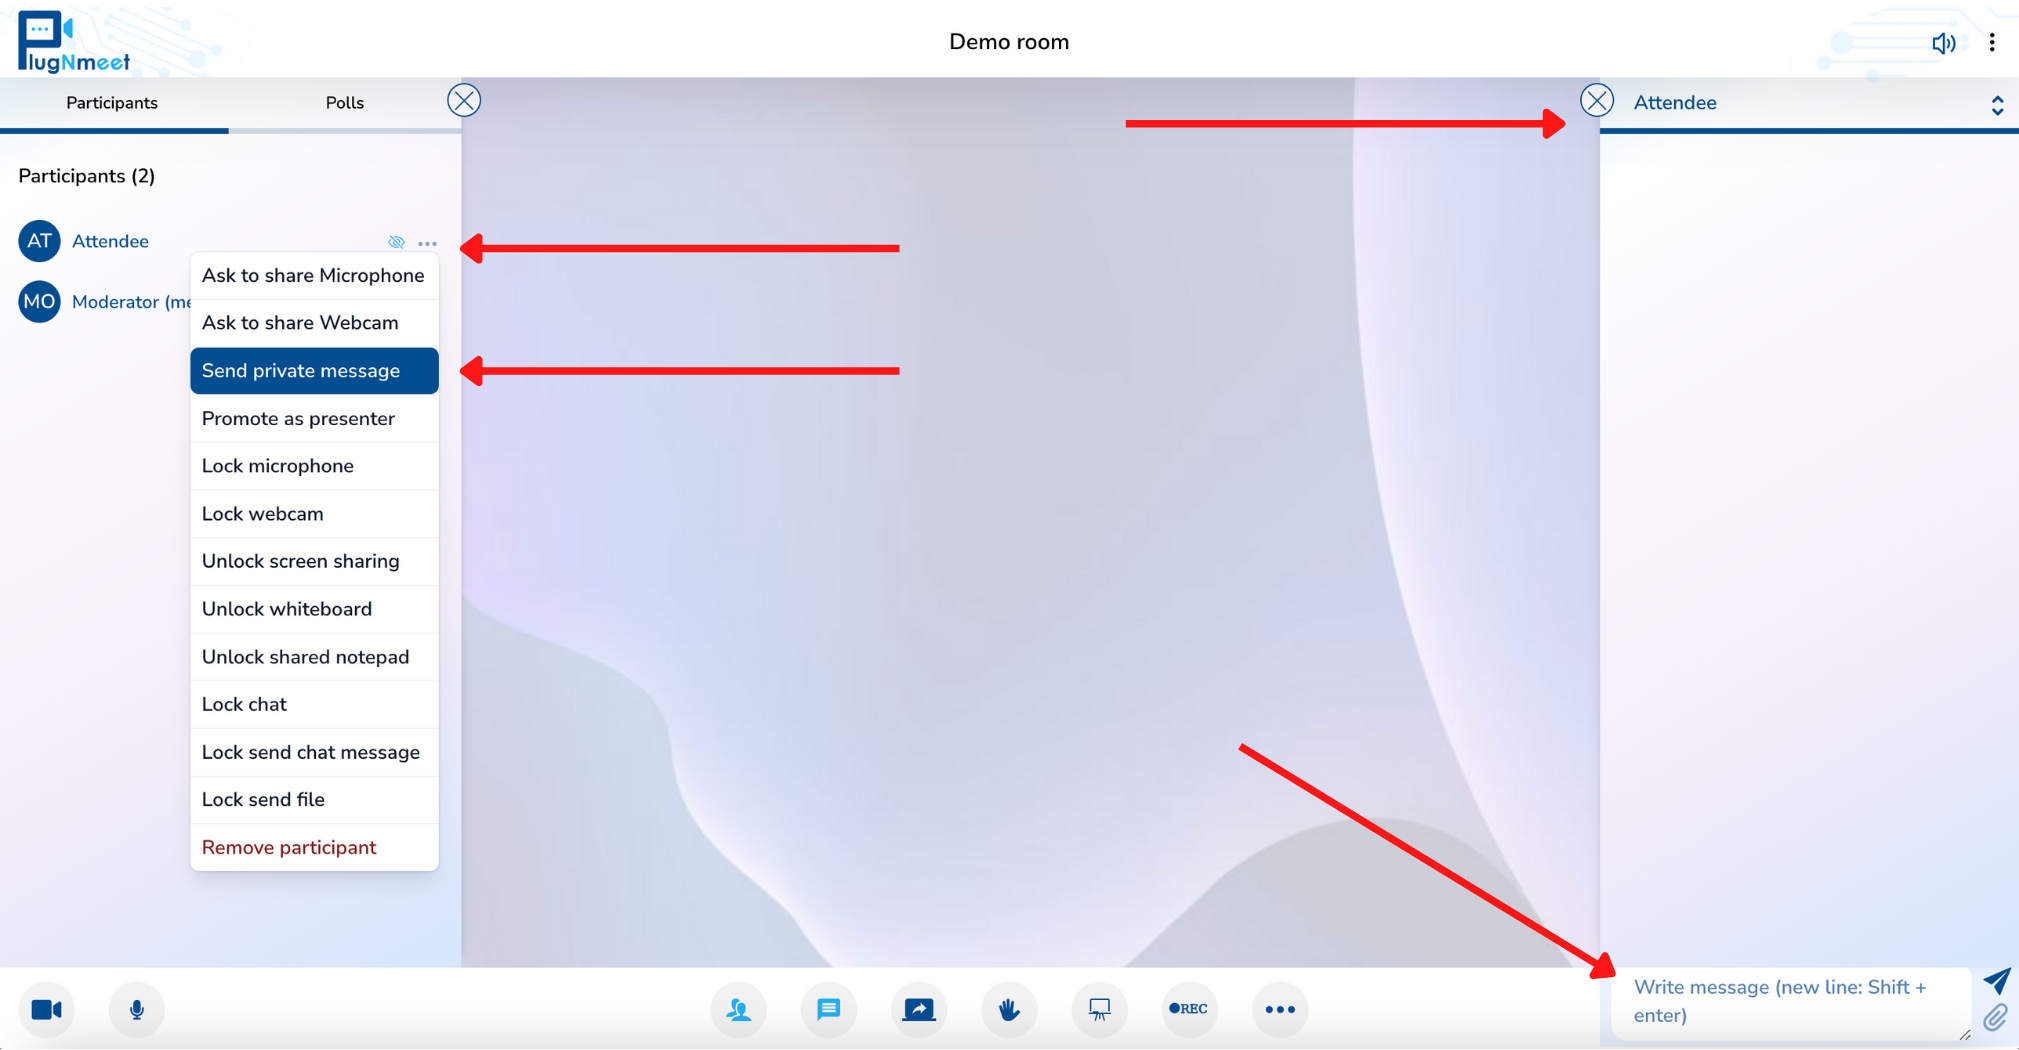
- To do this you first have to make sure you can view the list of participants.
- Then identify the user to whom you will want to write a private message.
- You will see that on the side of his name there is a symbol of "...". You'll have to click in those three points.
- Then you will select the option "Send private message".
- Next, the chat will be set up so that you only talk to the user you wanted to send a private message to.
- In the chat the name of the user will appear, and the chat will already be enabled to be able to send a private message. If you no longer want to send private messages, you can change it to public chat:
- You'll have to go to the chat and tap on the username.
- A drop-down list will appear, and you will select "Public chat".
- That way you can return to the public chat.
13. Waiting Room
To be able to manage who can enter the meeting, you can use the waiting room.
To configure it, you must do the following:
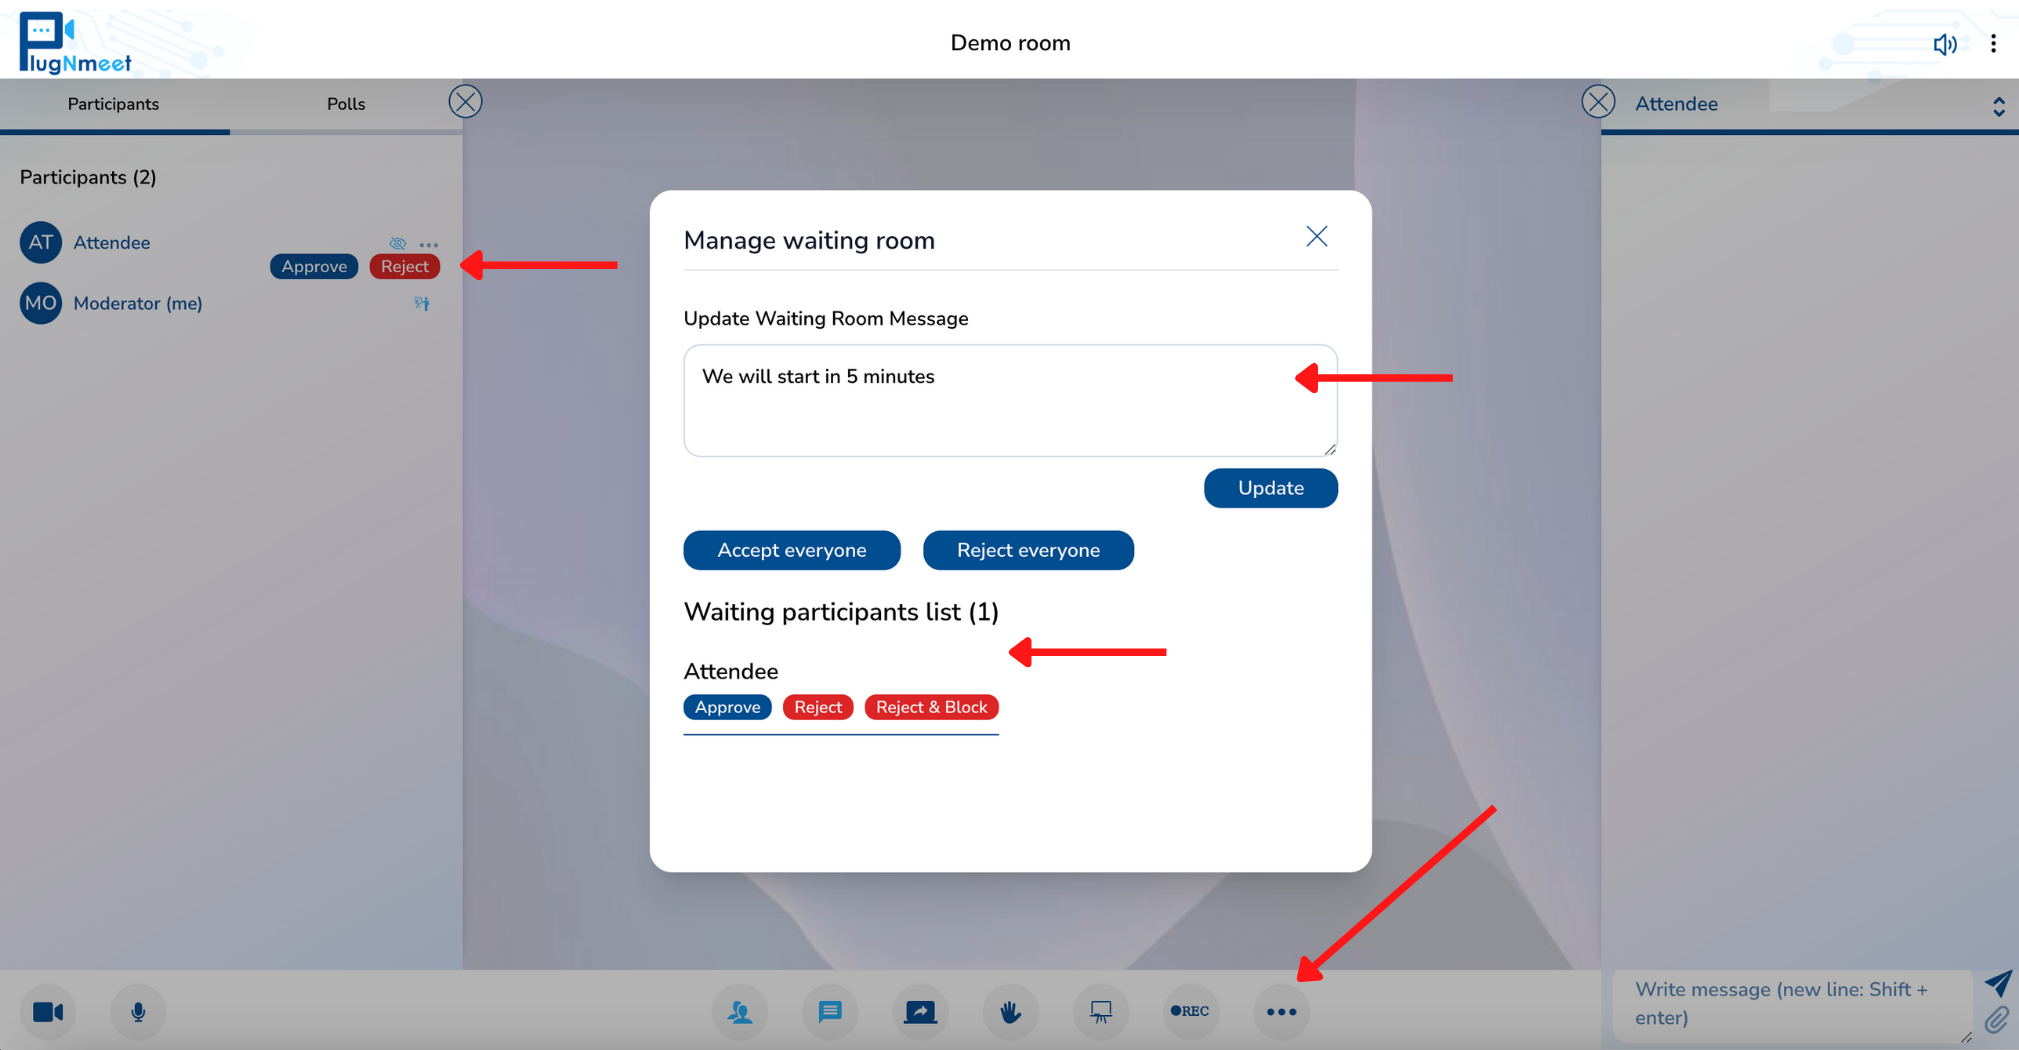
- Click the "..." which is located at the bottom center of the room.
- Then select the "Manage waiting room" option.
- Then, a dialog box will open in which you can make all the configurations for the waiting room.
- In the first part of the configuration, you can edit what the waiting message will be while users are in the waiting room. To be able to modify it you will have to click on "Update".
- Then, under the waiting room message, there are the options to accept everyone as reject all users who are on hold.
- Finally, in the final part of the dialog box you can accept, reject, or block users who want to enter the room.
- That way you can configure the waiting room.
Likewise, it is also possible to accept or reject the entry of a participant from the list of participants with the options "Approve" or "Reject" that will be seen on the right side of the user's name.
14. Poll
To know the opinions of the participants within the meeting, there is the option to make polls.
To configure it, you must do the following:
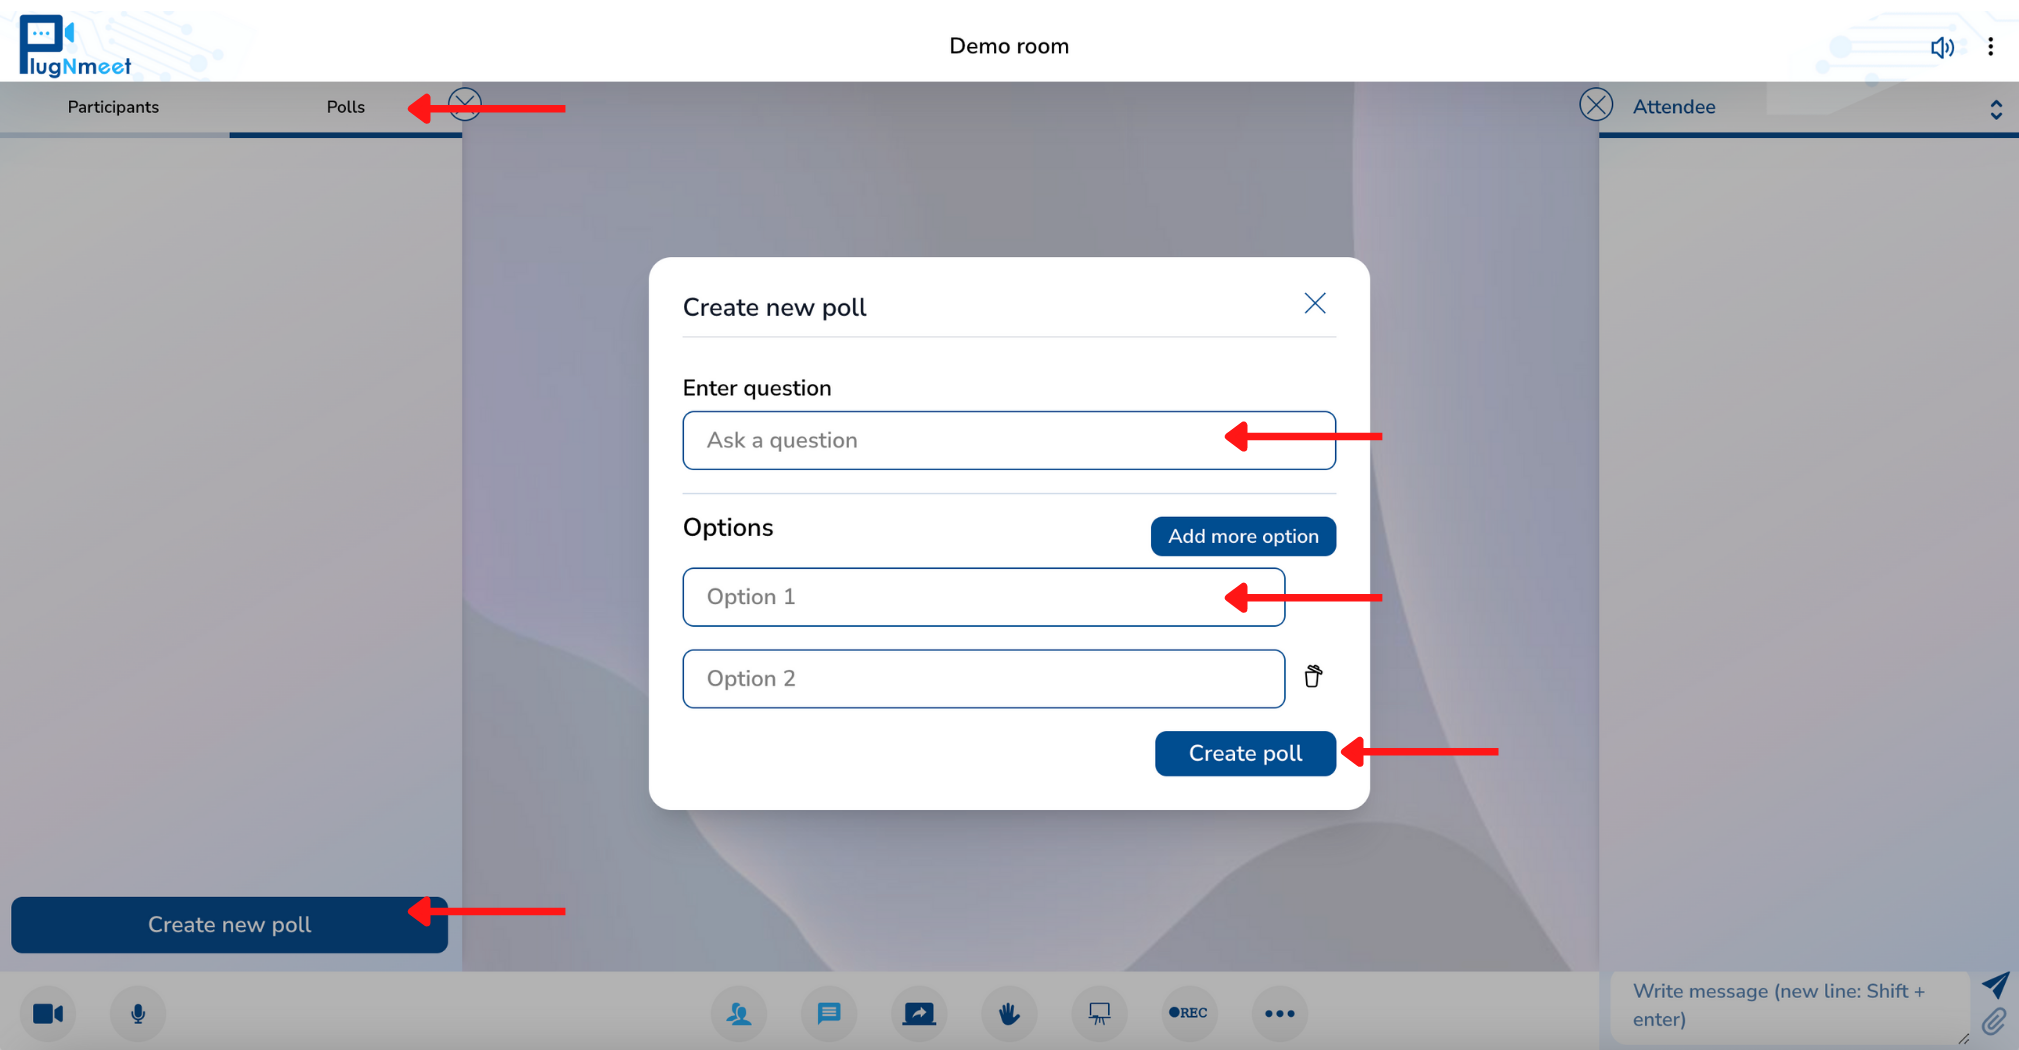
- First you will have to visualize the list of participants.
- Then, next to the "Participants" tab, you will be able to see another tab that says "Polls". You have to click on "Polls".
- After you have selected in the tab, you will have to click on the "Create new Poll" button, which is located at the bottom left.
- A dialog box will then open where you can edit which questions and answer options you want.
- After you have selected your question and answer options, you will click on "Create poll".
That way other users will be notified that a poll was created and will have to vote.
Once the participants finish voting, you can finish the poll and publish the results:
- You will go to the "Polls" tab.
- You will identify the survey you created and select "View details".
- Then, you will click on "End poll" to be able to finish the survey.
- Next, a button will be displayed that will say "Publish result", and if you select it, the results will be shared in the public chat, otherwise they will not appear in the chat.
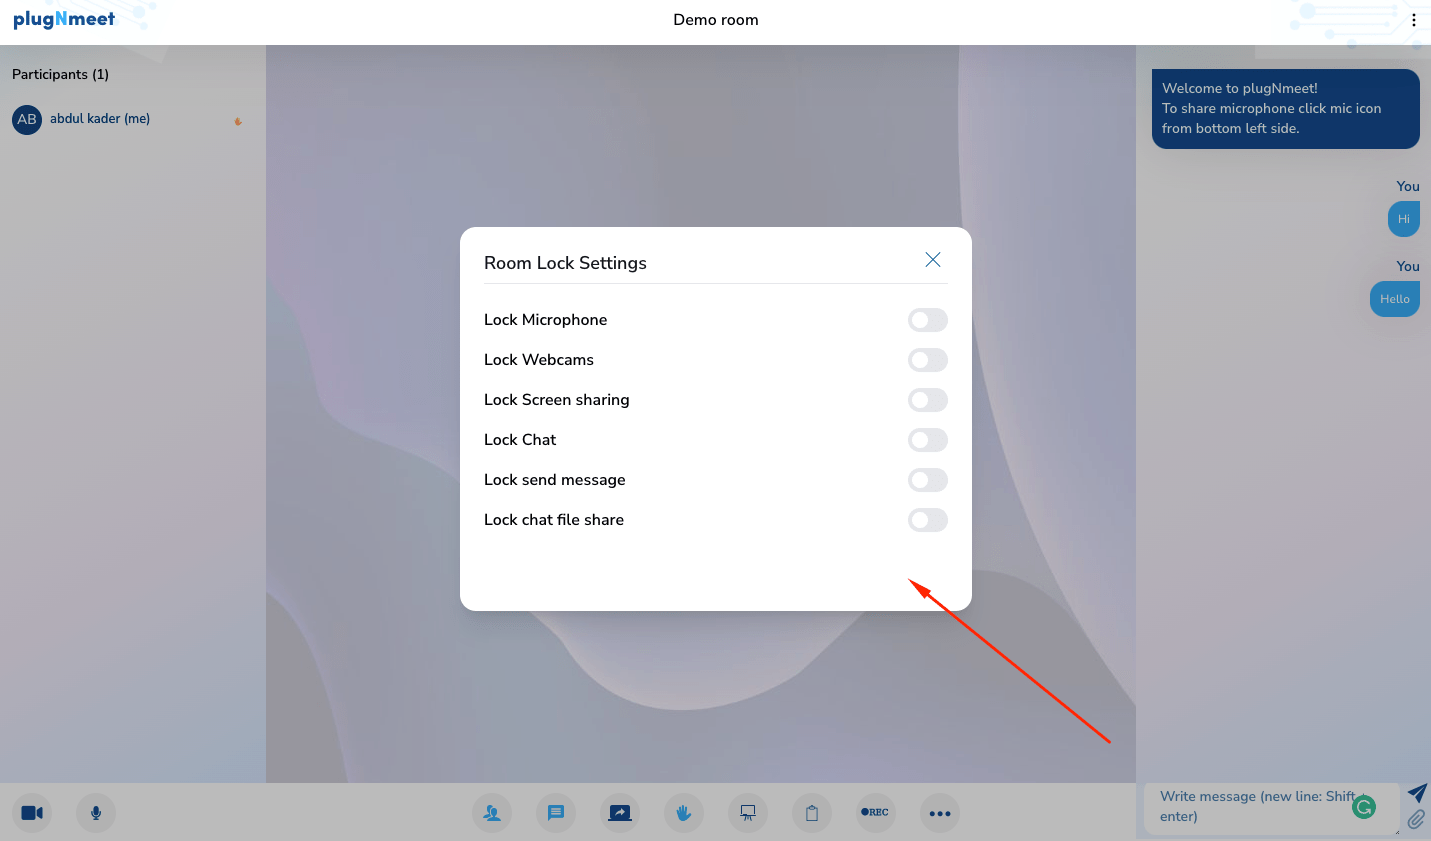
15. Room lock features
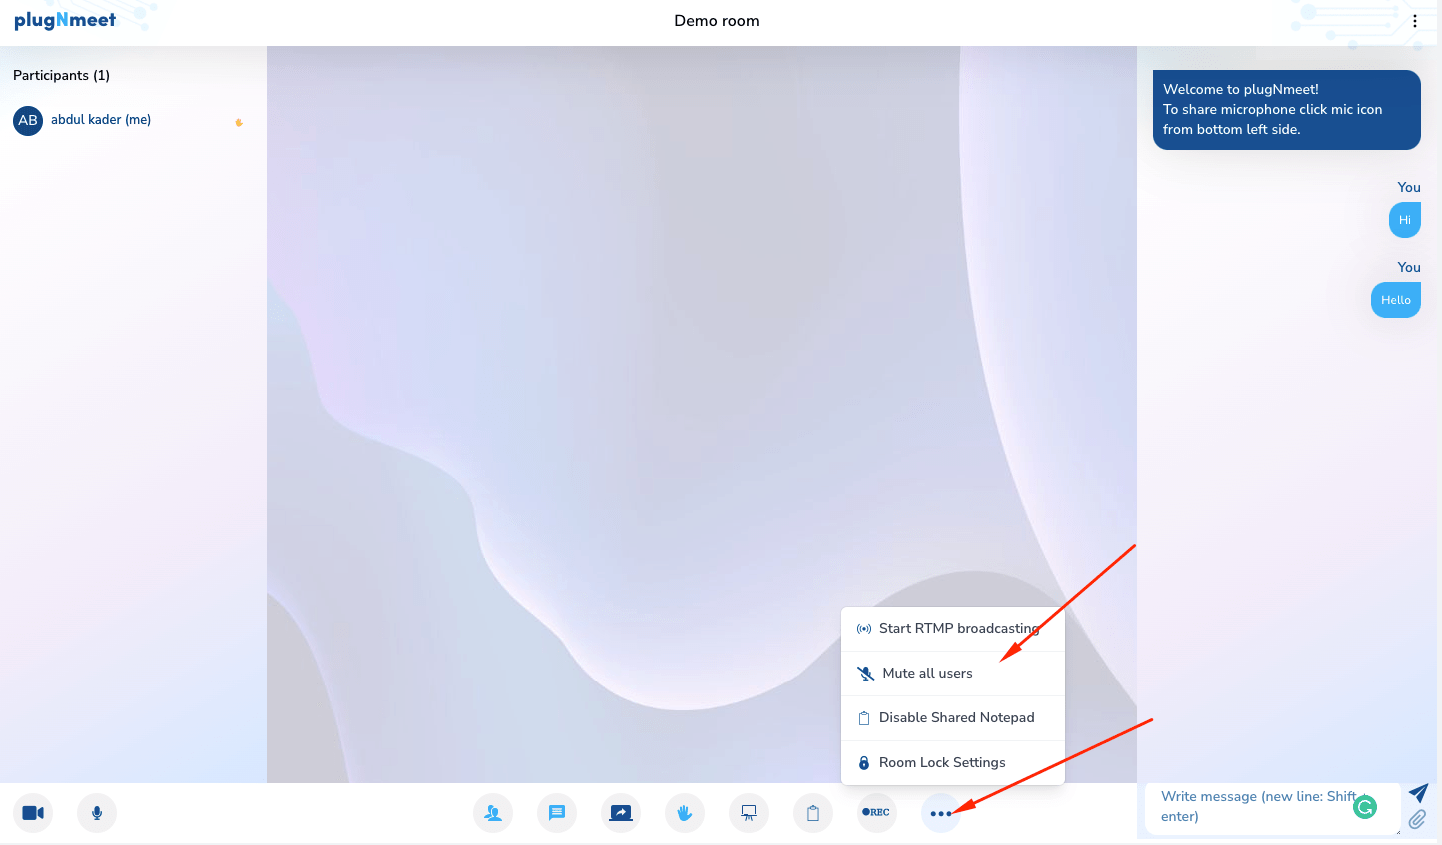
To access lock functions, what needs to be done is to go to the bottom center, select the three-dot icon and press "Room Lock Settings".
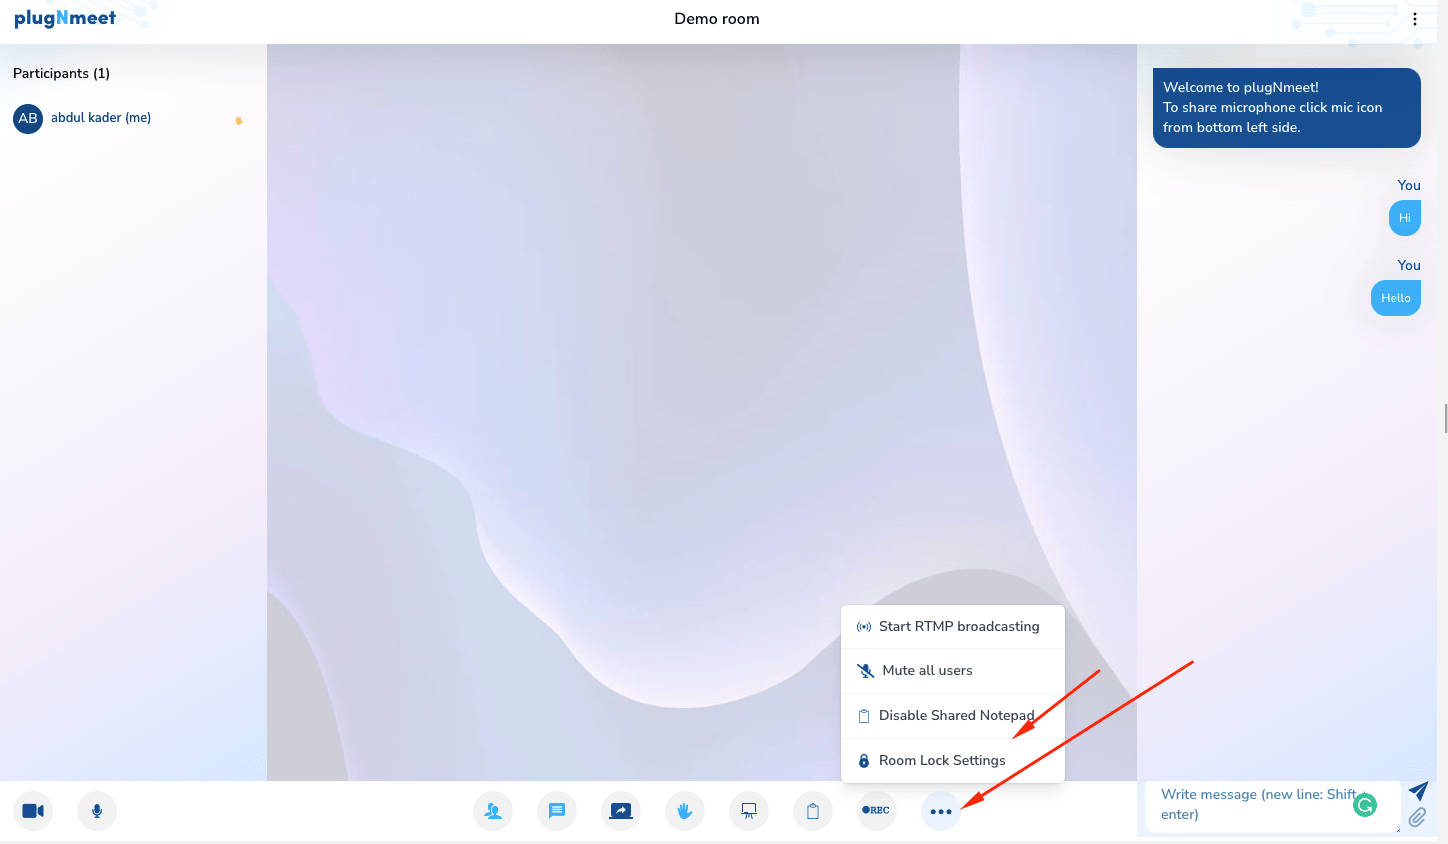
In the new box, you can turn the following on or off:
- Lock microphone: If you turn it on, participants will not be able to use their microphone.
- Lock Webcams: If you turn it on, participants won't be able to use their webcam.
- Lock screen sharing: If you turn it on, participants won't be able to share their screen.
- **Lock chat:**If you turn it on, participants will have access to the chat.
- Lock send message: If you turn it on, participants won't be able to send messages to chat.
- Lock chat file share: If you turn it on, no participant will be able to send attachments in the chat.
These blocking functions are aimed at the participants; therefore, the moderators are not affected.
16. Mute all users
In case you want to silence all the participants, what you must do is go to the bottom center, select the icon of the three points and press "Mute all users". This will only mute attendees role users, for moderator will not be muted.
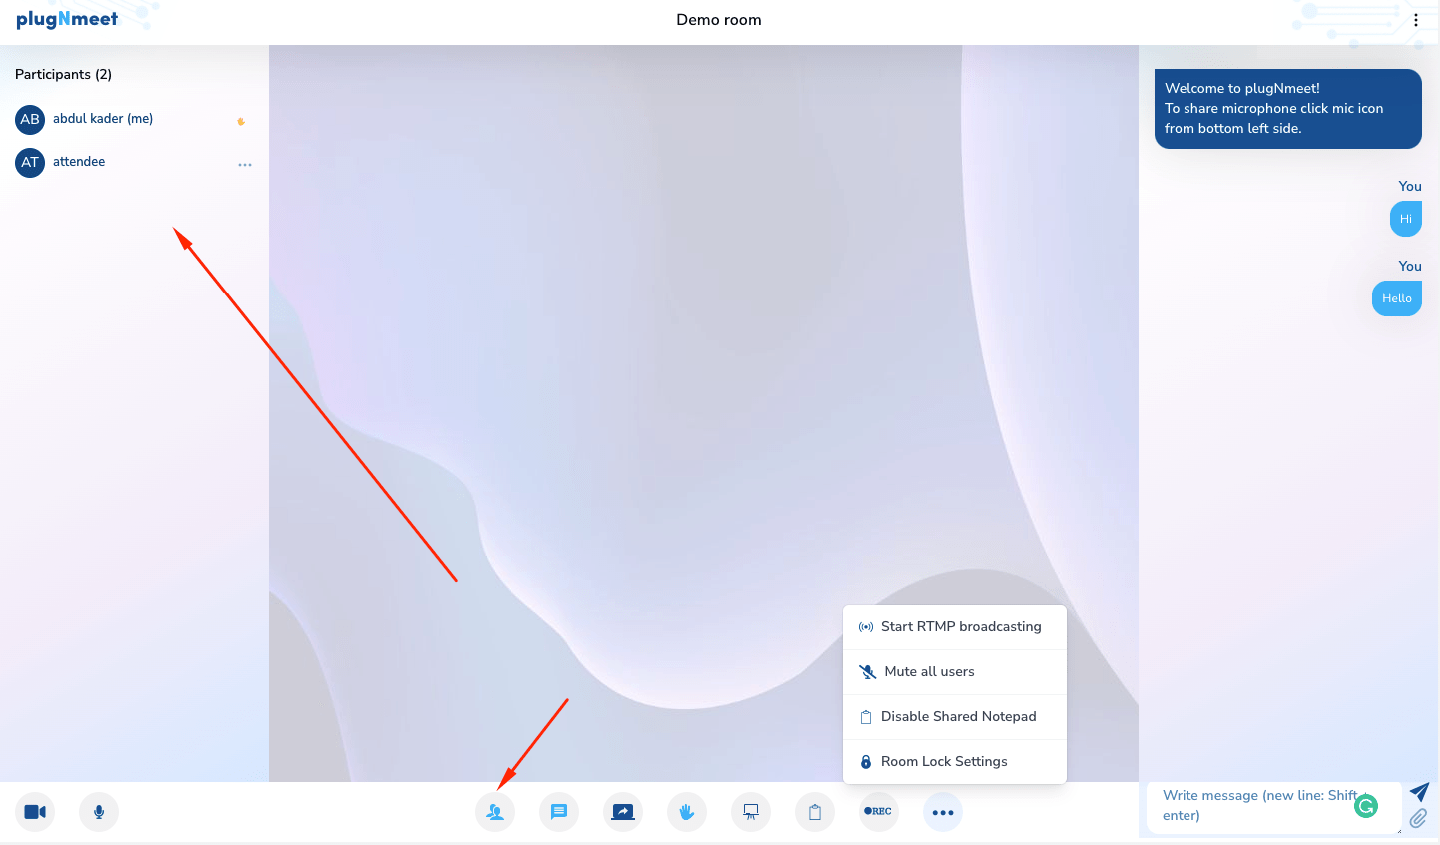
17. See list of participants
- To see the list of participants, what must be done is to go to the bottom center, select the icon on which two people appear.
- In case you no longer want to see, you press again on the same icon.
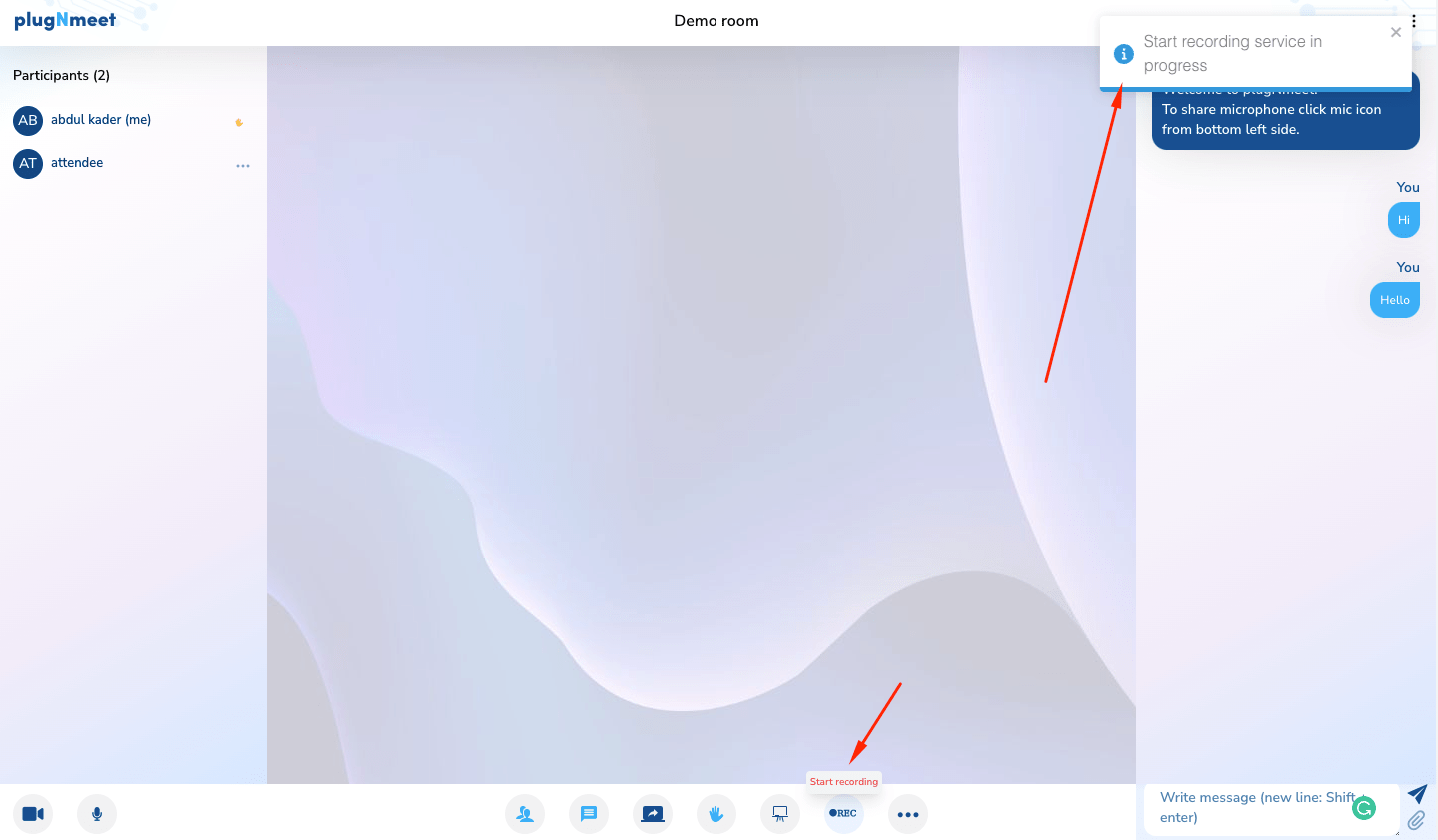
18. Record the meeting
- To record the meeting, what needs to be done is to go to the bottom center, select the REC icon.
- Then, it will be notified that you are already recording, and the REC icon will have a circle that shrinks and increases around it.
- Finally, if you no longer want to record, you will press on the same REC icon.
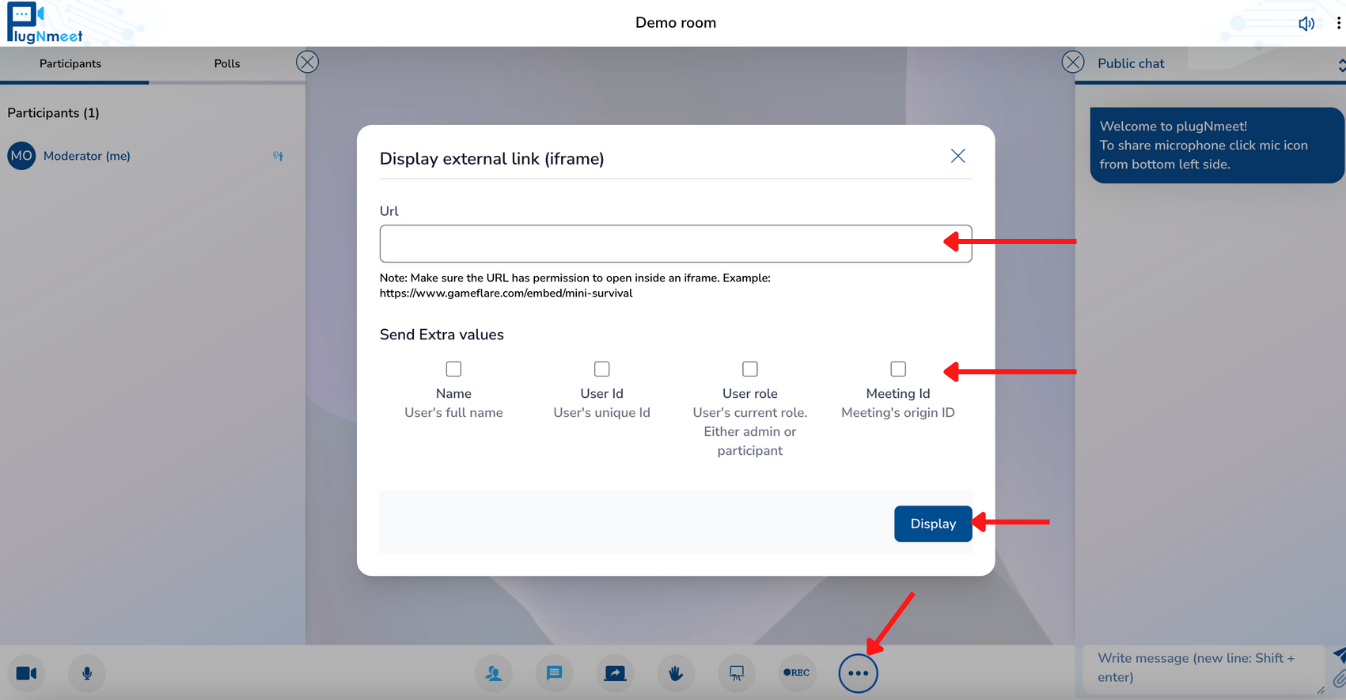
19.External content sharing (iframe)
To share external internet content, you must do the following:
- Click on "...".
- Select "Display external link".
- Insert the URL of the external content you want to present.
- Select if you want extra values:
- Name: User’s full name
- User Id: User’s unique Id
- User role: User’s current role. Either admin or participant
- Meeting Id: Meeting’s origin ID
- Click on “Display”
In this way, each member of the meeting will be able to access the external content. In case you want to finish sharing, you must do the following:
- Click on "...".
- Select "Stop display external link".
** This feature only support the url/website you shared which allow the iframe feature. otherwise, it won´t work.
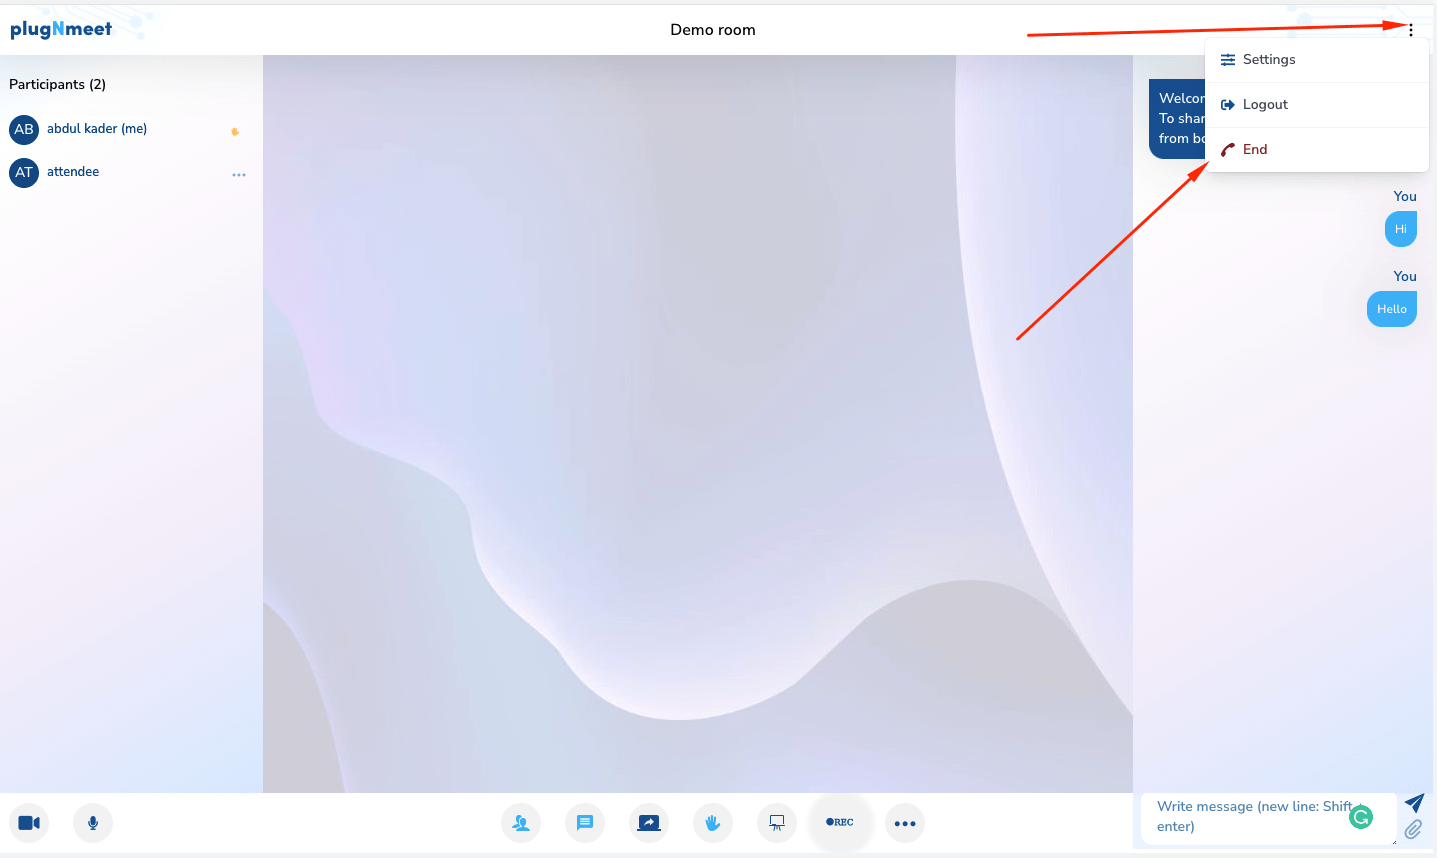
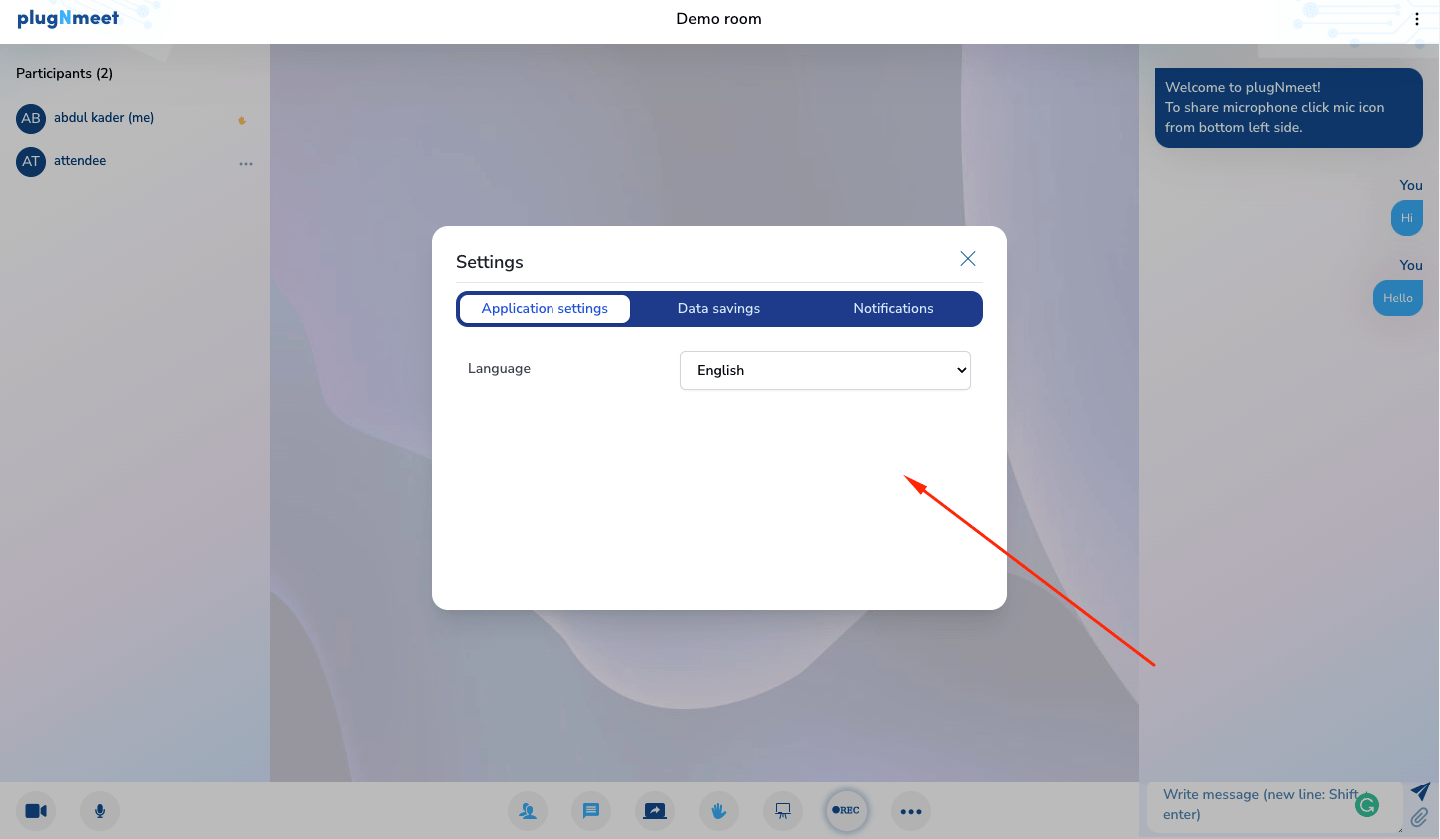
20. Access general settings
To be able to make general configurations of the meeting, what must be done is to go to the top left, select the icon of three vertical dots, and then choose "Settings".
Three sections will appear here:
-
Application settings:
Here you can choose the preferred language. -
Data saving:
It can be activated if you want to show webcams or screen sharing in the meeting. -
Notifications:
You can choose whether to allow an audio notification.
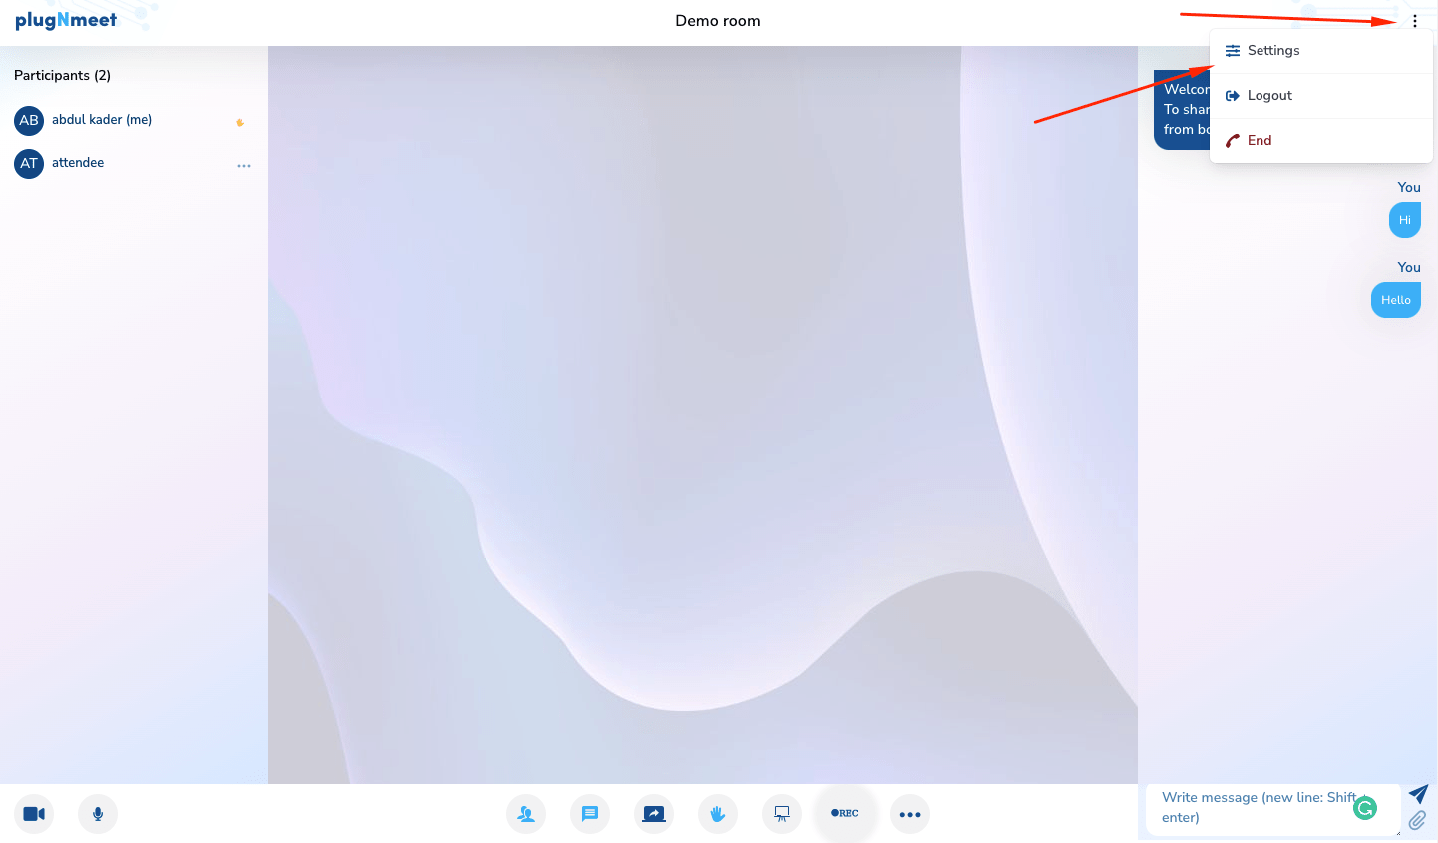
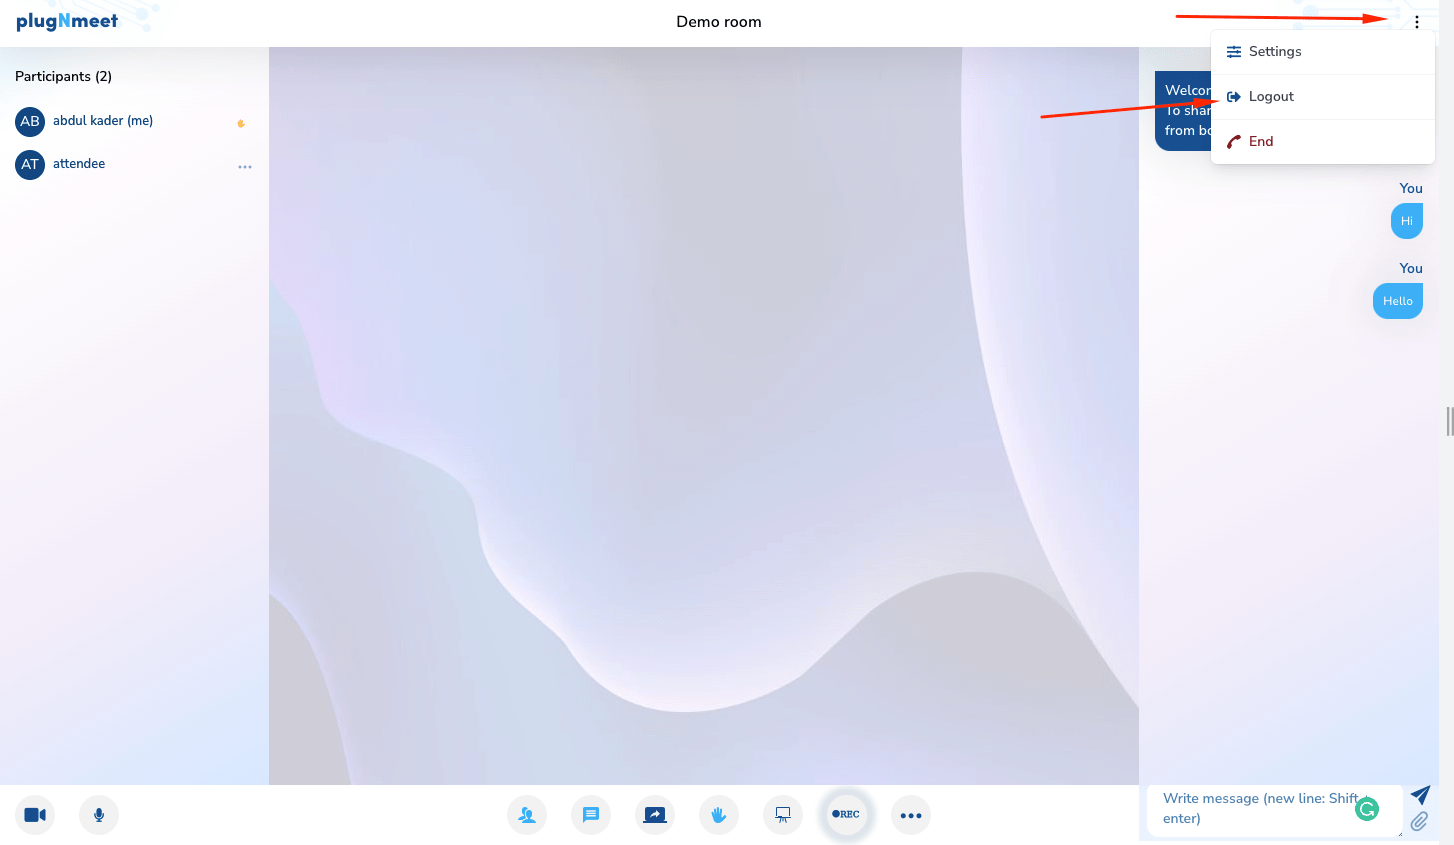
21. Logout the meeting
- To be able to leave the meeting without the other participants disconnecting and staying in the meeting, you have to go to the top right, select the icon of the three vertical dots, and then choose “Log out”.
- A confirmation box will then appear to make sure you want to leave the meeting.
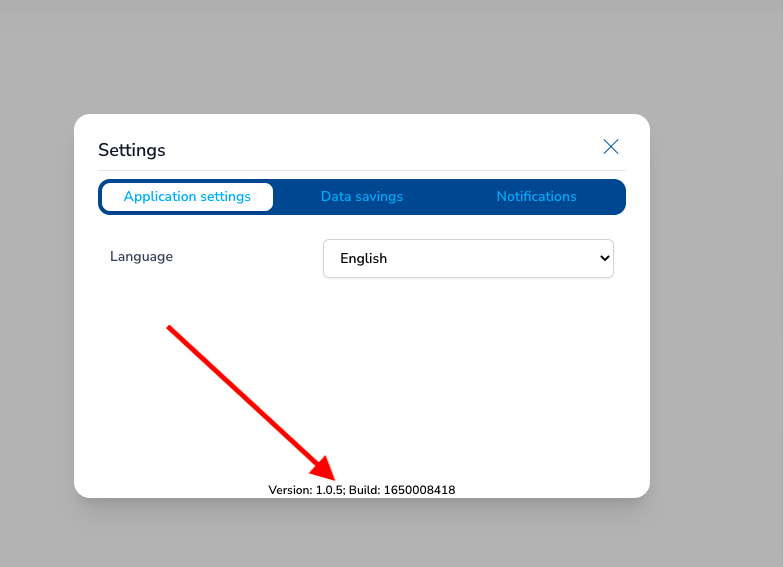
22. Software Version
If you want to know which version of the software you are using now, you can go to the top left, select the icon of three vertical dots, and then choose "Settings". From the pop up window, at the bottom area, you will see the current version of the software.
This information is useful when you want to report a problem about the software.
23. End the meeting
- To be able to end the meeting, what must be done is to go to the top right, select the icon of three vertical dots, and then choose "End".
- A confirmation box will then appear to ensure that you want to end the meeting, because when the action is performed, all participants will be disconnected.